How to unlock the secret ending in Dead Space, and Marker Fragment locations
How to find all 12 Marker Fragments and unlock the 'Reunion' achievement.

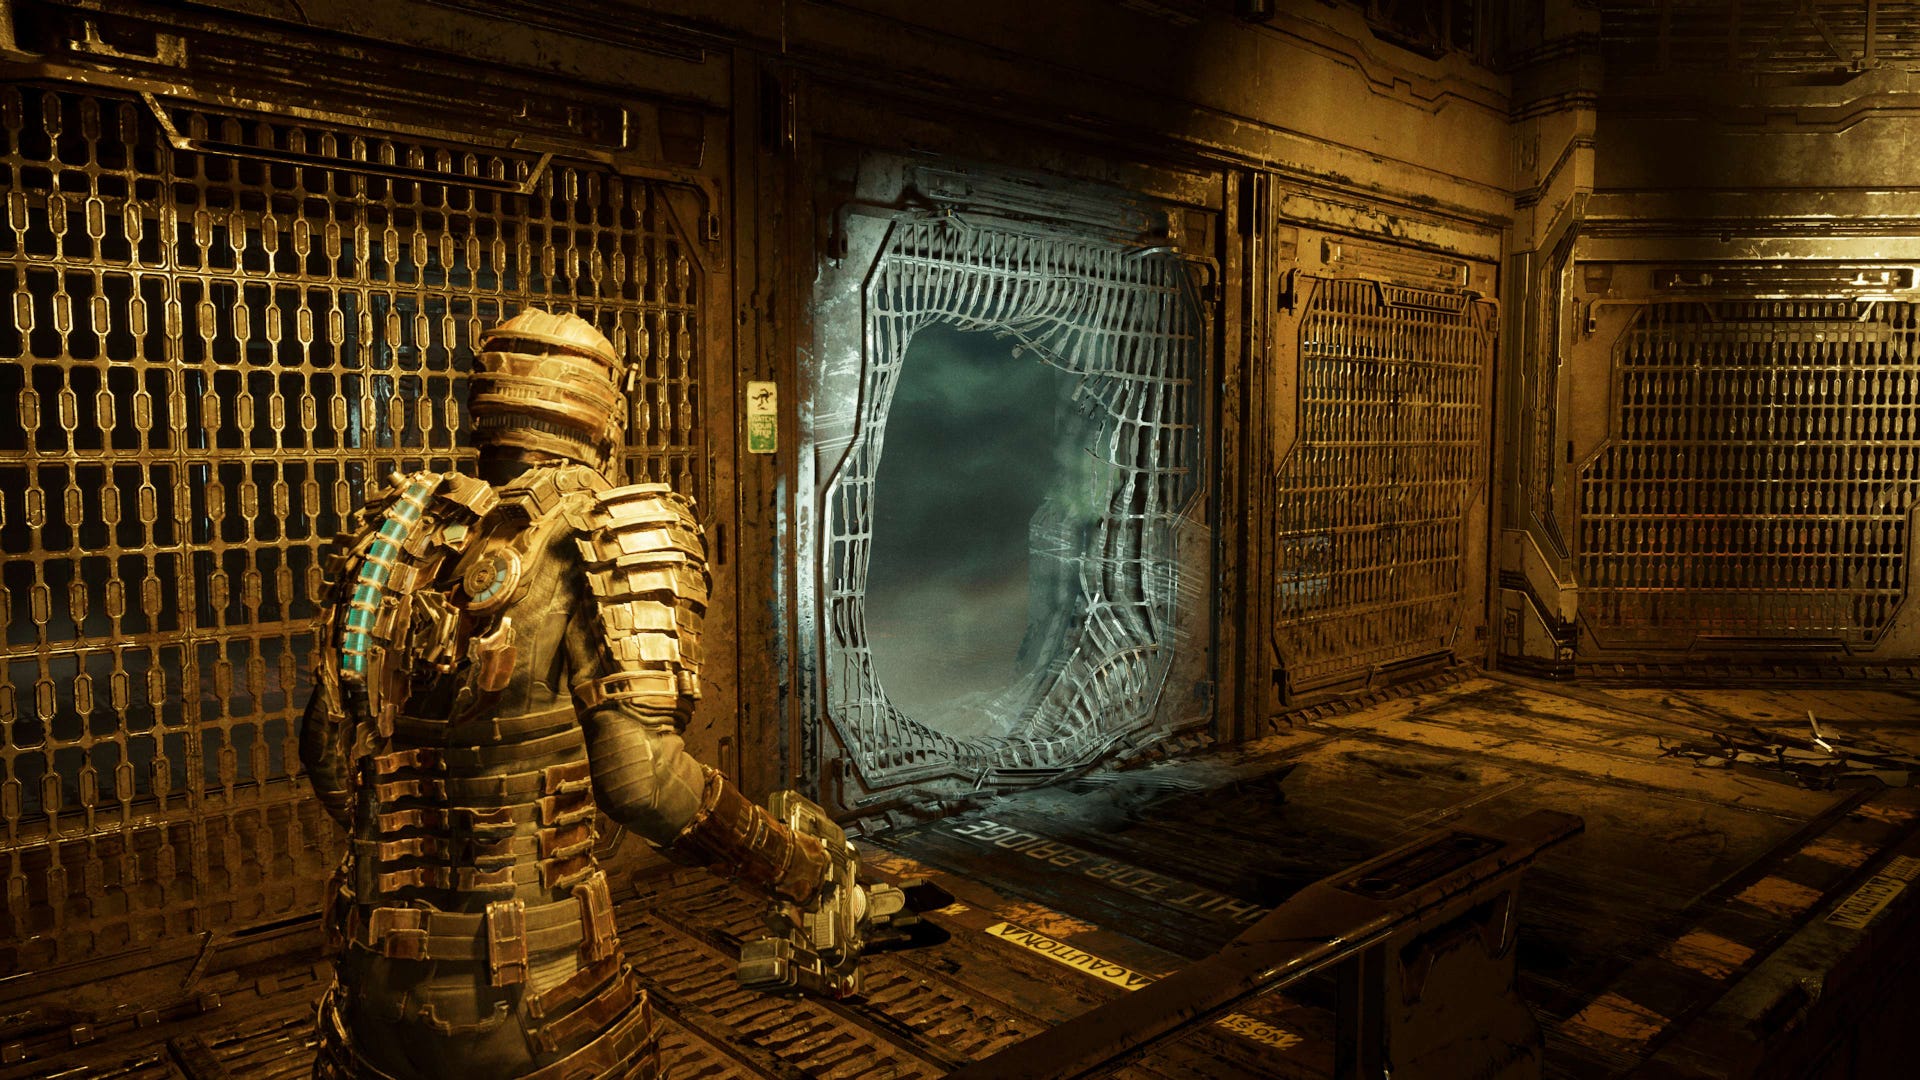
Whilst the Dead Space remake is about as faithful as it gets with video game remakes, it's not without its fair share of new features and content, including a bonus secret ending.
There's a bit of set up you'll need to do before you can actually start working towards Dead Space's secret ending however - including beating the game and unlocking its New Game Plus mode.
In this guide, we'll be delving into just how to unlock the New Game Plus mode, where to find all 12 Marker Fragments and how to activate the secret ending.
On this page:
- How to unlock New Game Plus
- Where to find all 12 Marker Fragments in Dead Space
- Chapter 1 Marker Fragment location
- Chapter 2 Marker Fragment location
- Chapter 3 Marker Fragment location
- Chapter 4 Marker Fragment location
- Chapter 5 Marker Fragment location A
- Chapter 5 Marker Fragment location B
- Chapter 6 Marker Fragment location
- Chapter 7 Marker Fragment location
- Chapter 8 Marker Fragment location
- Chapter 10 Marker Fragment location A
- Chapter 10 Marker Fragment location B
- Chapter 11 Marker Fragment location
- How to activate the secret ending in Dead Space
Explainers:
Marker Fragment locations and activation method:

How to unlock New Game Plus in Dead Space
To be able to start the collectible hunt and unlock the secret ending in Dead Space, you'll first need to unlock the New Game Plus mode.
As such, you need to play the game from start to finish - on any difficulty setting - until the credits roll.
Following that, upon return to the menu, you'll see a new option listed that'll let you jump into the New Game Plus mode, carrying across all of your acquired weapons, upgrades and items from the previous playthrough.
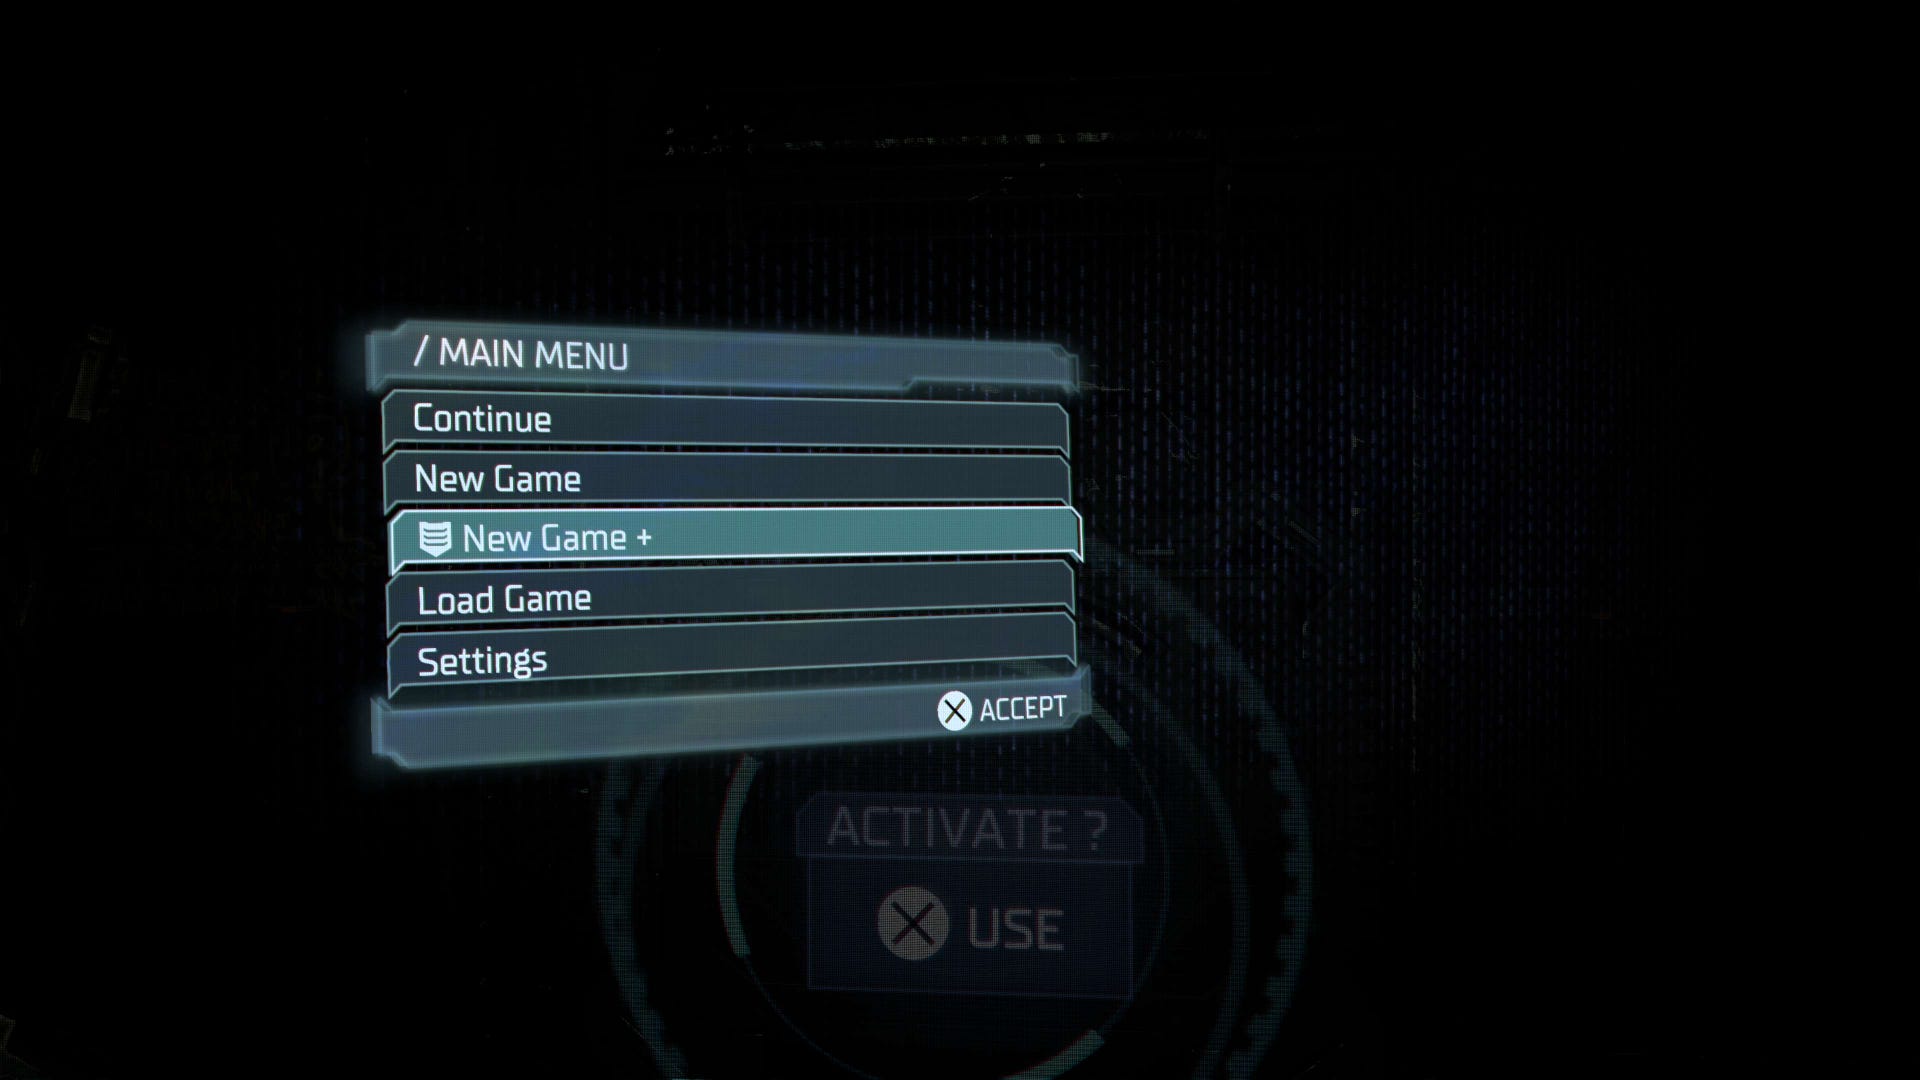
Select this option, pick whichever save file and difficulty you want to play with, and you'll be ready to begin your hunt for the 12 Marker Fragments required for the secret ending.
It's worth noting, New Game Plus has more to it than just the secret ending, including the Level 6 Suit and a new 'Phantom' variant of Necromorph.
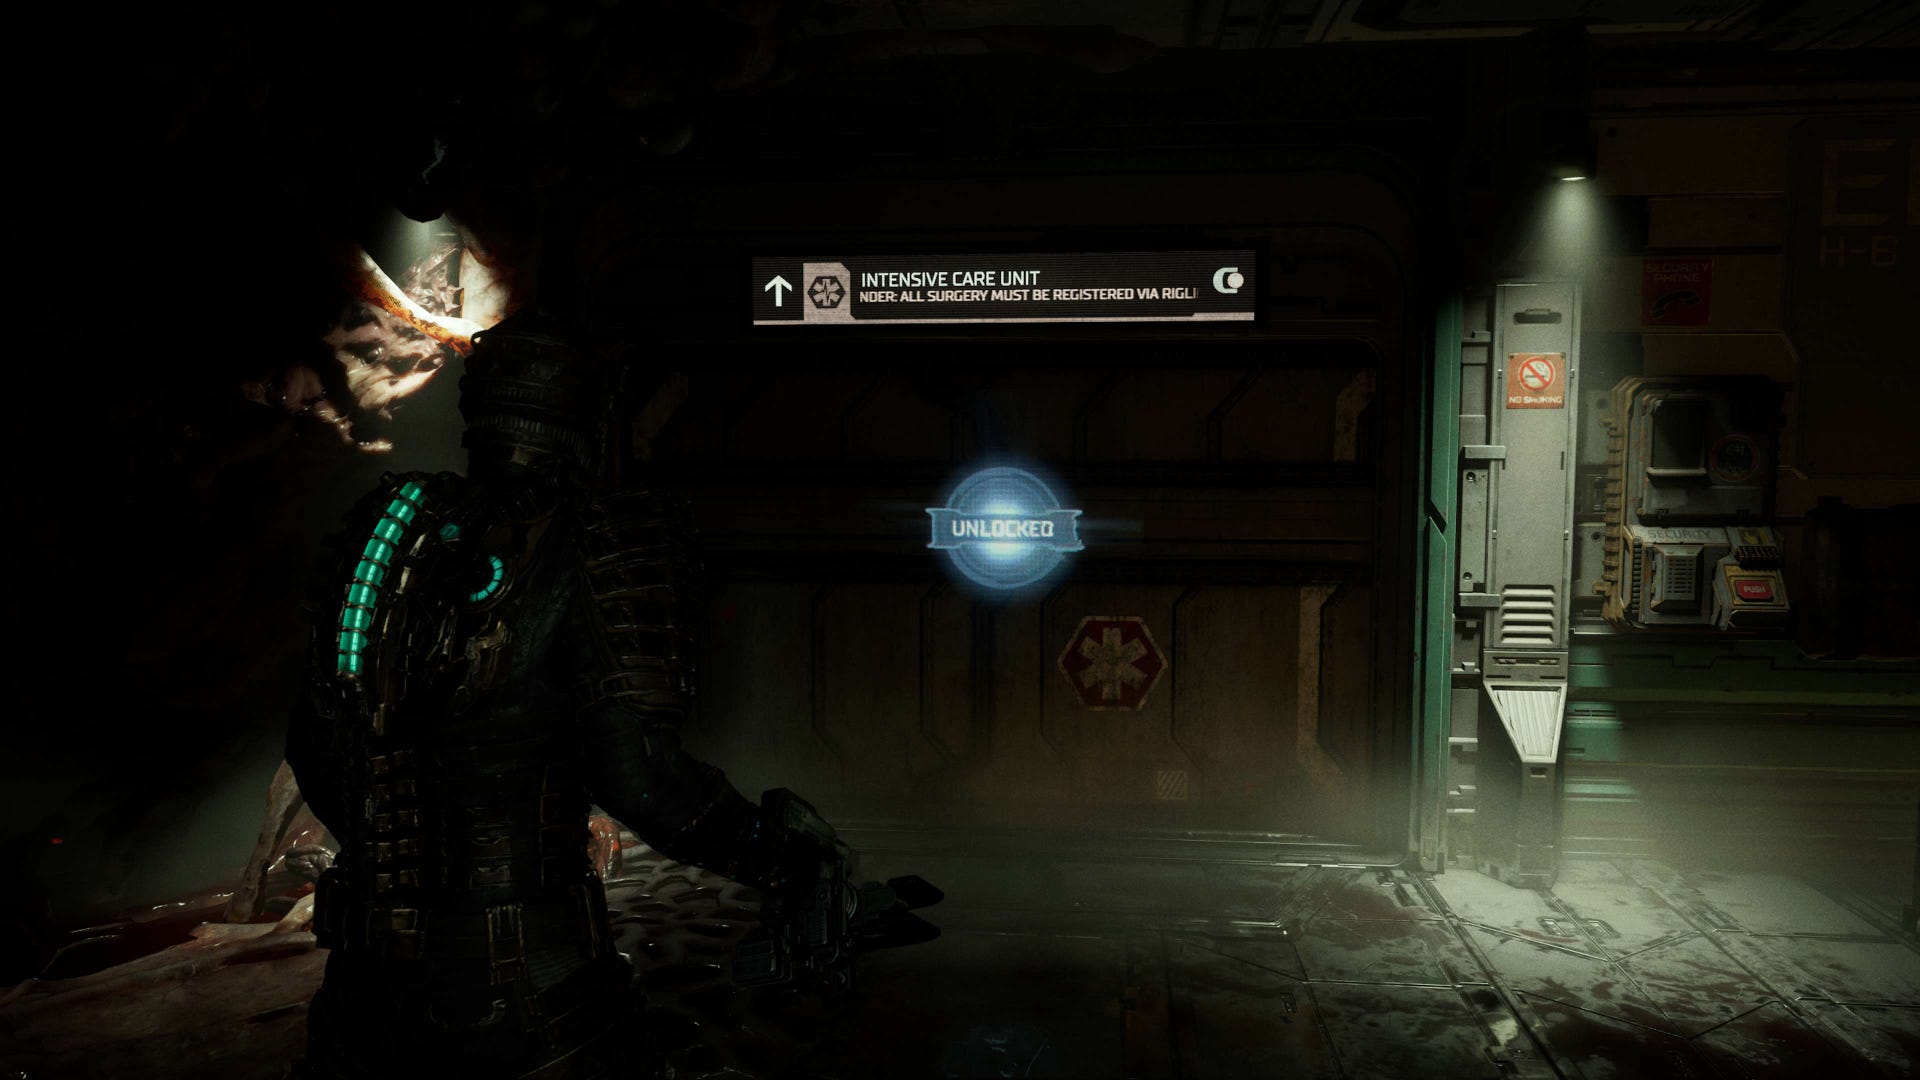
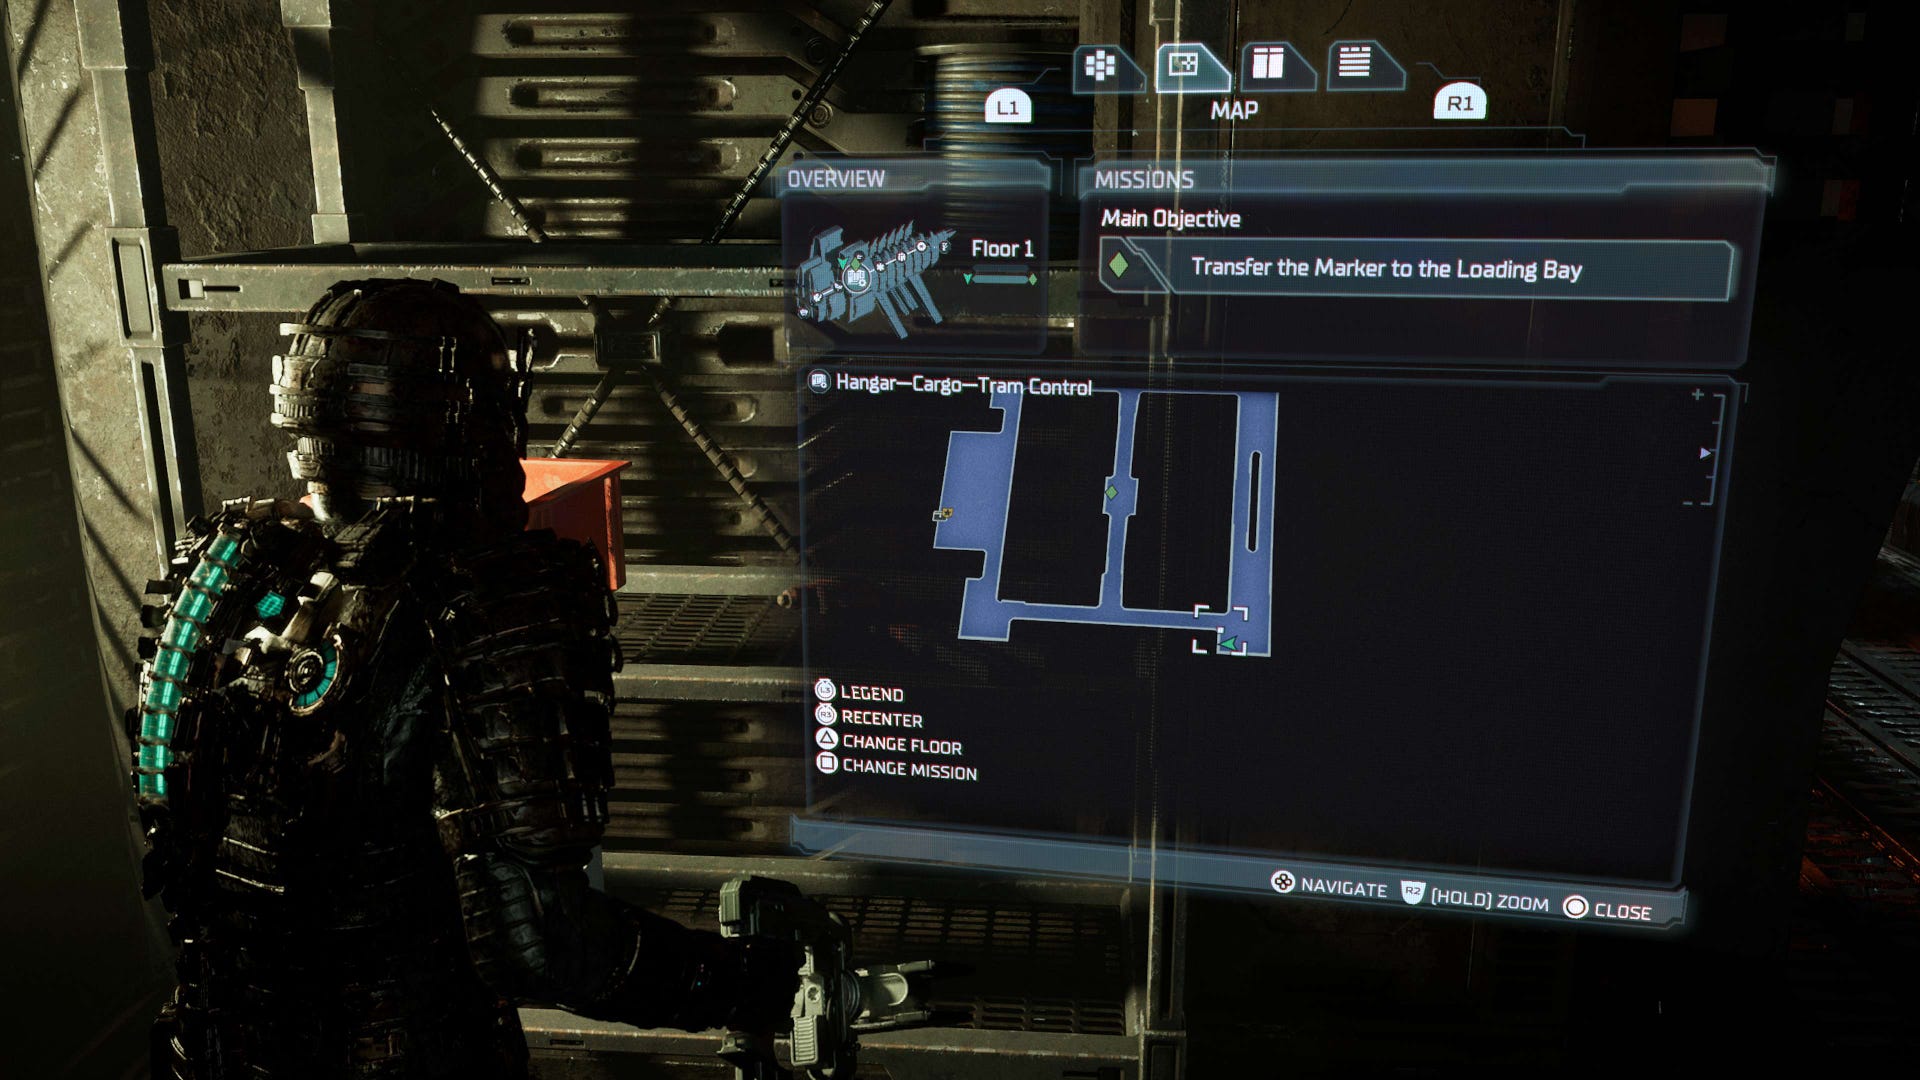
Where to find all 12 Marker Fragments in Dead Space
To unlock the secret ending in the Dead Space remake, your primary objective and first order of business is to find 12 Marker Fragments scattered throughout a New Game Plus playthrough.
There is one to be found in each of the game's twelve chapters, not including Chapter 9 and 12 which don't have any - instead, there are two you'll need to collect in both chapters 5 and 10 totalling the aforementioned 12.
Since many of these are found very close to the main story path, whilst you can explore most of the Ishimura more or less by the end of the game, we recommend you pick them up as you progress through the story to save return trips later.
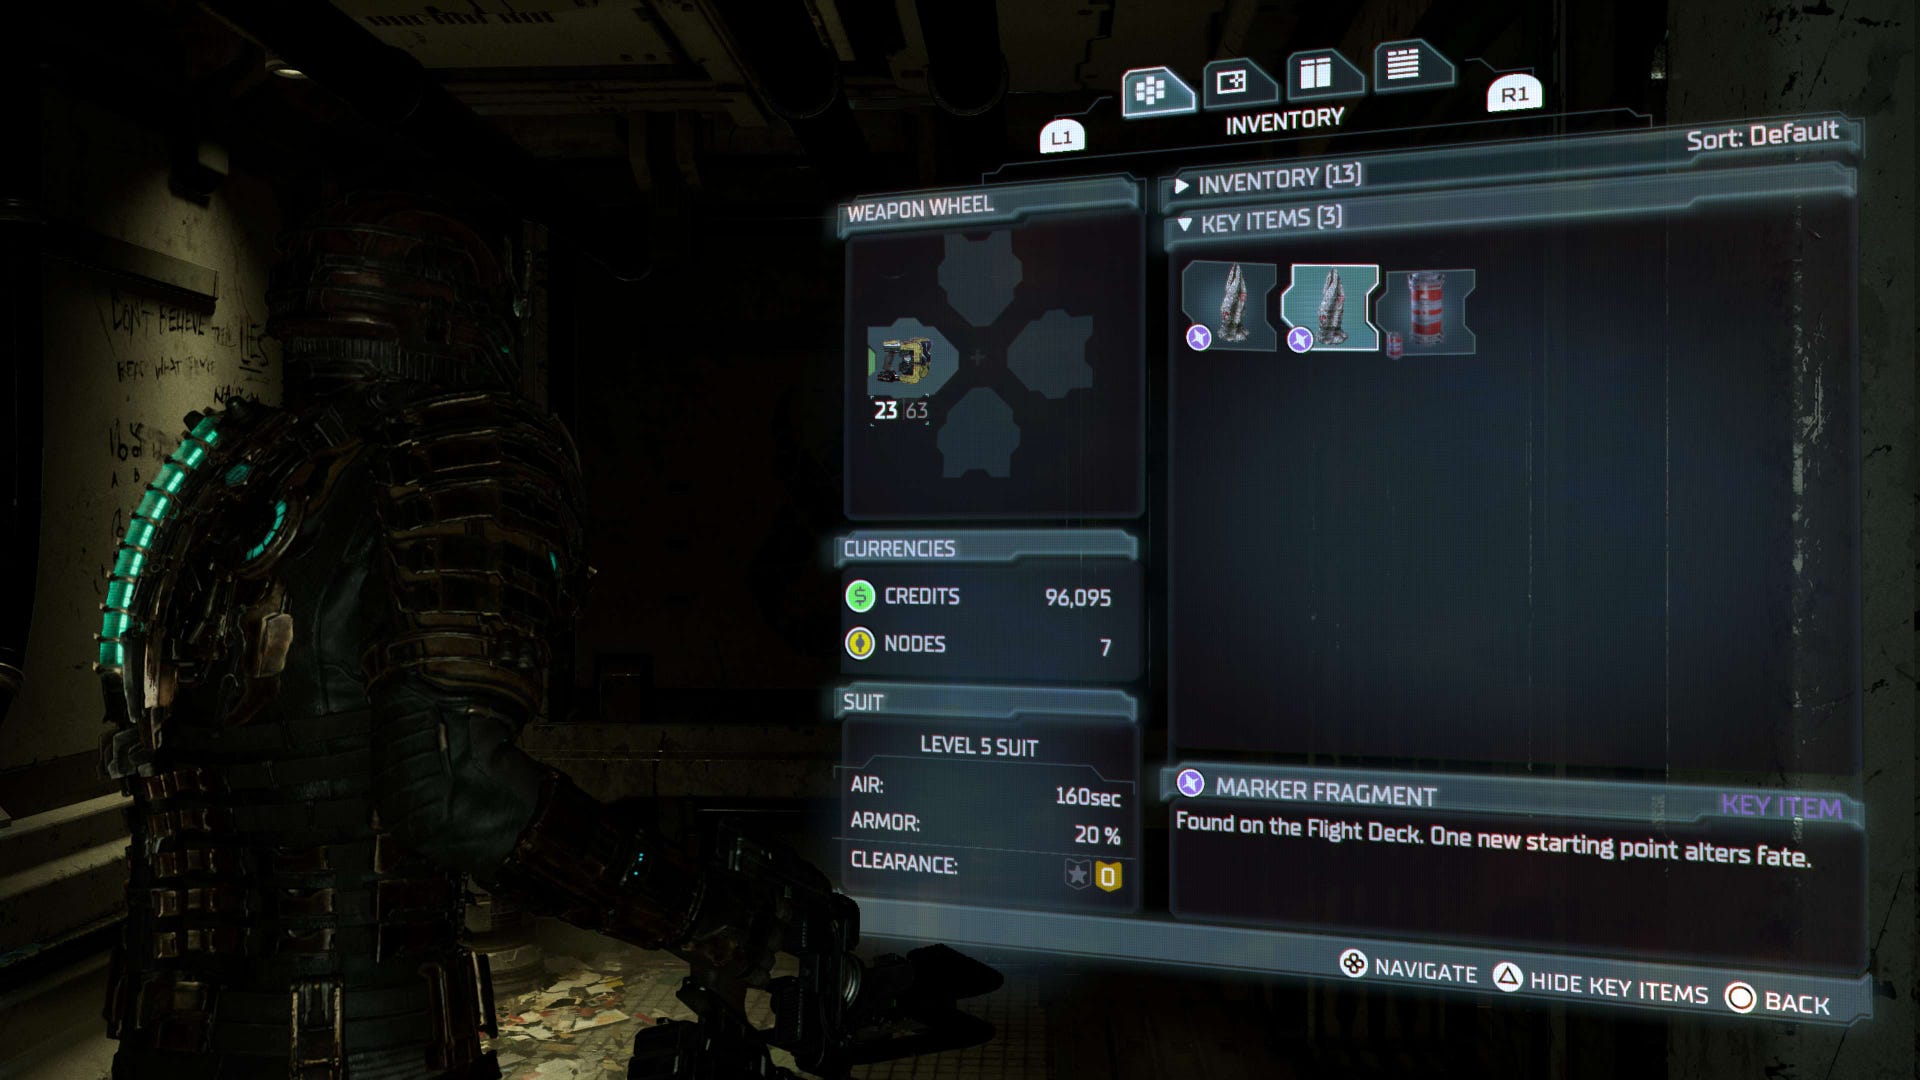
If you ever want to check how many or which Marker Fragments you've collected however, you can see all the ones you've found at any point inside of the 'Key Items' section which can be accessed via the inventory.
Keep reading to learn where to find each Marker Fragment, and how to activate the secret ending once you've acquired all twelve.
- Chapter 1 Marker Fragment location
- Chapter 2 Marker Fragment location
- Chapter 3 Marker Fragment location
- Chapter 4 Marker Fragment location
- Chapter 5 Marker Fragment location A
- Chapter 5 Marker Fragment location B
- Chapter 6 Marker Fragment location
- Chapter 7 Marker Fragment location
- Chapter 8 Marker Fragment location
- Chapter 10 Marker Fragment location A
- Chapter 10 Marker Fragment location B
- Chapter 11 Marker Fragment location
- How to activate the secret ending in Dead Space
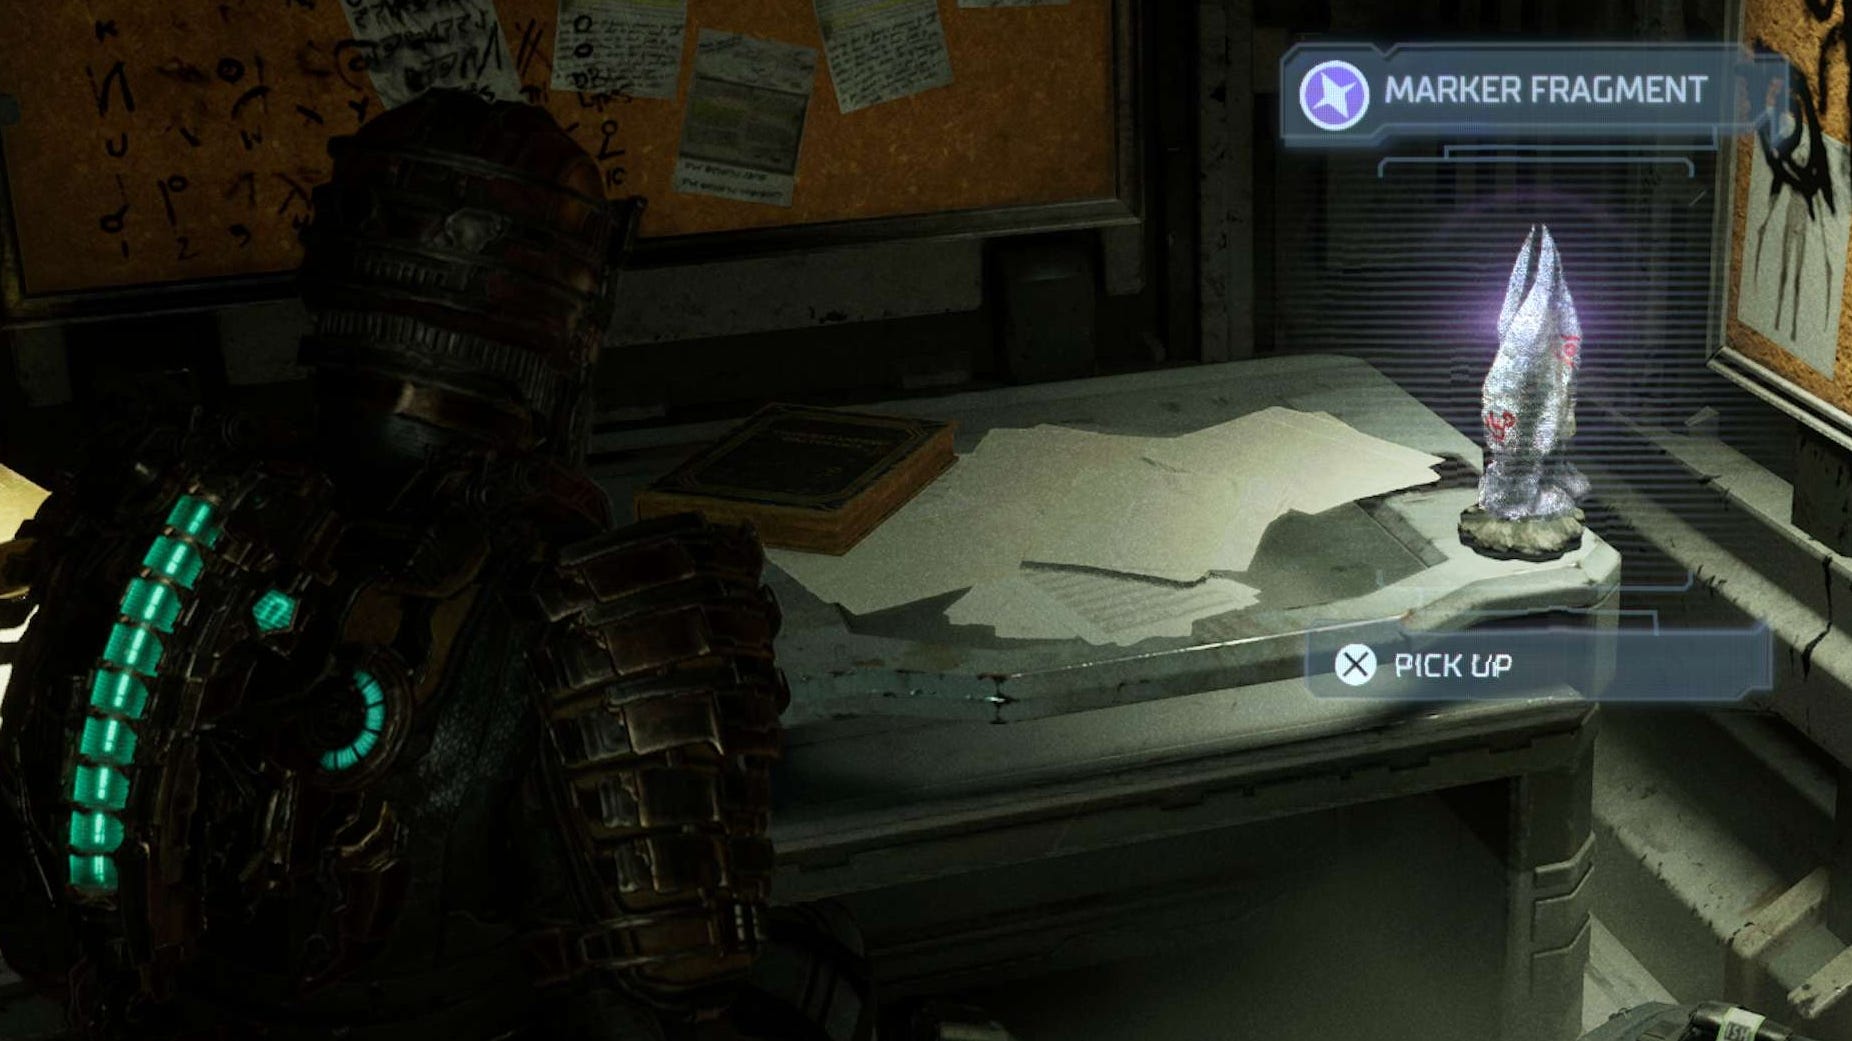
Chapter 1 Marker Fragment location in Dead Space
Location: Administration - Maintenance Bay Office
The first Marker Fragment you'll want to grab is rather early on in the game.
When you receive the objective to 'Find the Data Board' - shortly after you acquire the Plasma Cutter - you'll want to follow that objective until you reach the Maintenance Bay Office whereby you'll find the data board for the story.
To access this room, you need to reroute the power via a circuit breaker on the upper floor of the Maintenance Bay, then return to the floor below - you'll naturally do this as part of story progression.
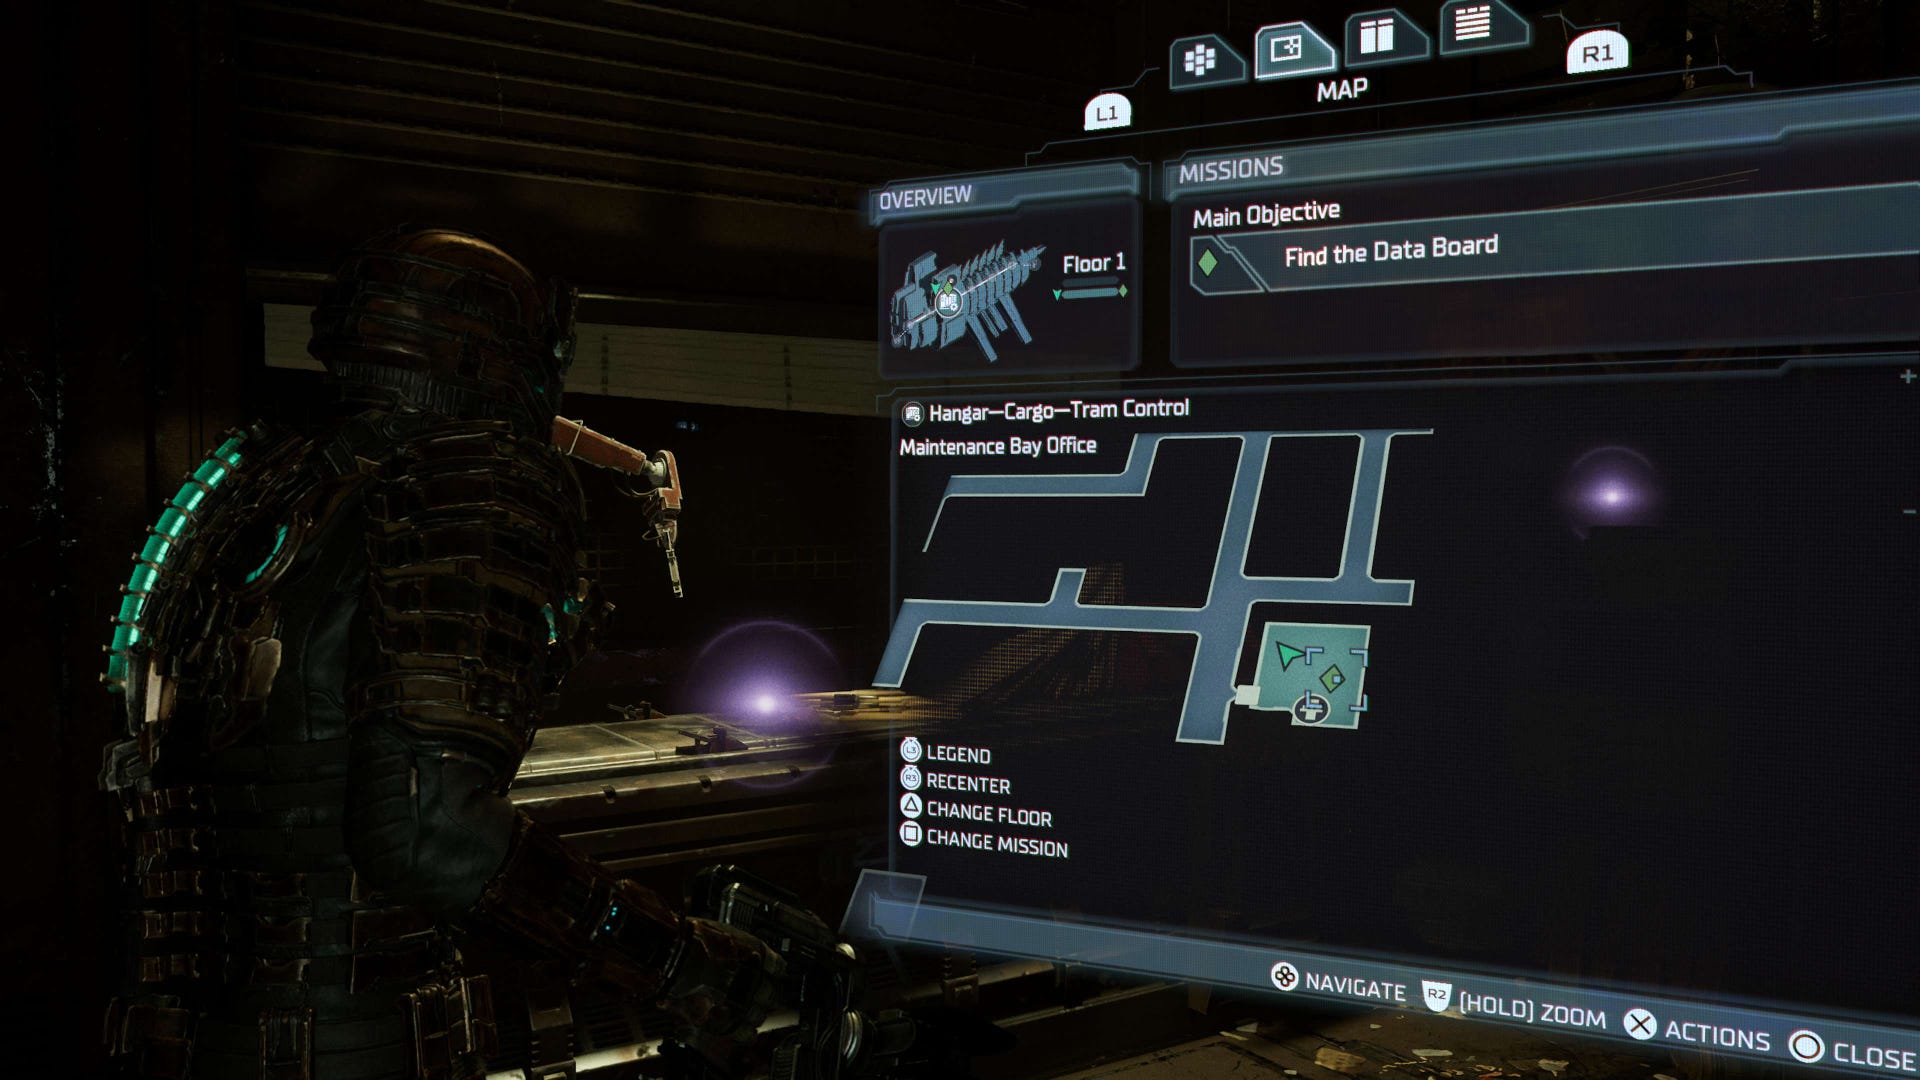
Once you've rerouted the power and entered the Maintenance Bay Office, to the left you'll see a desk and a shelf - on the desk will be the data board you need for the objective, and on the shelf the first Marker Fragment.
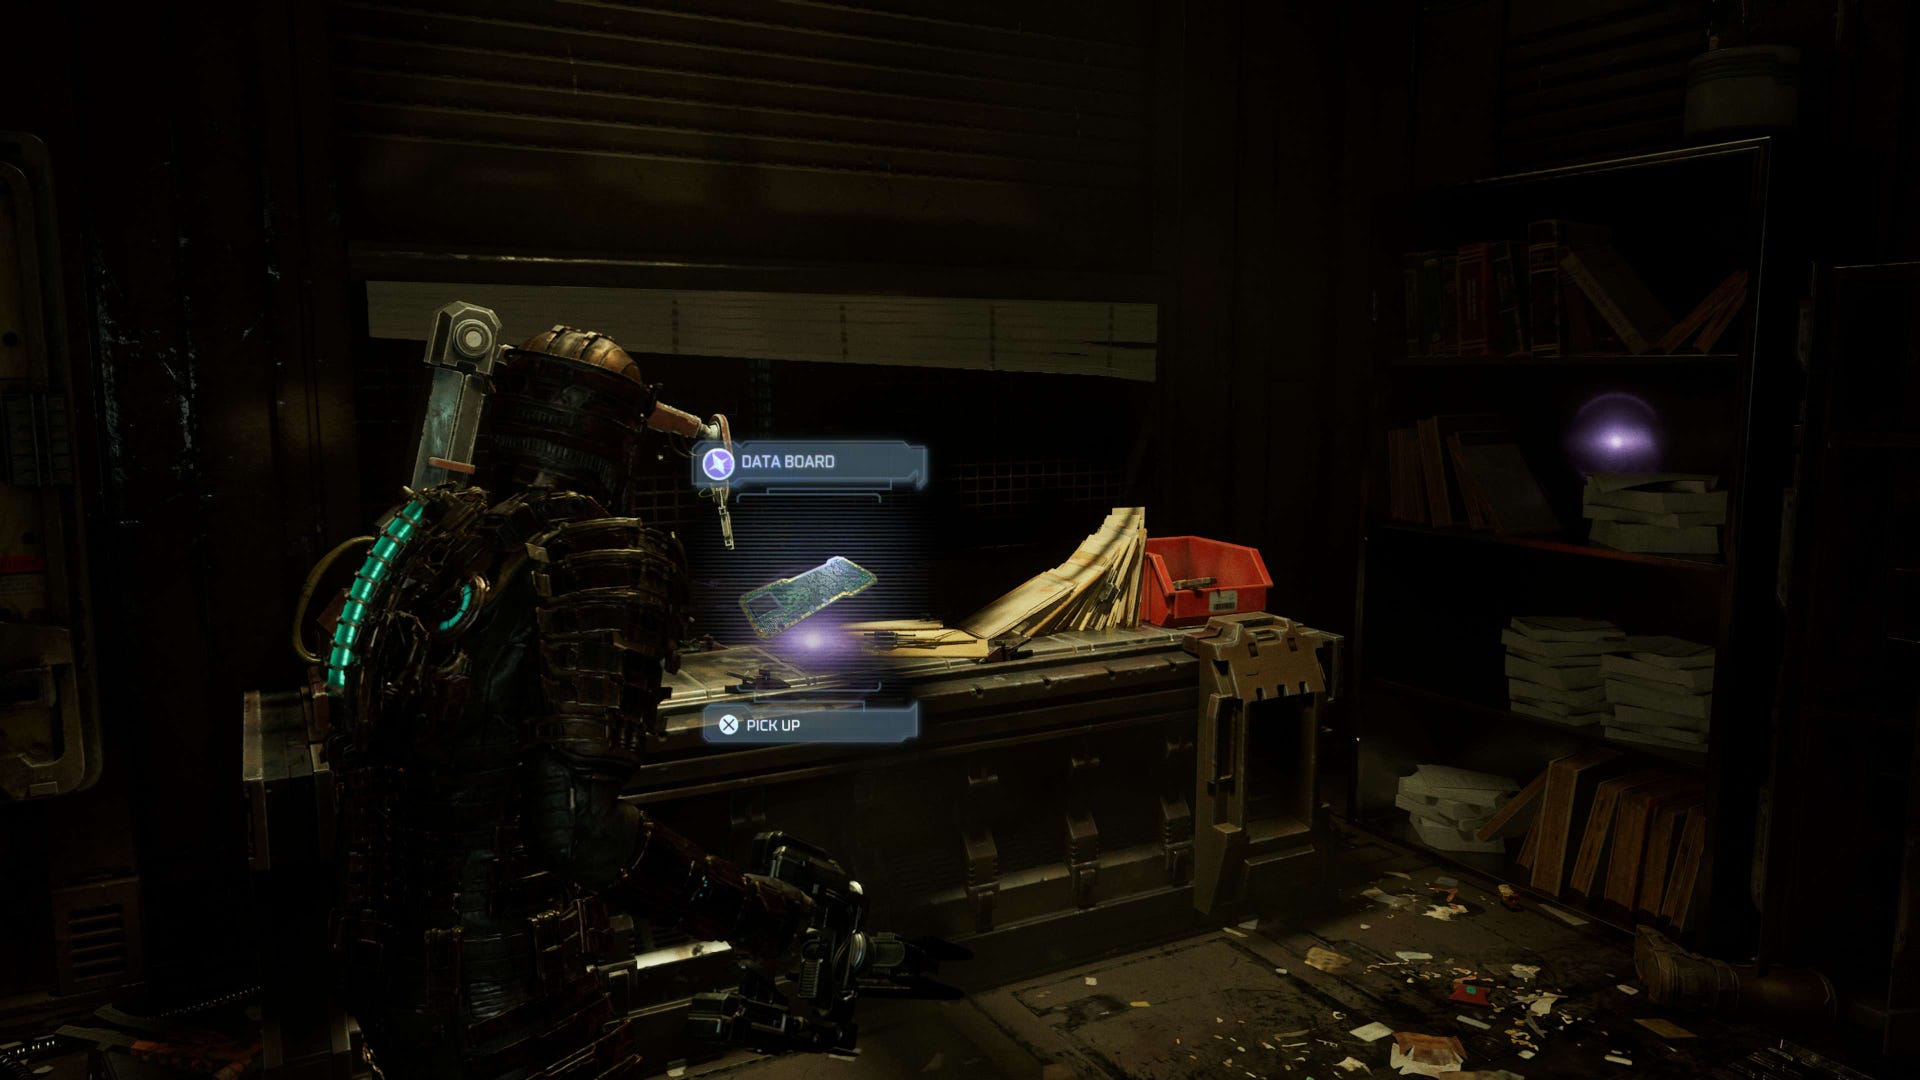
To acquire it however, you'll need to use a melee attack to knock it down, after which you'll be able to pick it up, acquiring the 'Marked' achievement/trophy in the process - if this is your first ever collected Marker Fragment.
Chapter 2 Marker Fragment location in Dead Space
Location: Medical - Dr. T. Kyne CSO
Much like the first Marker Fragment, the second is located in an area you can get to fairly quickly into the chapter - you'll be wanting to track and follow the 'Find a Shock Pad' objective.
Following this will lead you to the Main Lab which has two floors - your collectible is in a room on the lower floor, which you can get to by using an elevator on the far right from the entrance to reach.
First however, you'll need to deal with the enemies that ambush you as the room is thrown into quarantine soon after your arrival - eliminate the ones who attack you on the upper levels, take the elevator down and continue the limb-cutting combat until all enemies are down.
Once that's done, you'll be wanting to head into a room directly opposite the elevator you just used - above the entrance, you should see this is the office of Dr. T. Kyne.
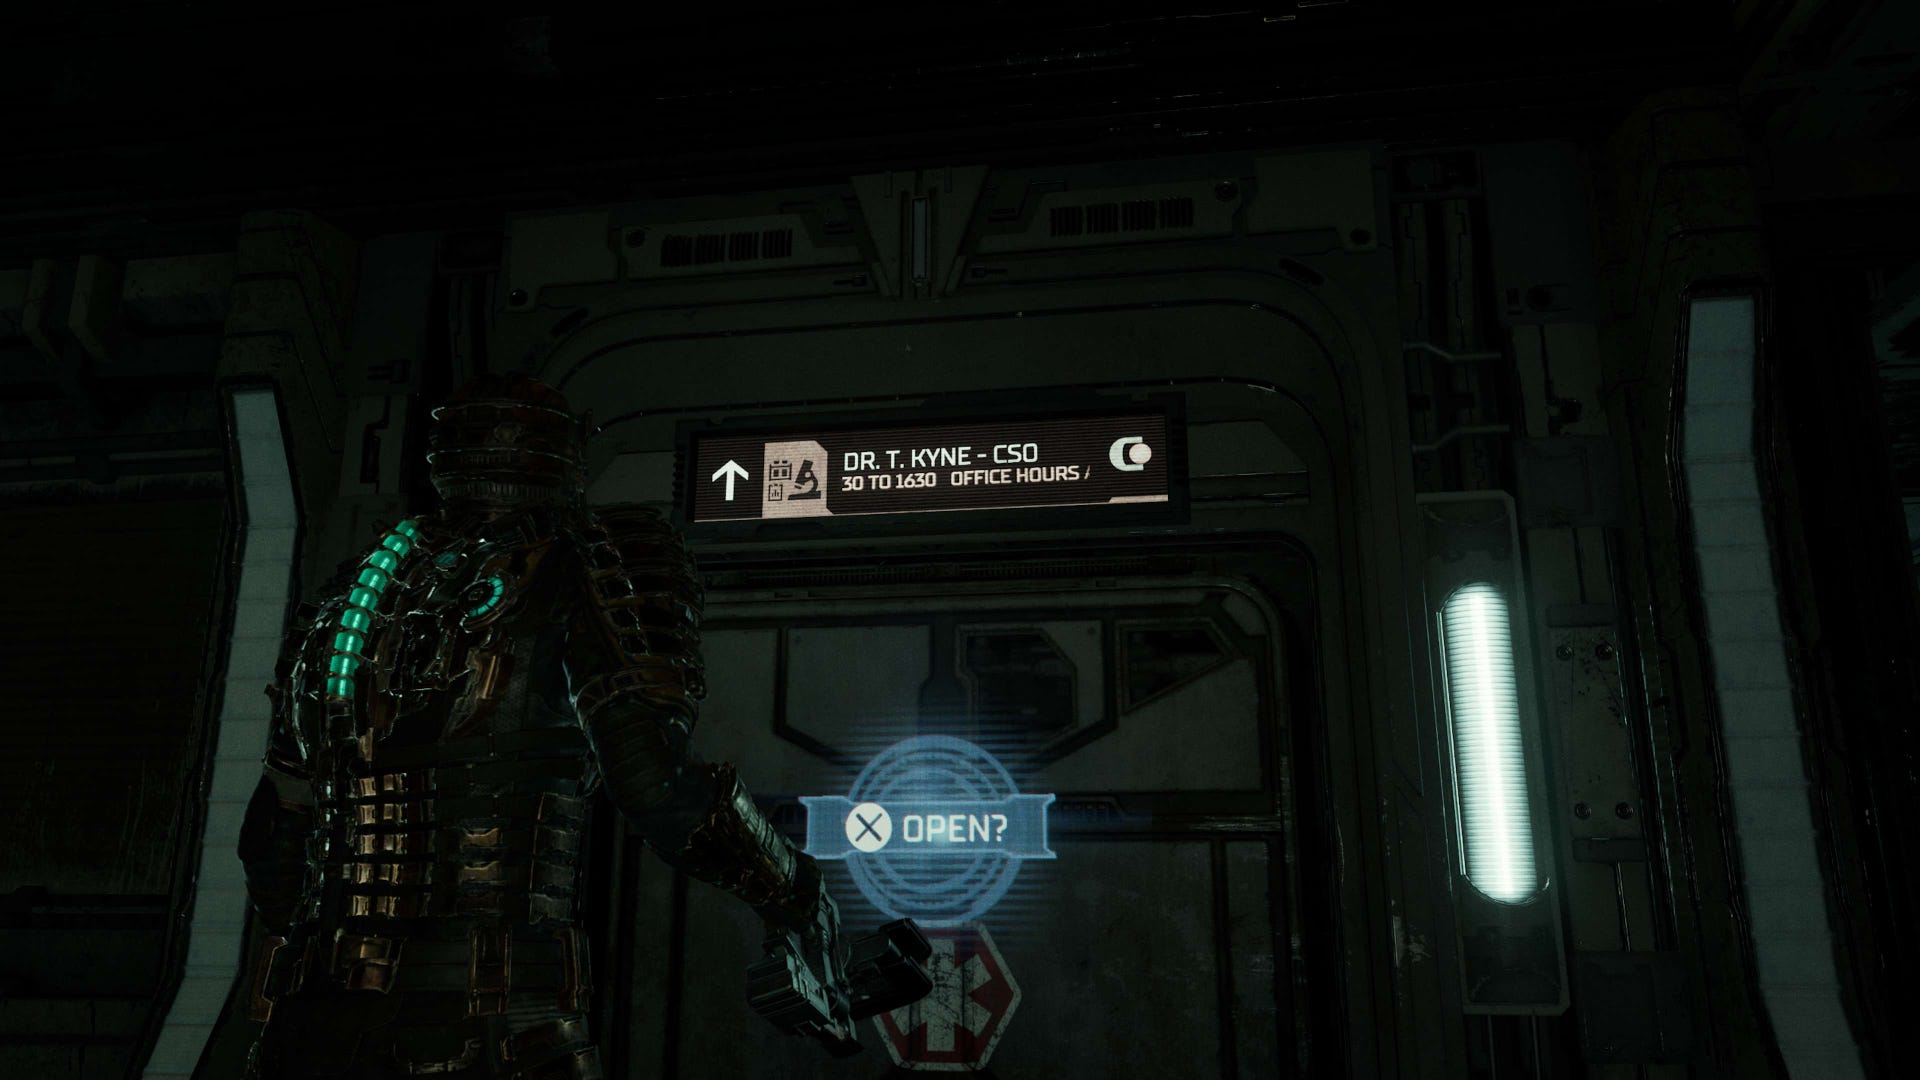
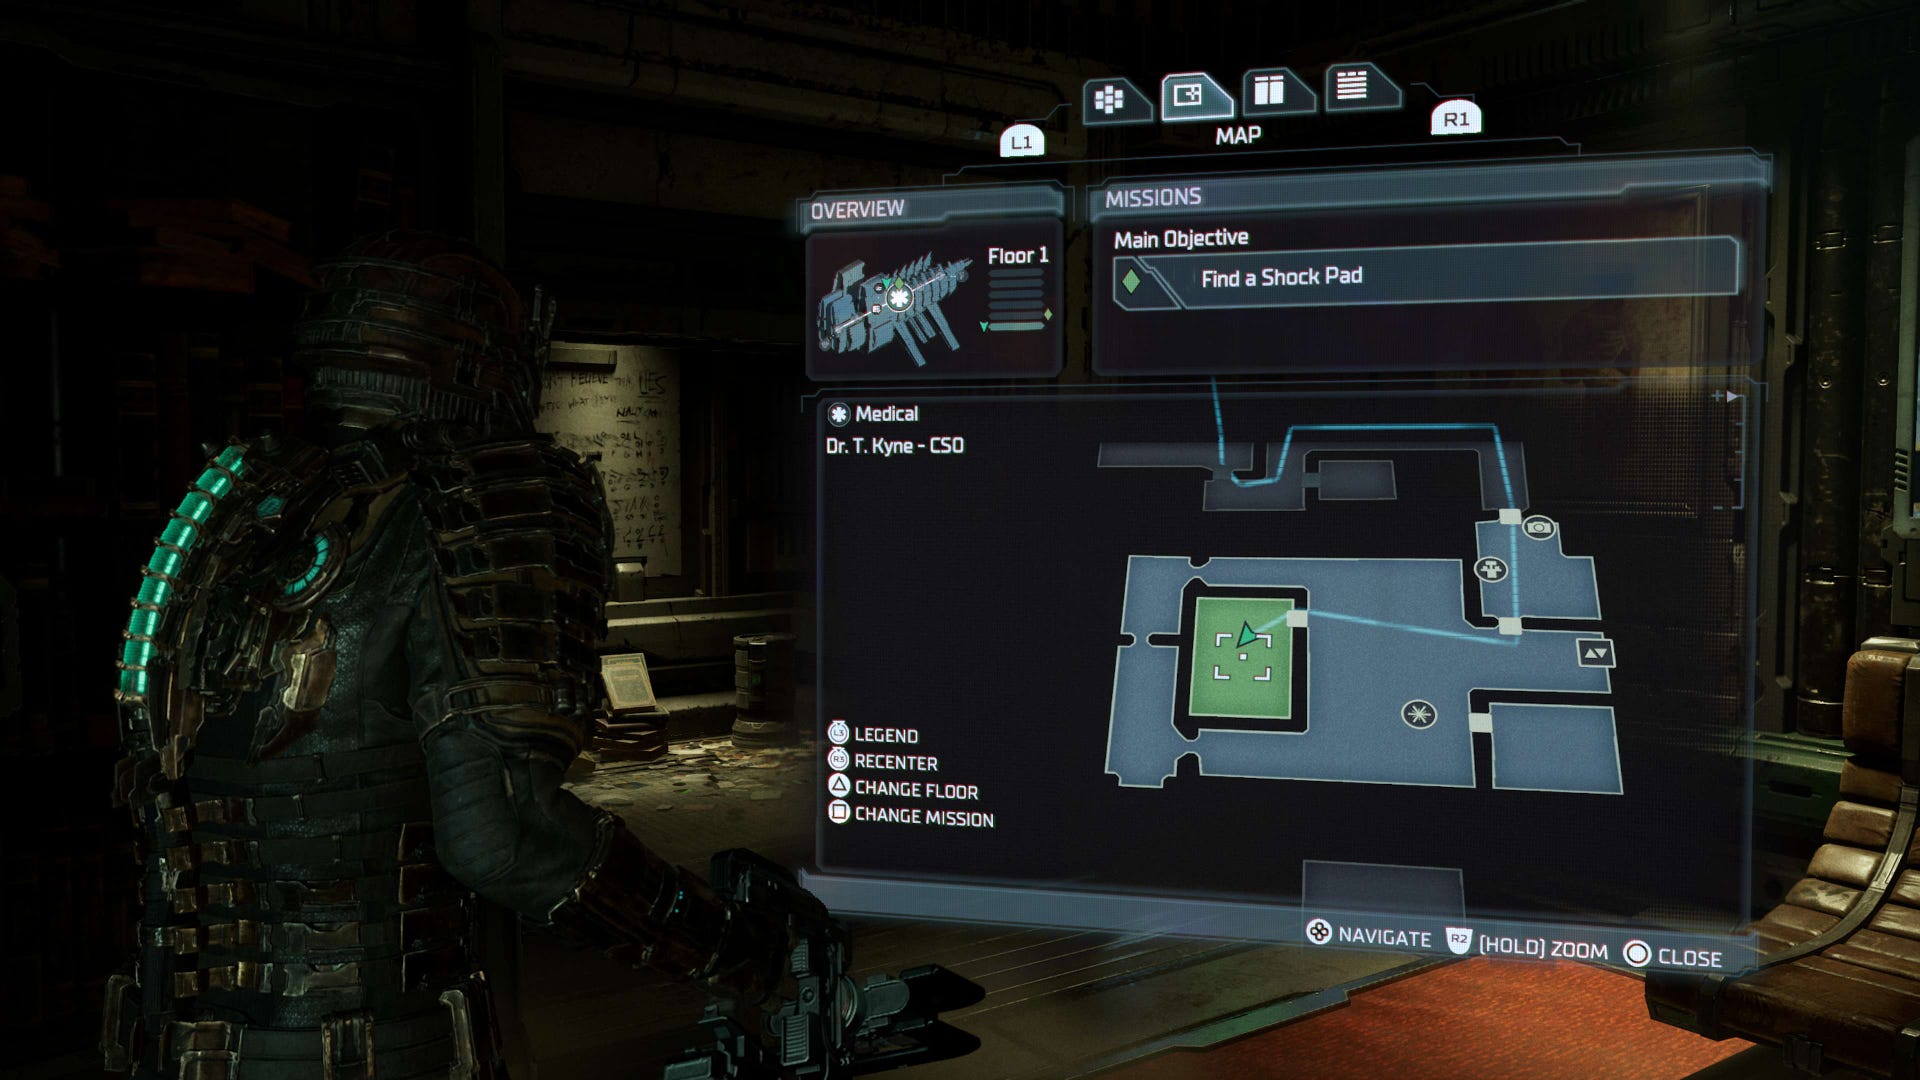
Enter and look toward the two bookshelves on the left side of the room - your collectible is sneakily hidden inside a room behind them!
To reach it, all you need to do is use Kinesis to move the bookshelves to the left, revealing a small room with your second Marker Fragment hidden inside on the corner of a desk.
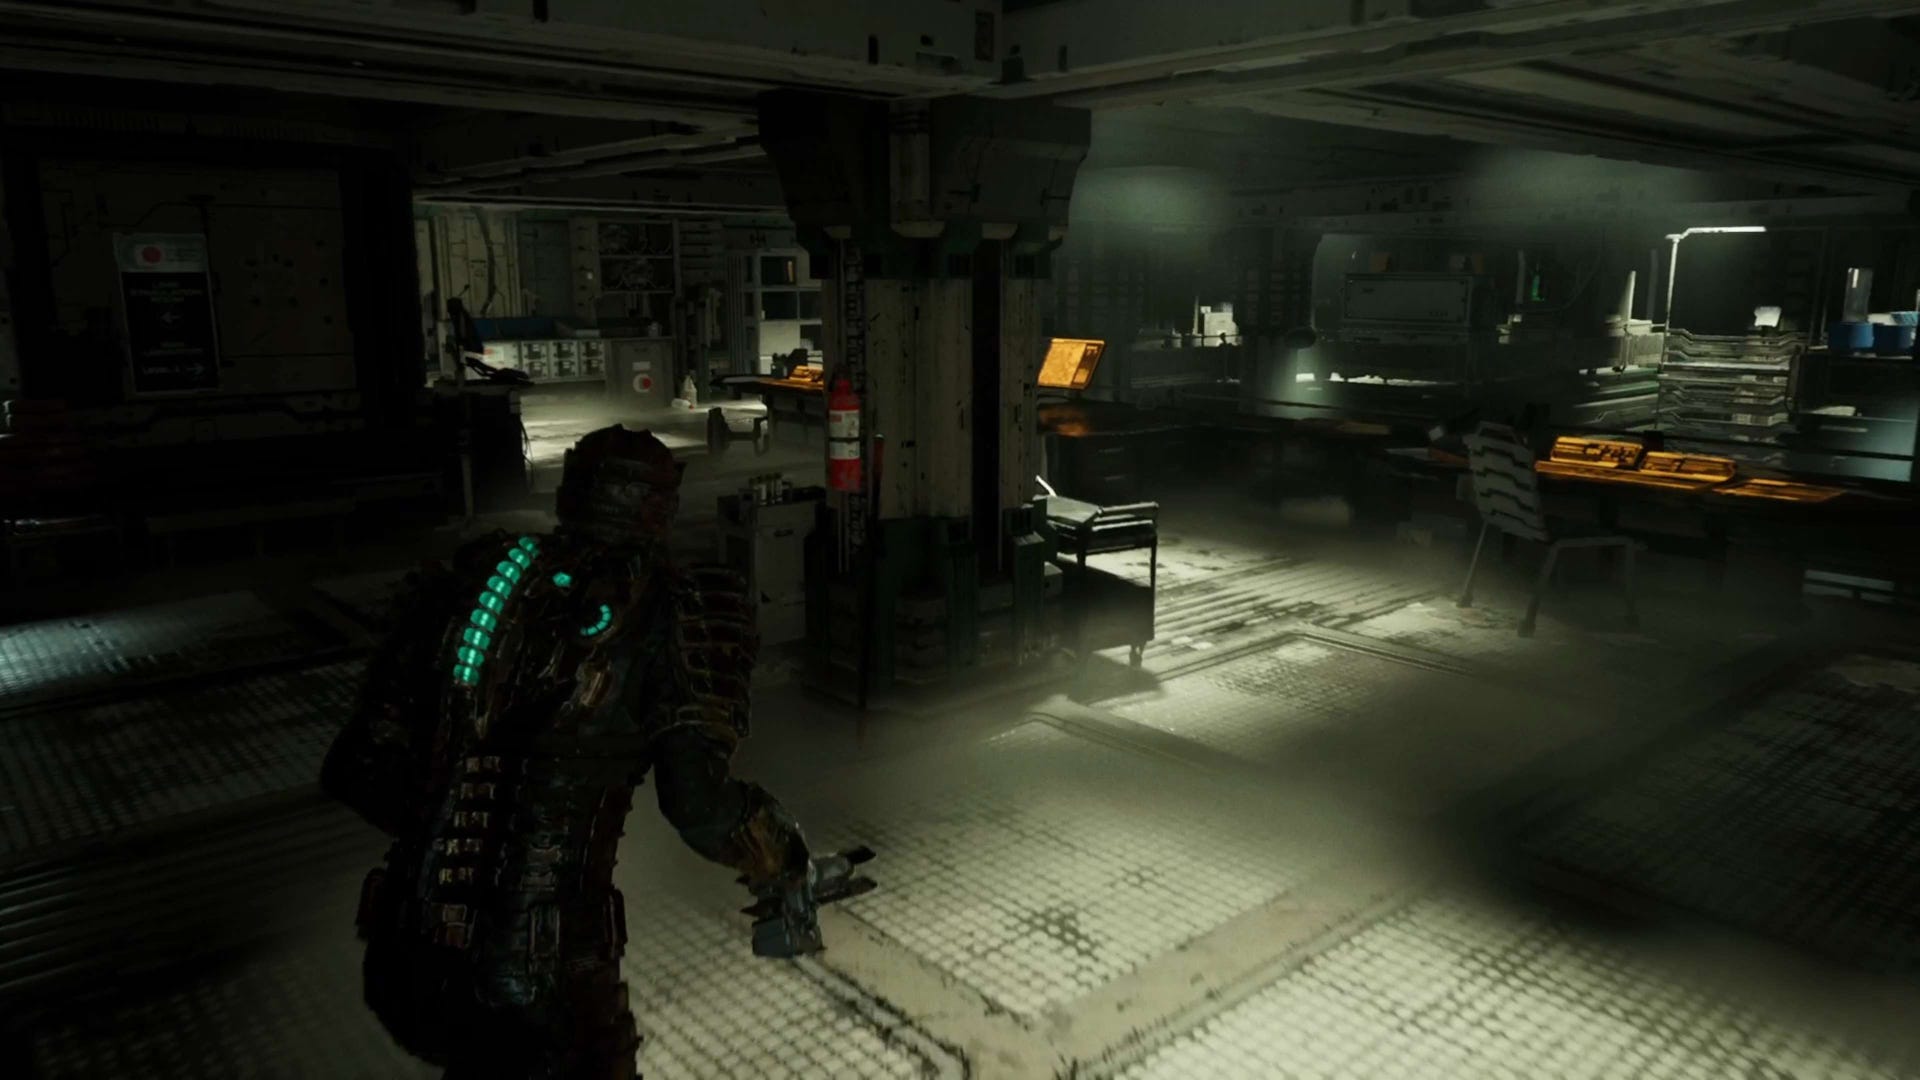
Chapter 3 Marker Fragment location in Dead Space
Location: Engineering - Engine Room
Compared to the first couple of Marker Fragments you've found, the third is a little deeper into the chapter, hidden in a darkened area within the Engine Room.
You'll want to complete the first couple of objectives in Chapter 3 - activating the control console, and refuelling both engines in the north and south.
After that, you'll need to head to the Engine Room as part of the story - once there, you'll have a few enemies to fight, as well as the objective 'Manually Ignite the Engines'.
Before continuing with the objective, once all the enemies are down, head over to the far side of the room, opposite from where you entered.
On the left, you'll see a metal structure lit up orange, with many wires and pipes running toward it, as well as an alcove within whereby there's an empty power cell slot glowing red.
Above it, you should see a sign saying 'Power Sub-Station - 03' - head around to the left where you'll find a stack of boxes nearby a desk.
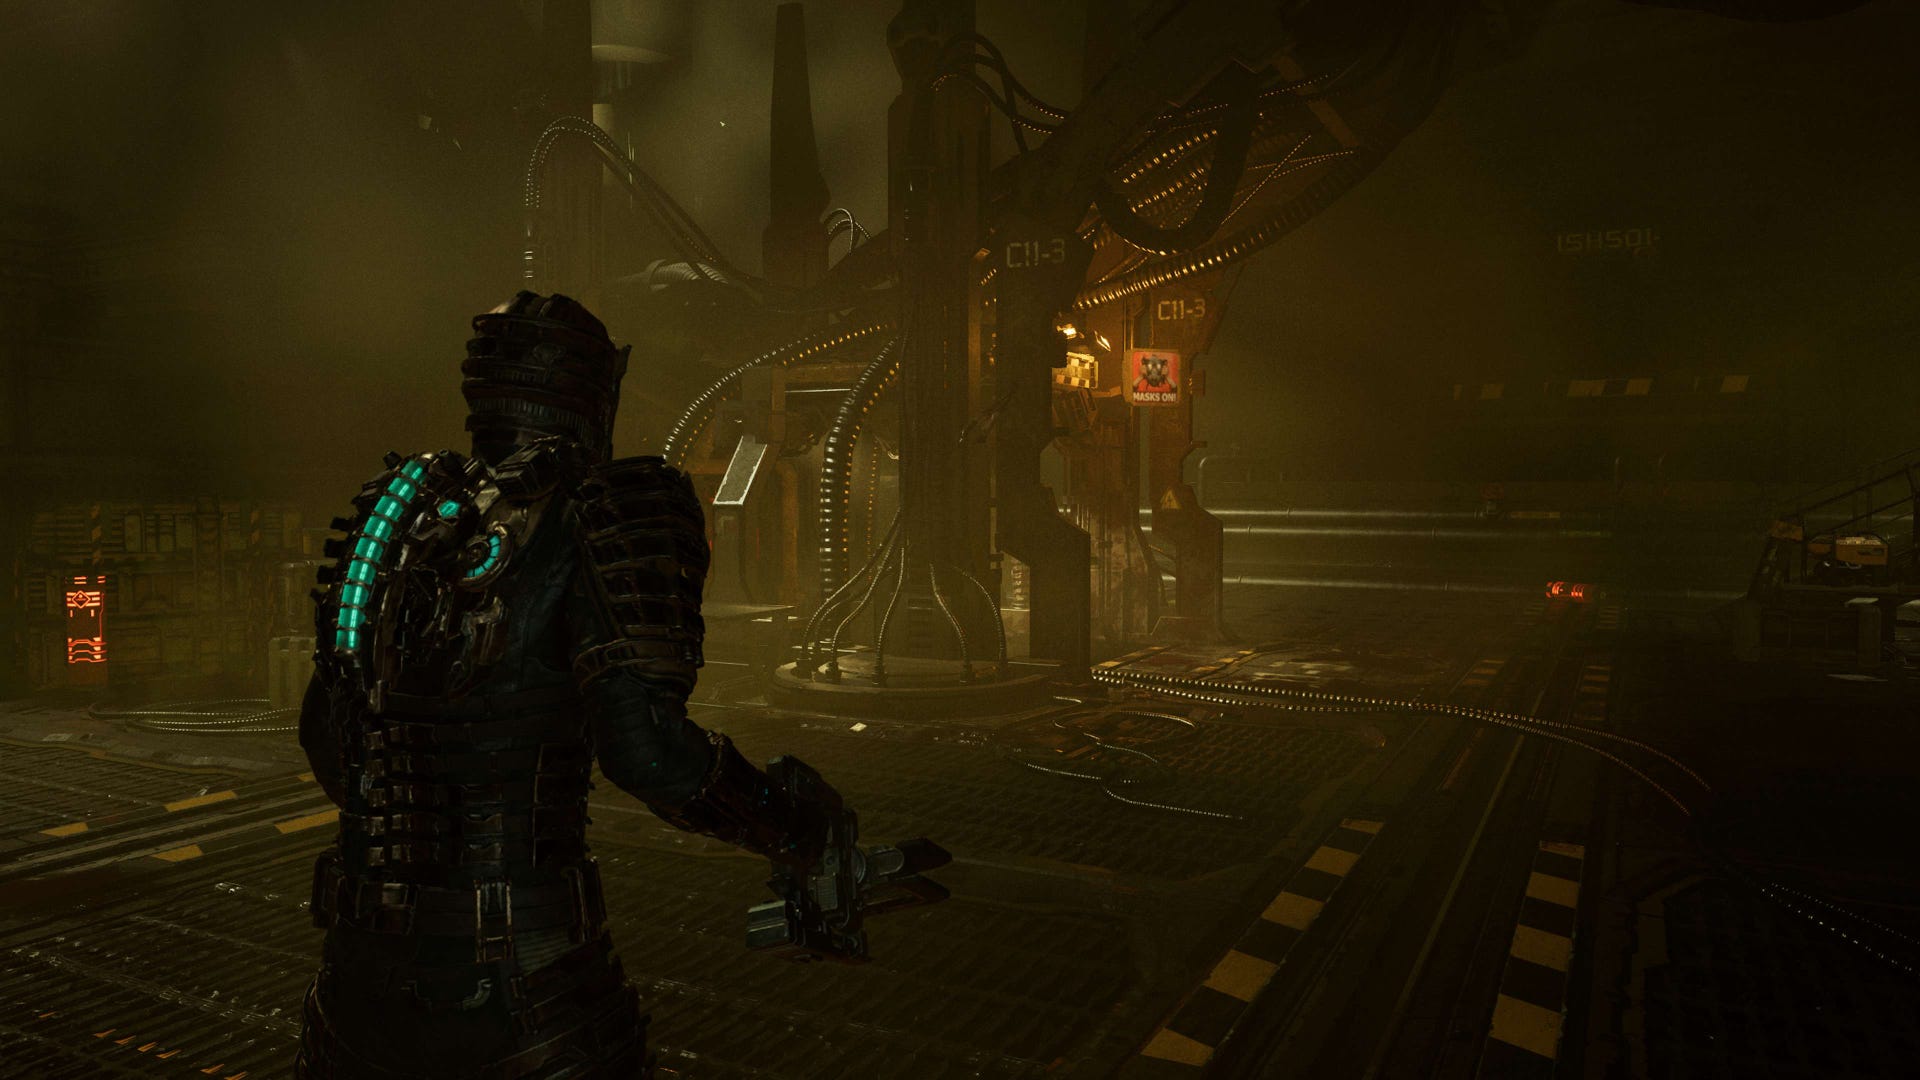
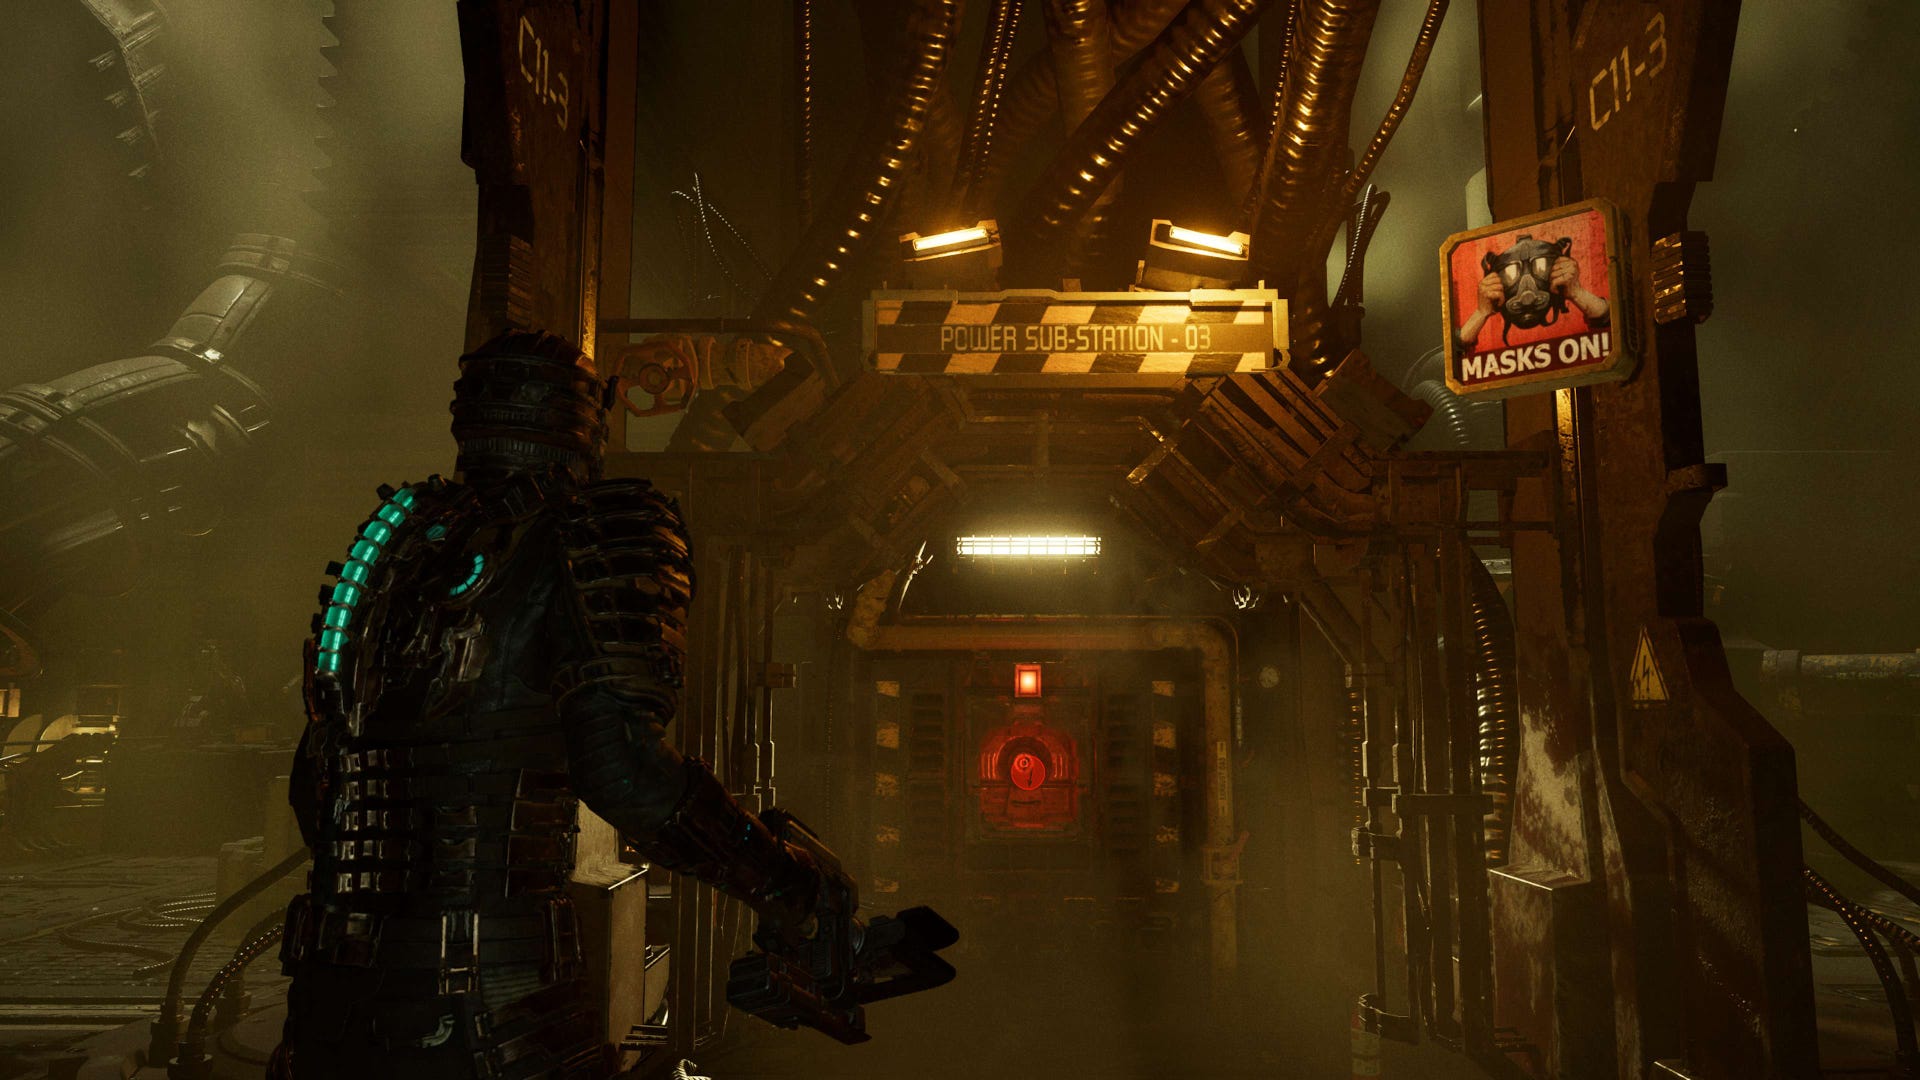
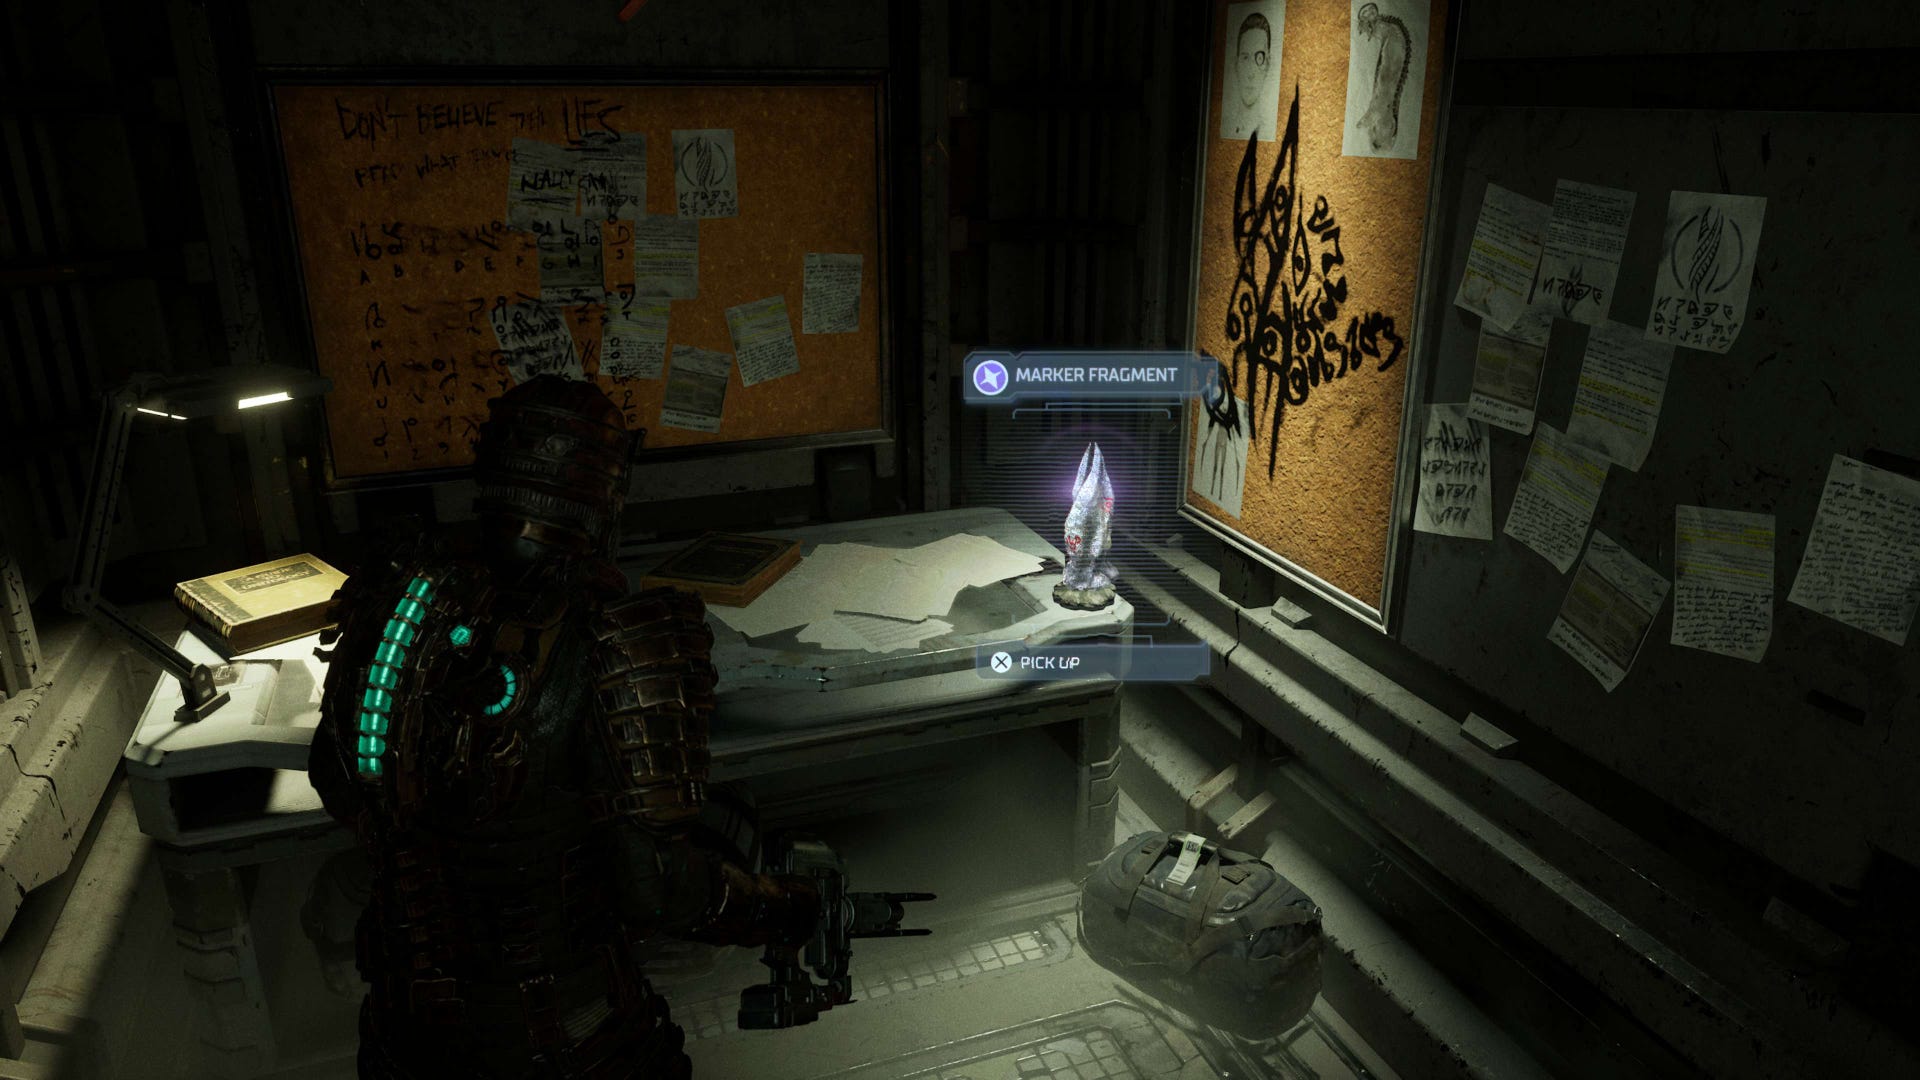
Behind the boxes and directly opposite the desk in the darkened area you'll see a purple glowing light indicating your third Marker Fragment.
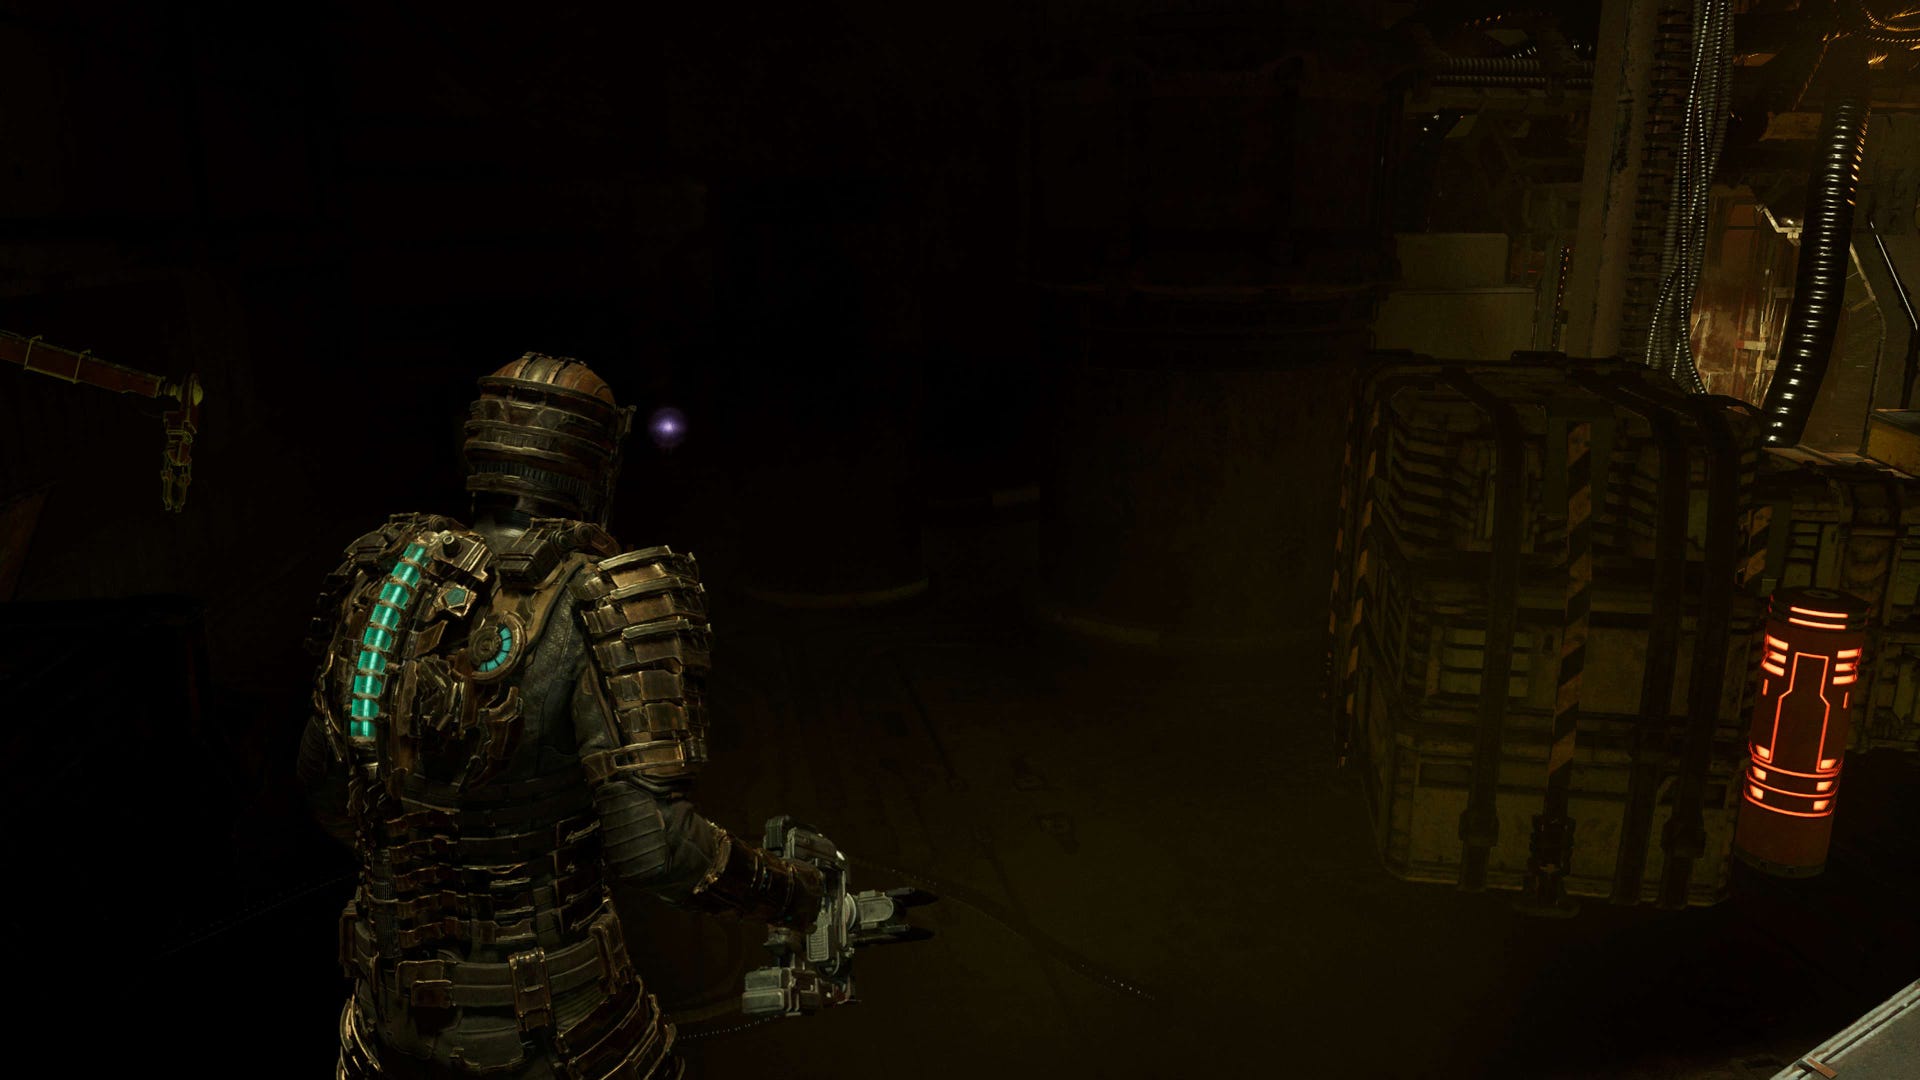

Chapter 4 Marker Fragment location in Dead Space
Location: Flight Deck - Break Room
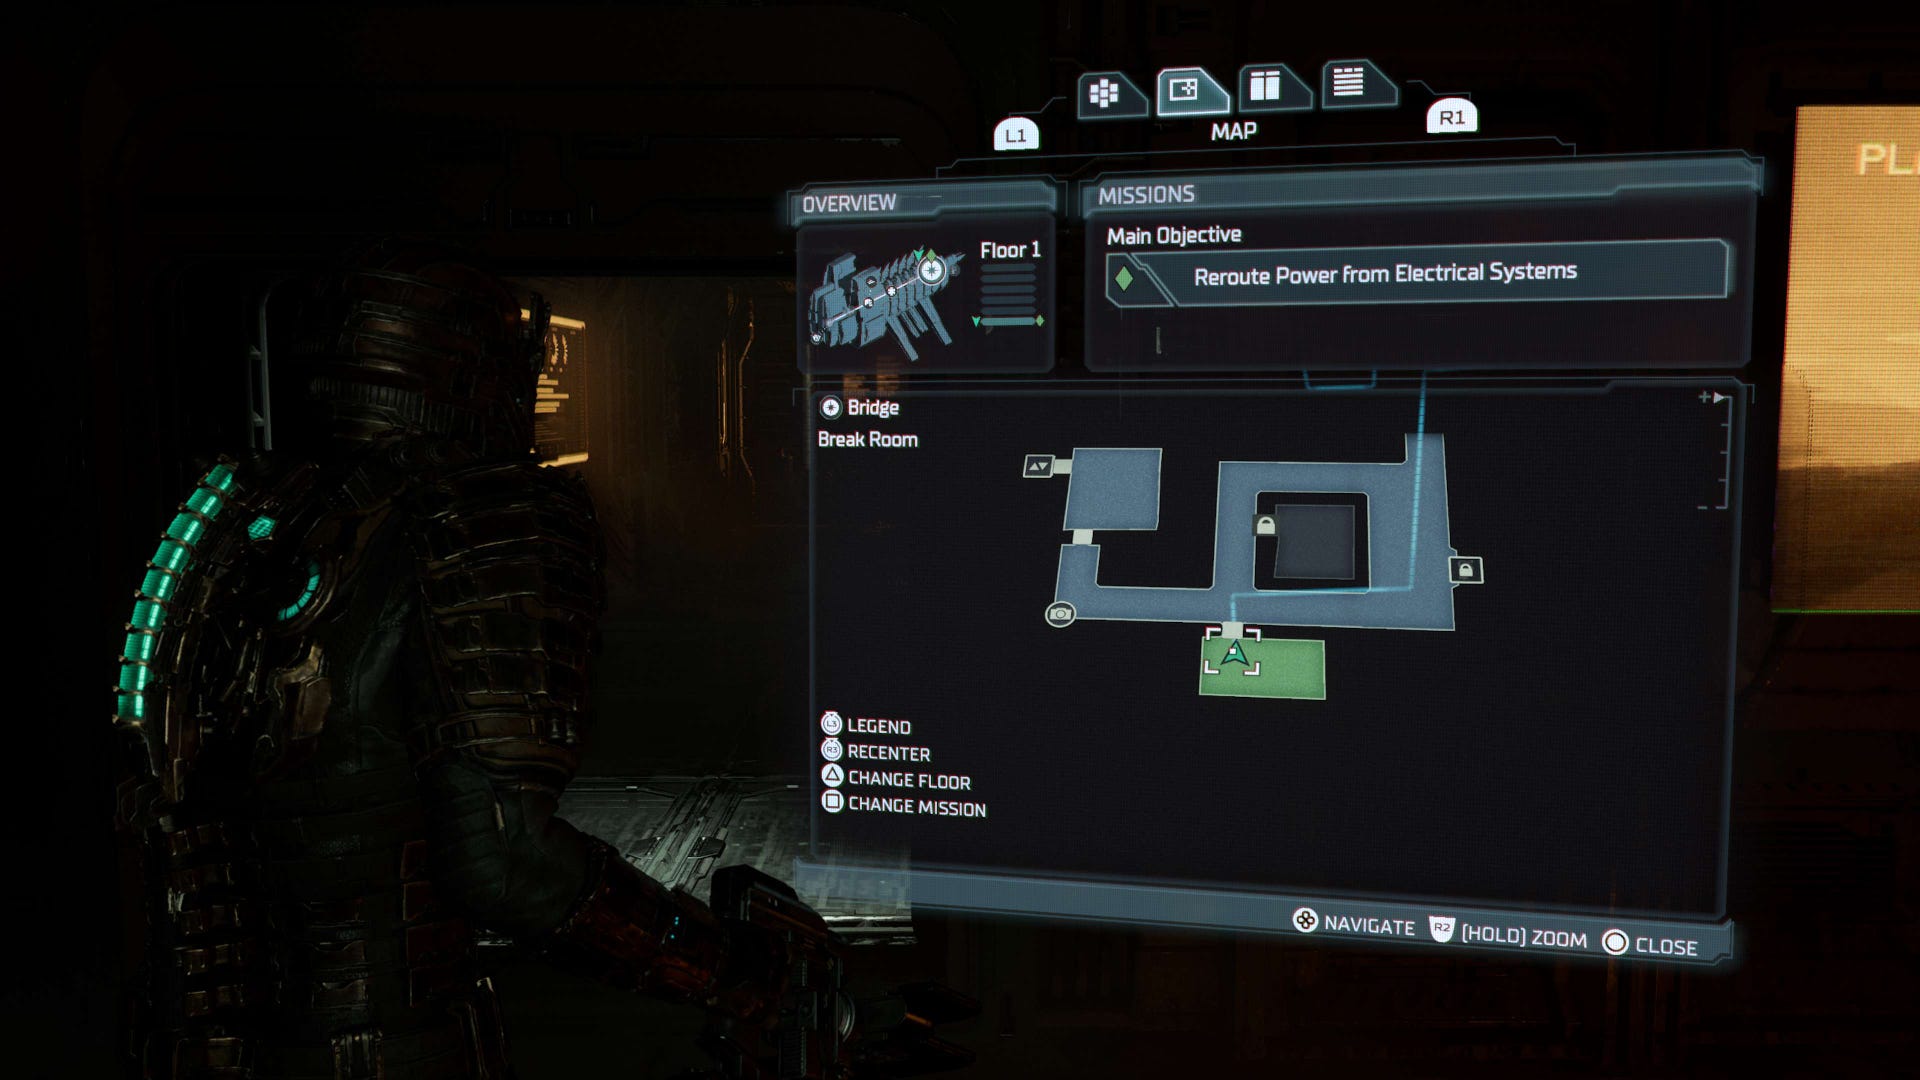
After speaking to Hammond at the Bridge shortly after Chapter 4 begins, you'll need to reactivate the elevators - head over and complete this objective, and then two more will appear, one of which is to 'Reroute power from Electrical Systems'.
Be sure to track this objective and take the elevator to floor 1 for the objective.
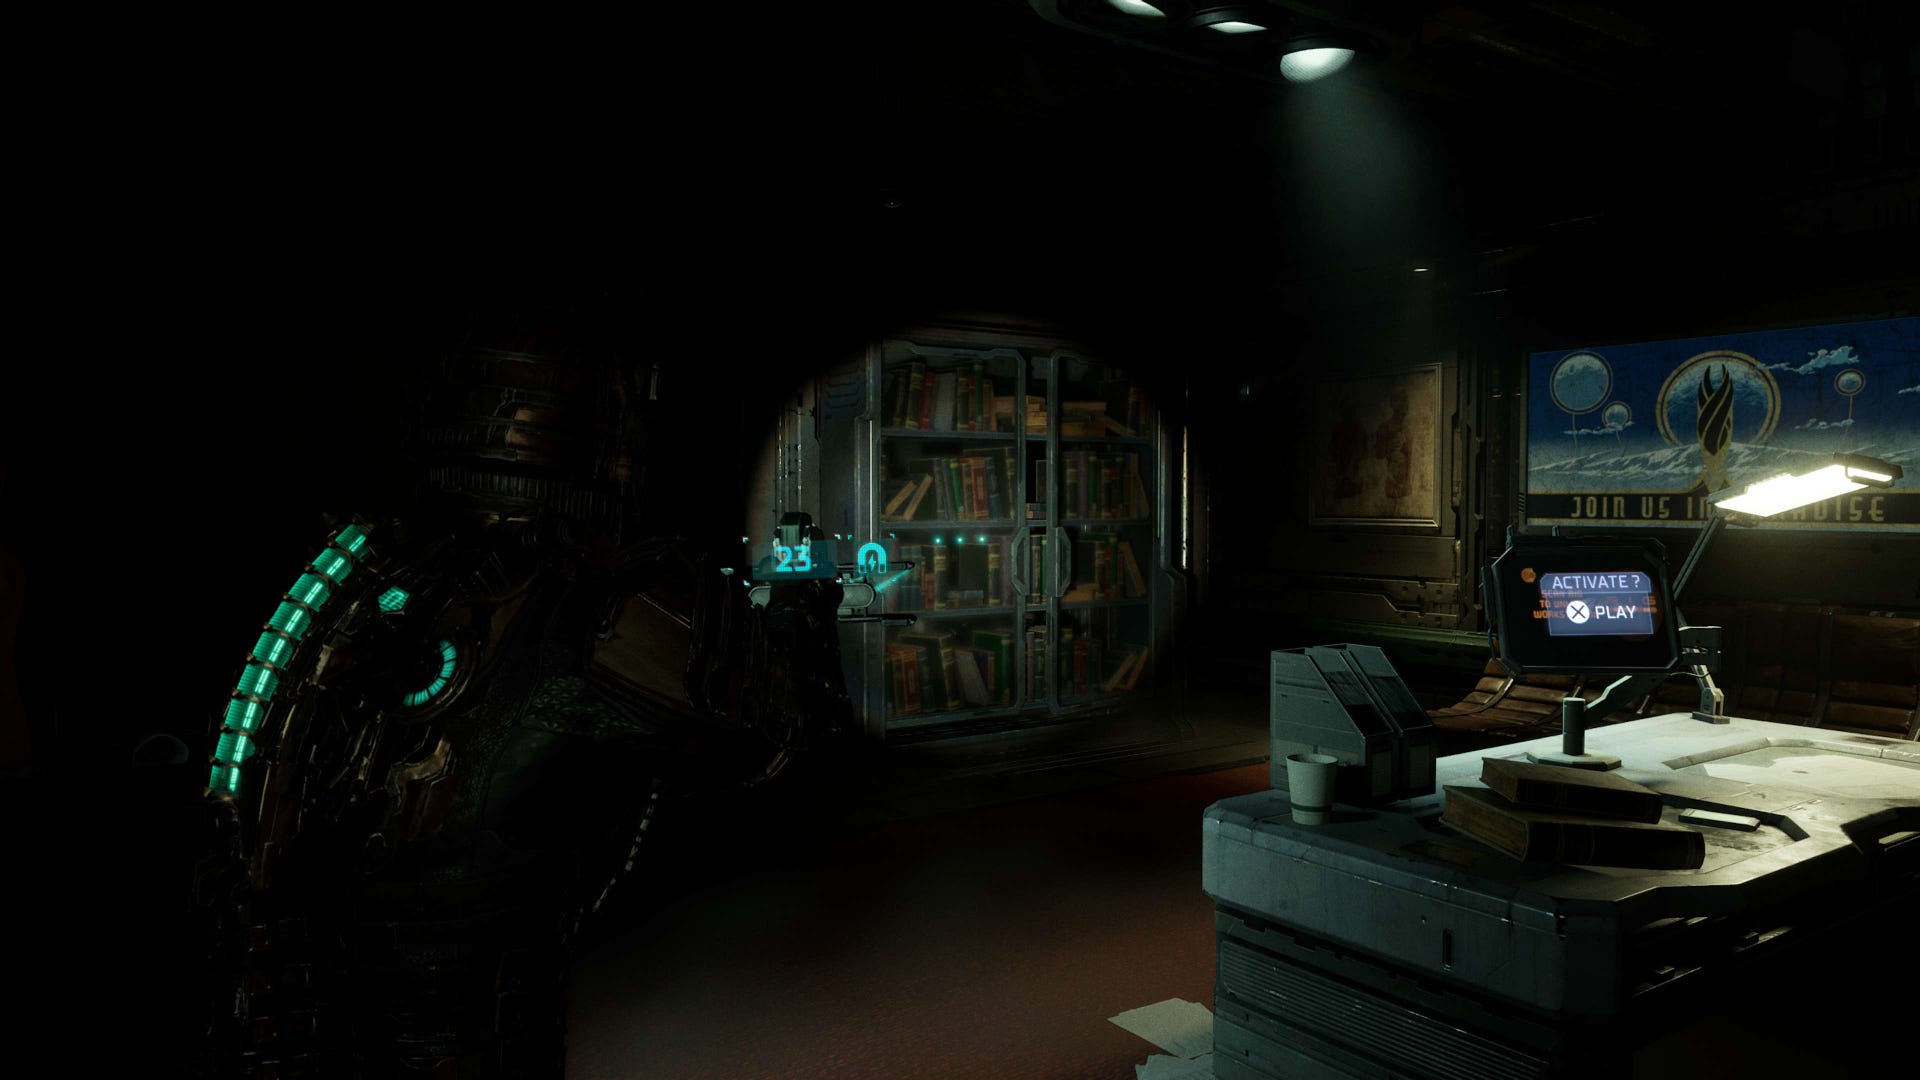
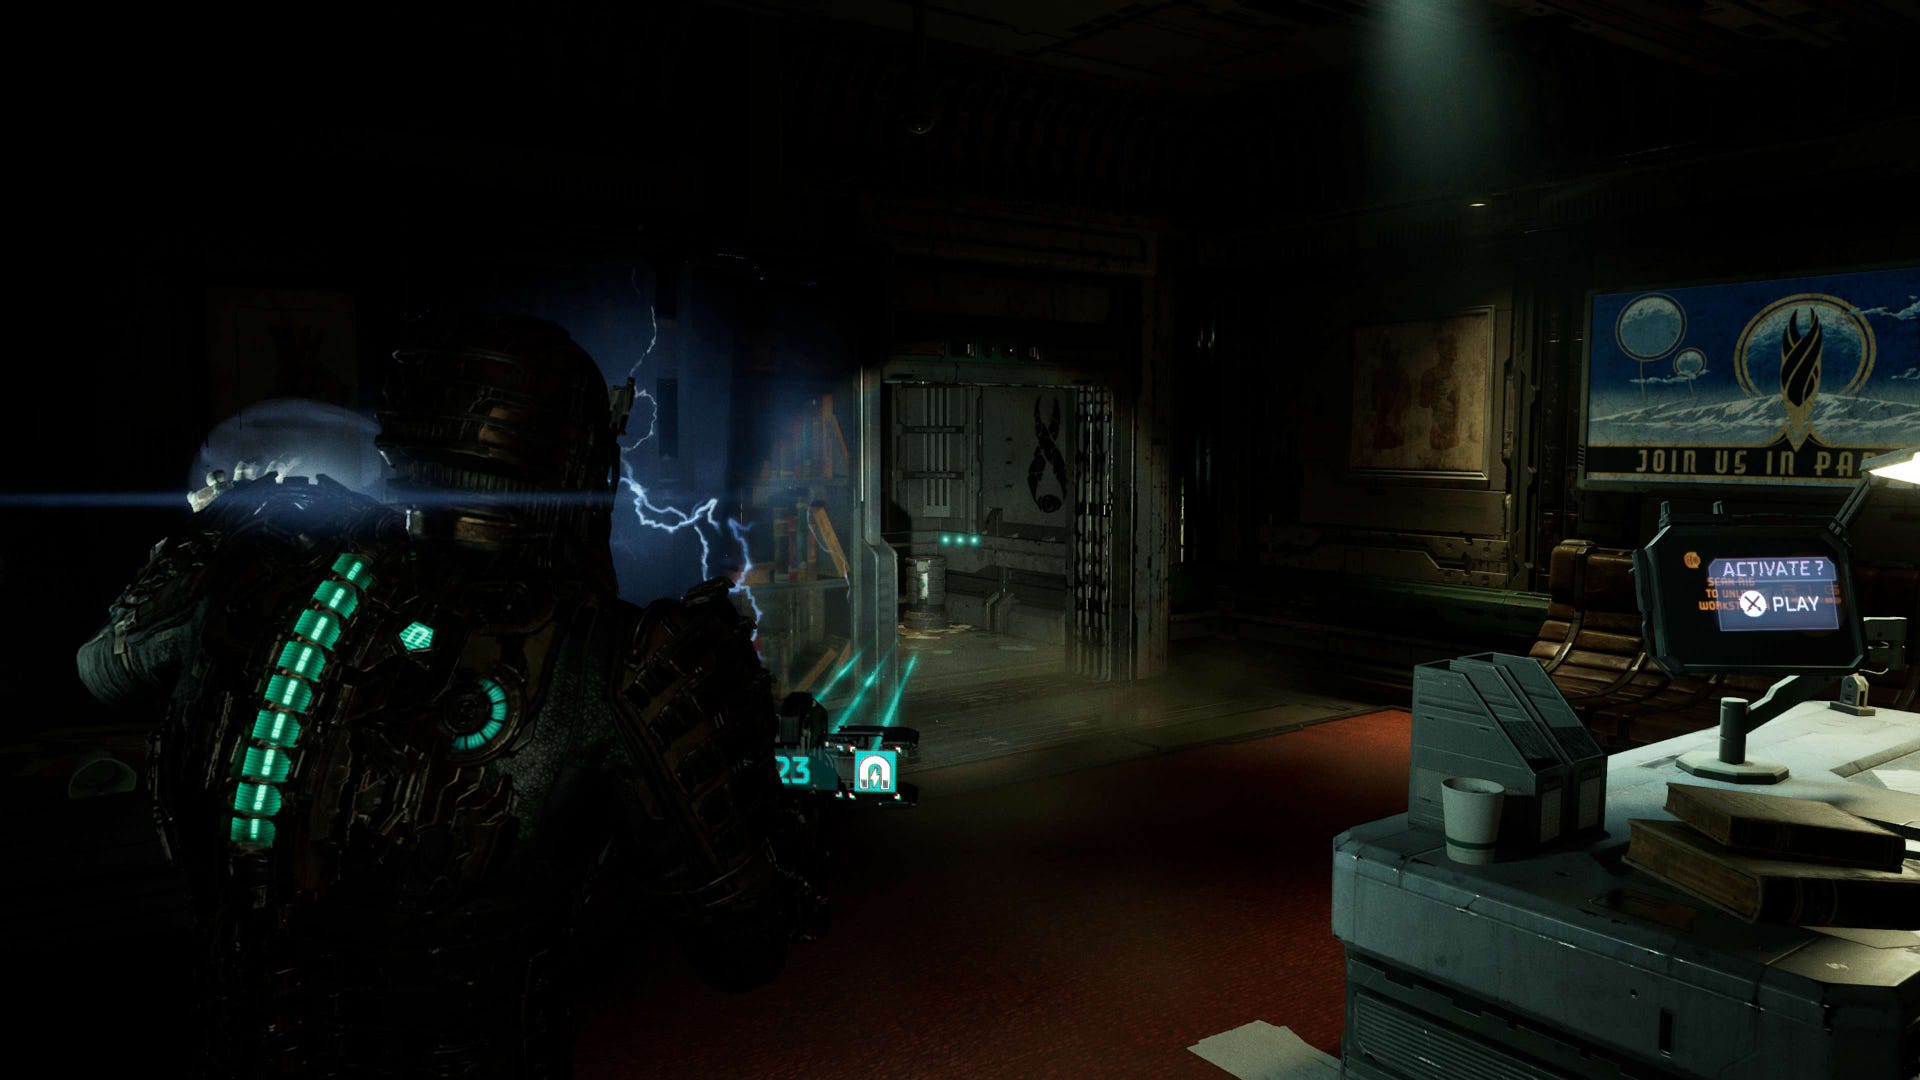
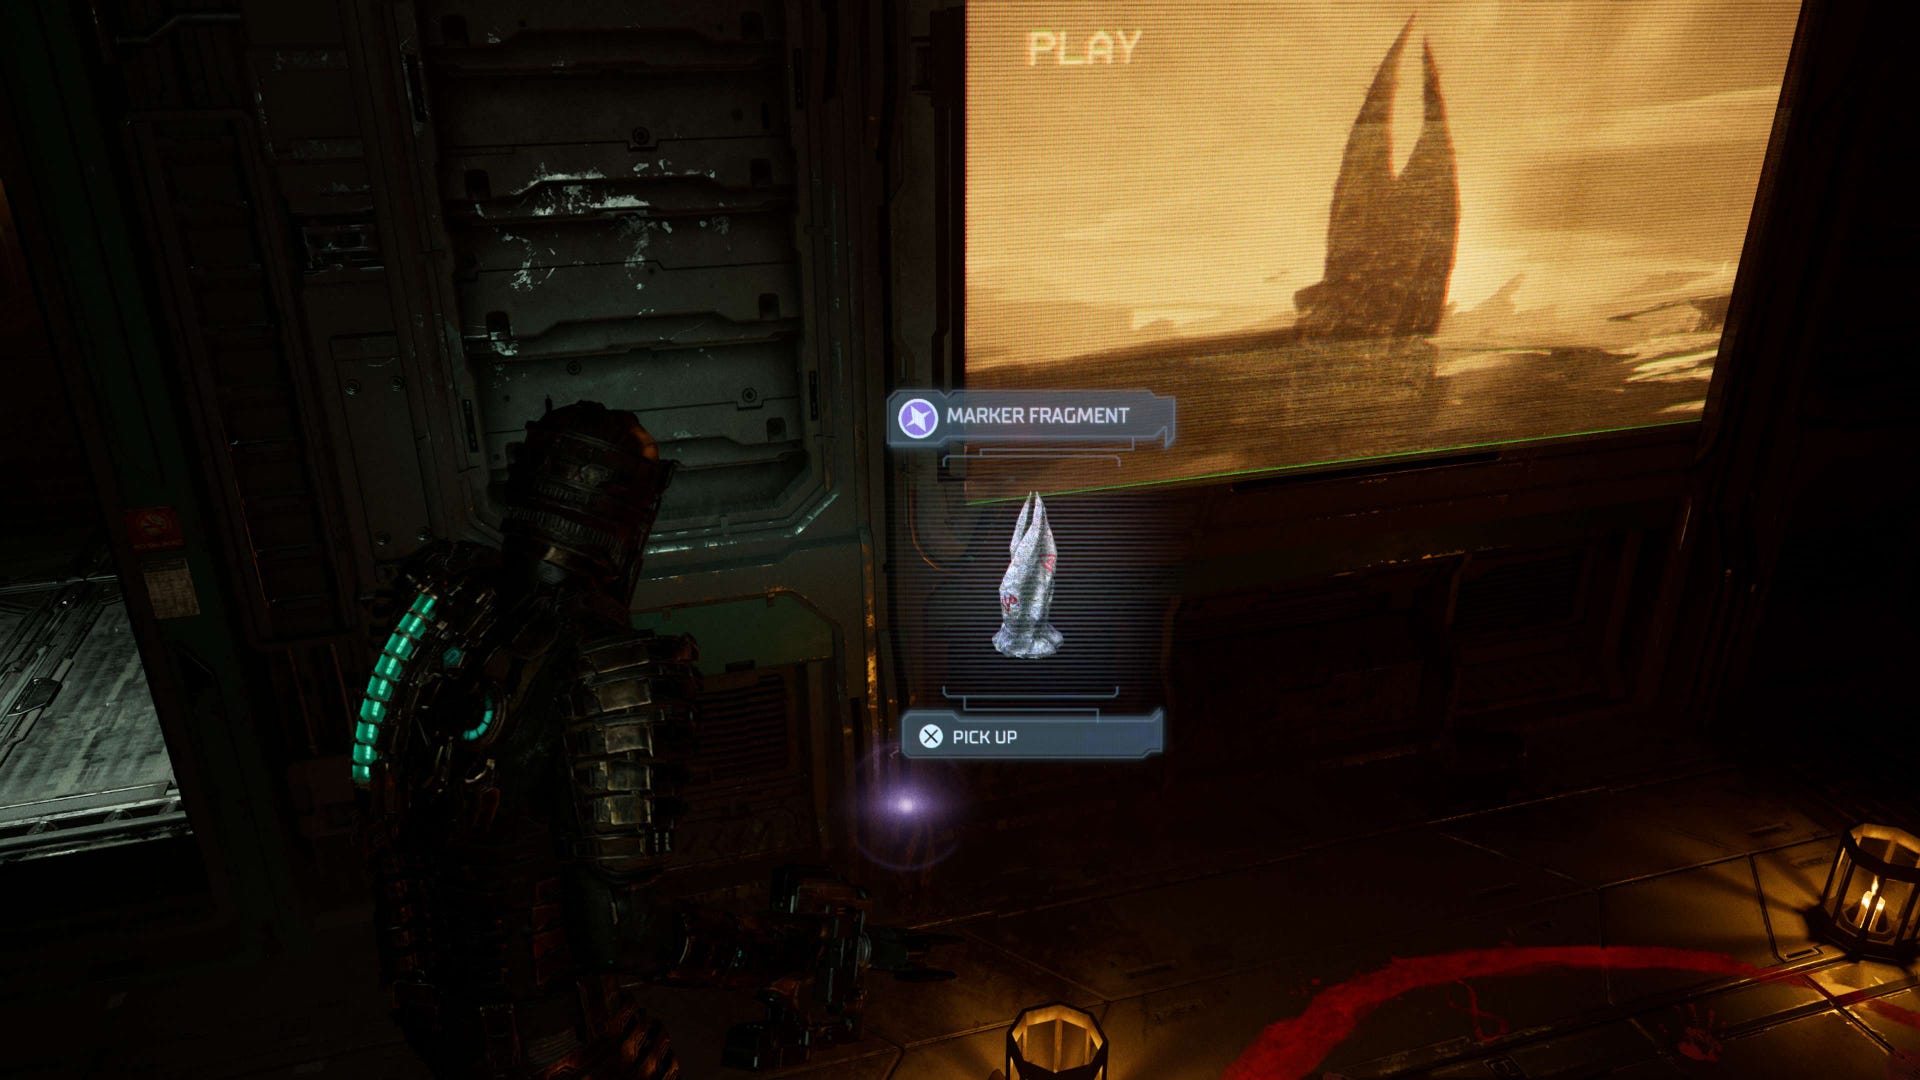
Once there, on the lower end of the map, you should be able to see the Break Room - its name will be visible above the entrance to the room too.
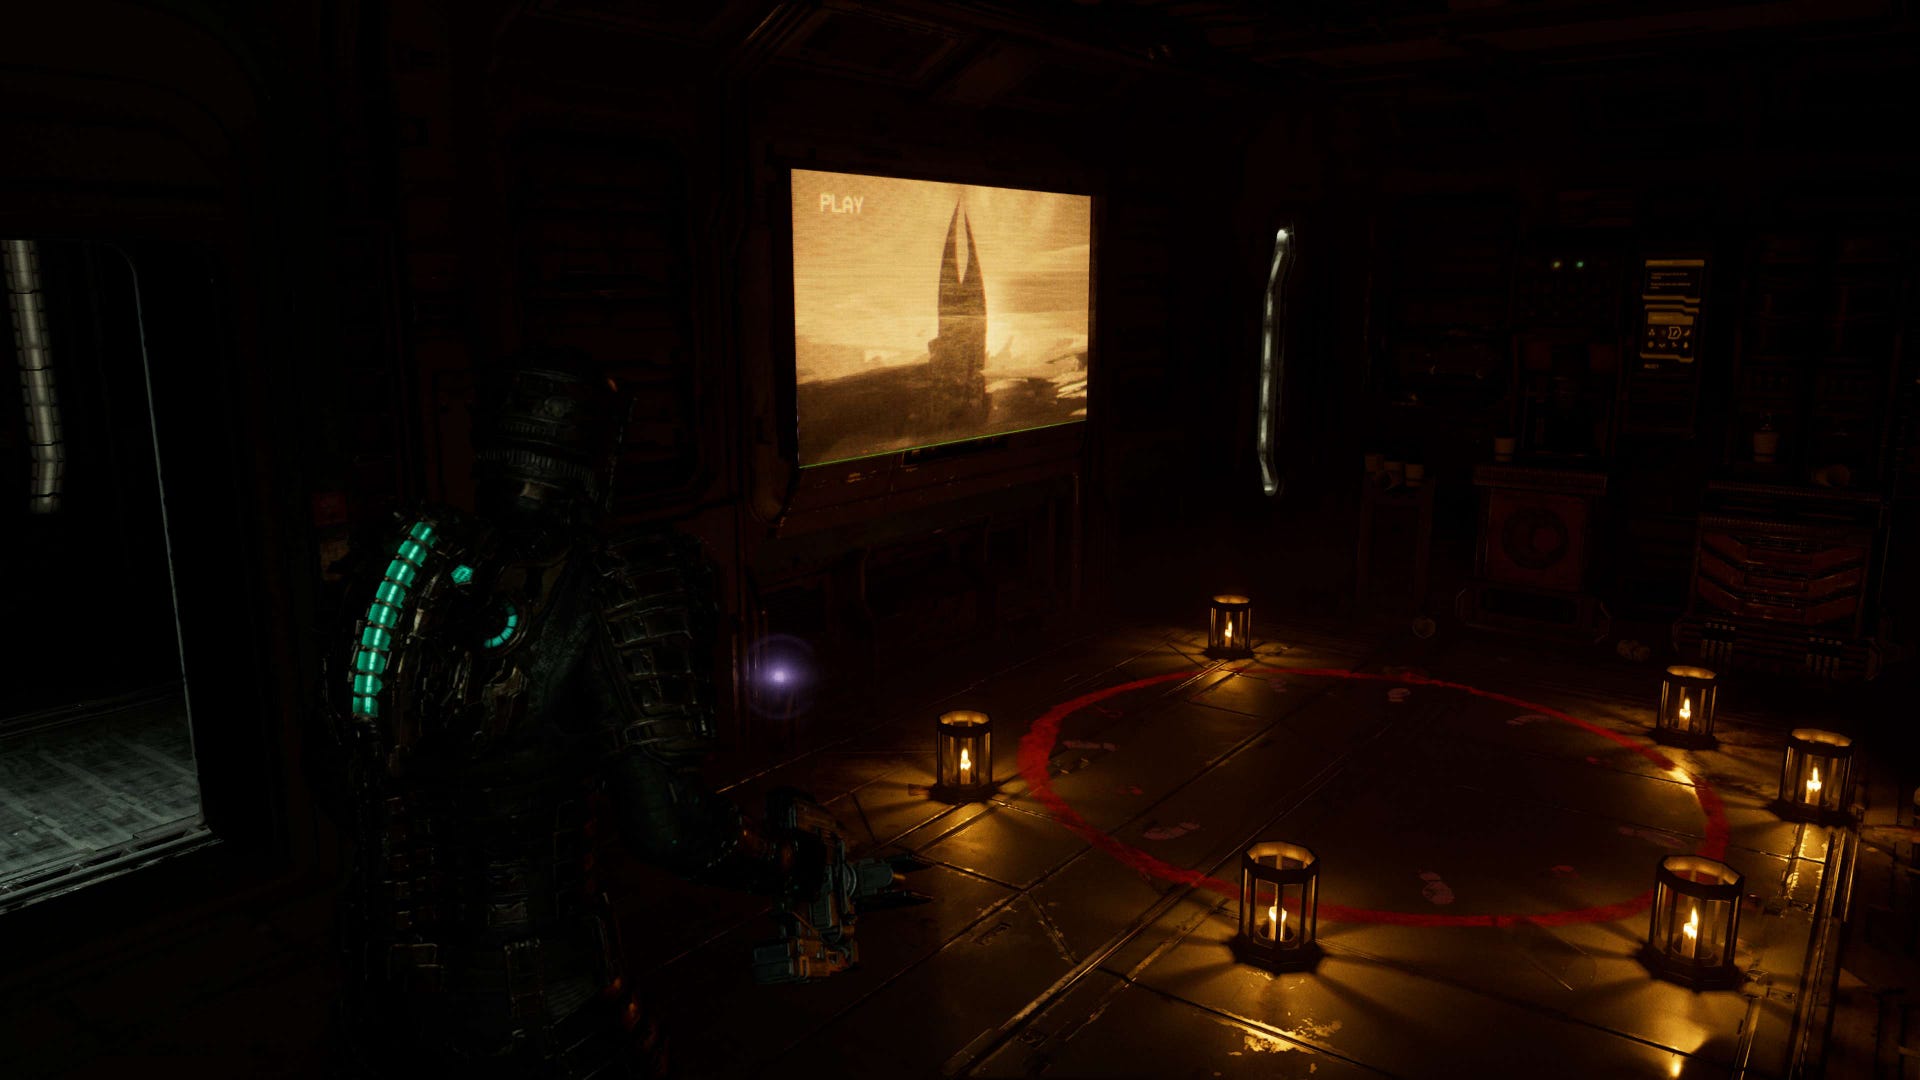
Make your way to that room, and on your left as you enter will be a glowing purple light - your fourth Marker Fragment - next to a TV broadcasting a video of the Marker.
Whilst you're there, you might want to check out some of the bonus secrets that can be activated in the Break Room too.
Chapter 5 Marker Fragment location A in Dead Space
This is the first of two chapters with two Marker Fragments to collect - be sure to find them both before you leave to save backtracking later.
Location: Dr. Mercer's office
The first of the two Fragments can be found after you escape from the regenerating Hunter boss following your initial face-to-face contact with Mercer.
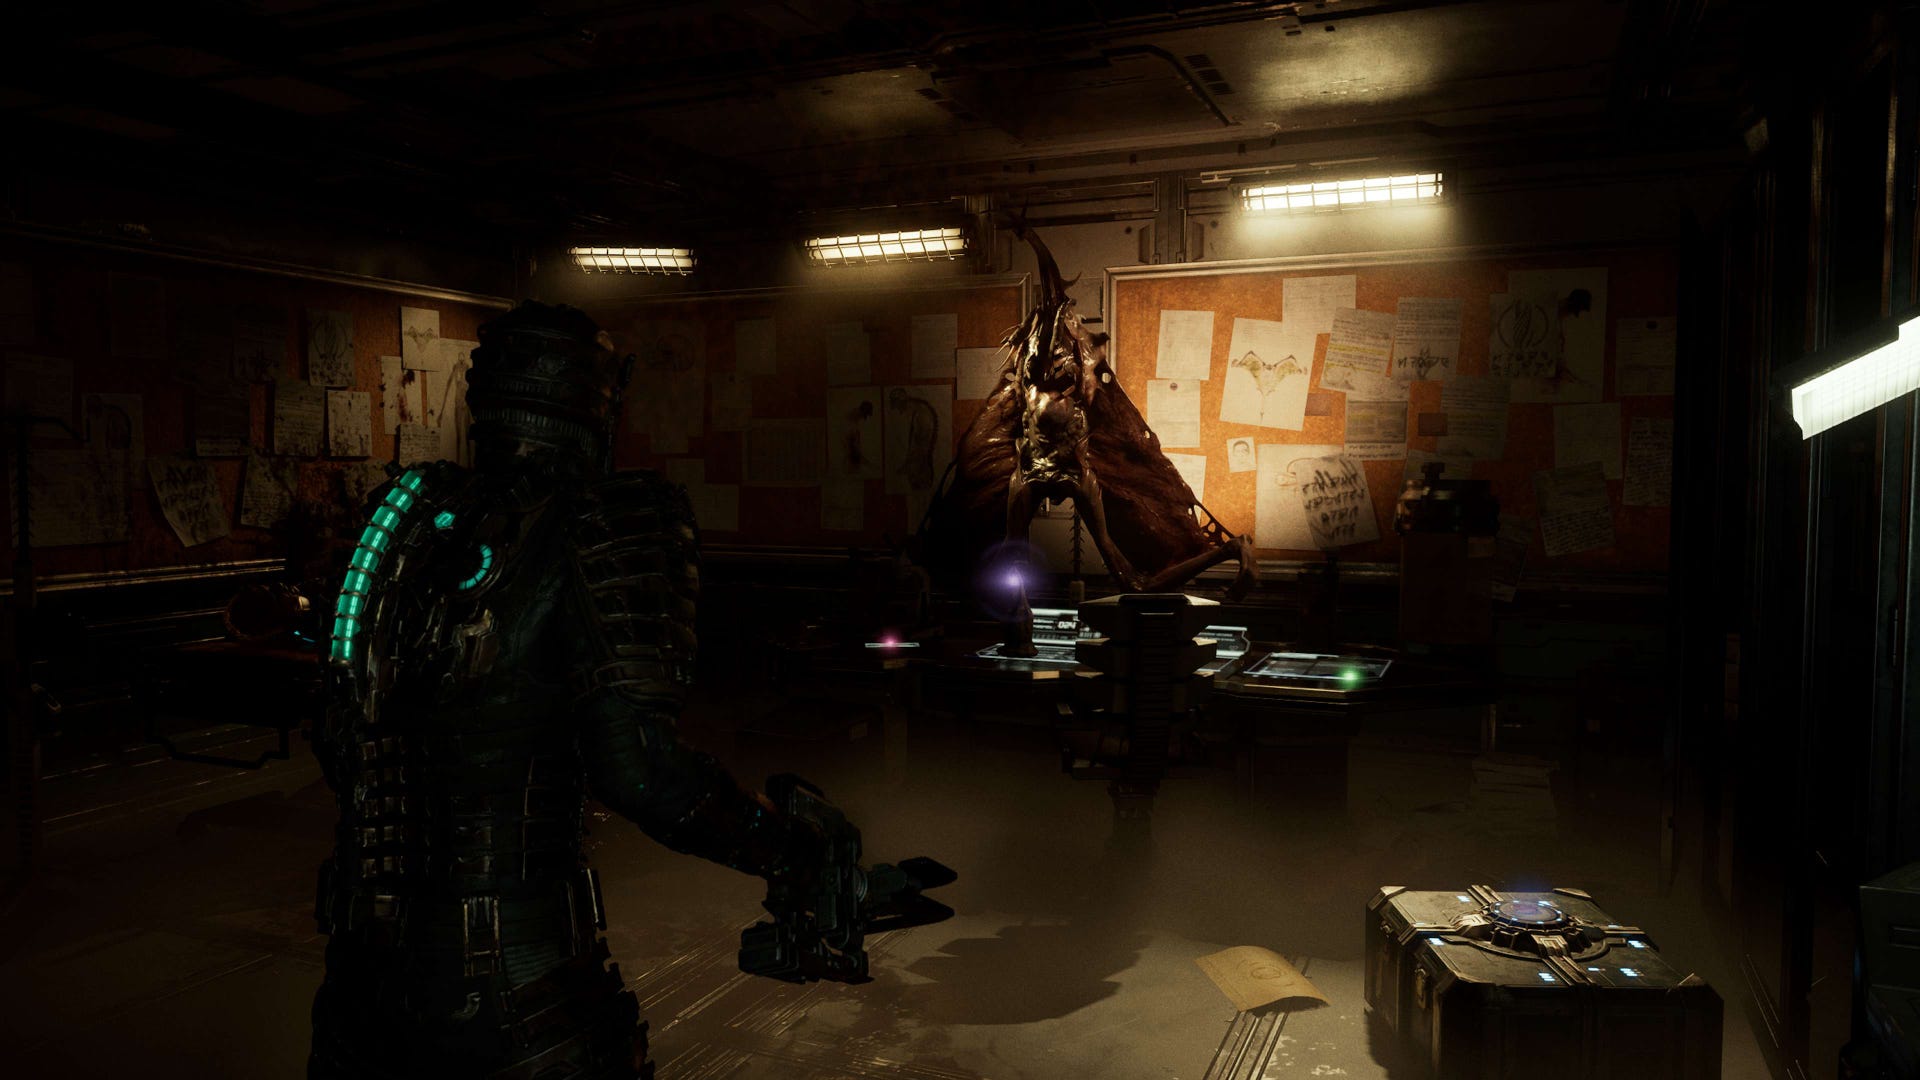
After your escape, you'll have to make your way to an office labelled 'Dr. C. Mercer - 250', a room you'll naturally enter via the Intensive Care Unit as part of the main story path.
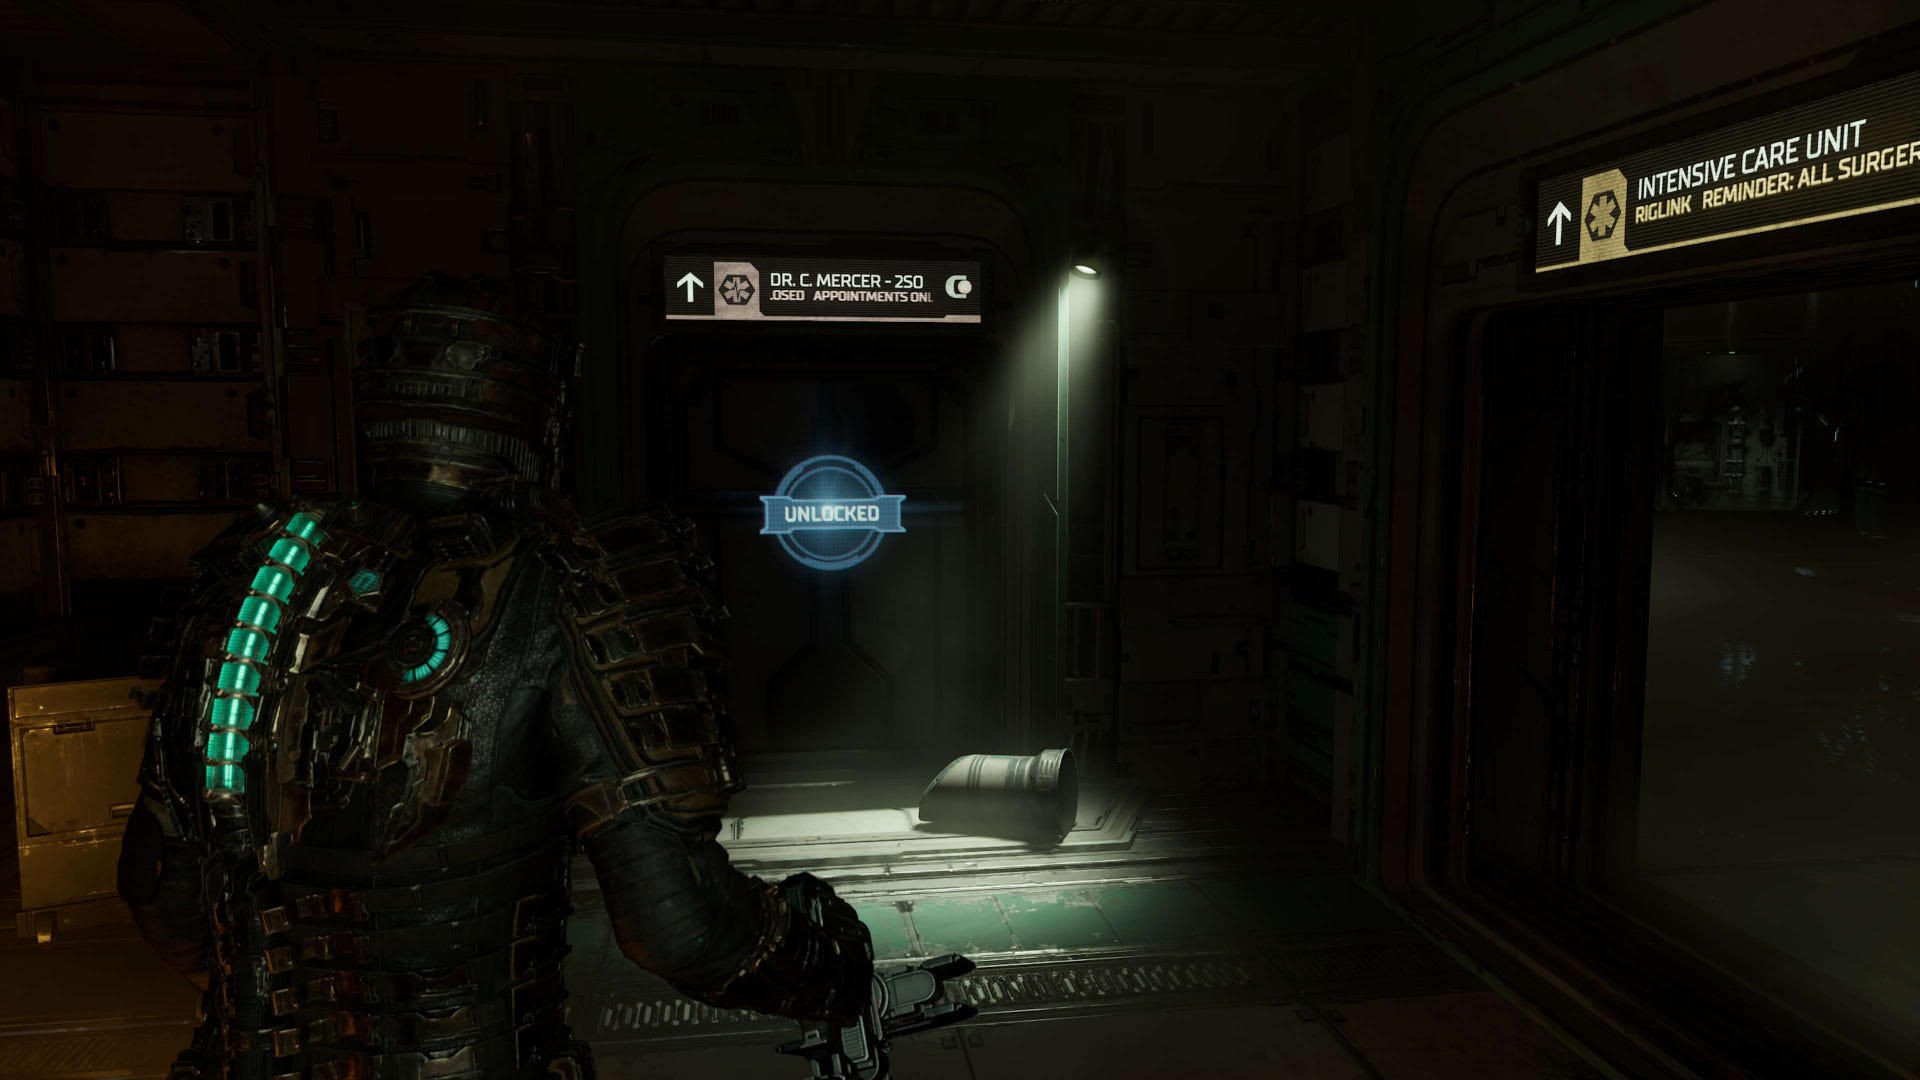
Once you enter the office, you'll notice what appears to be a winged Necromorph held up above a desk, and beneath it a glowing purple light - this is your fifth Marker Fragment.
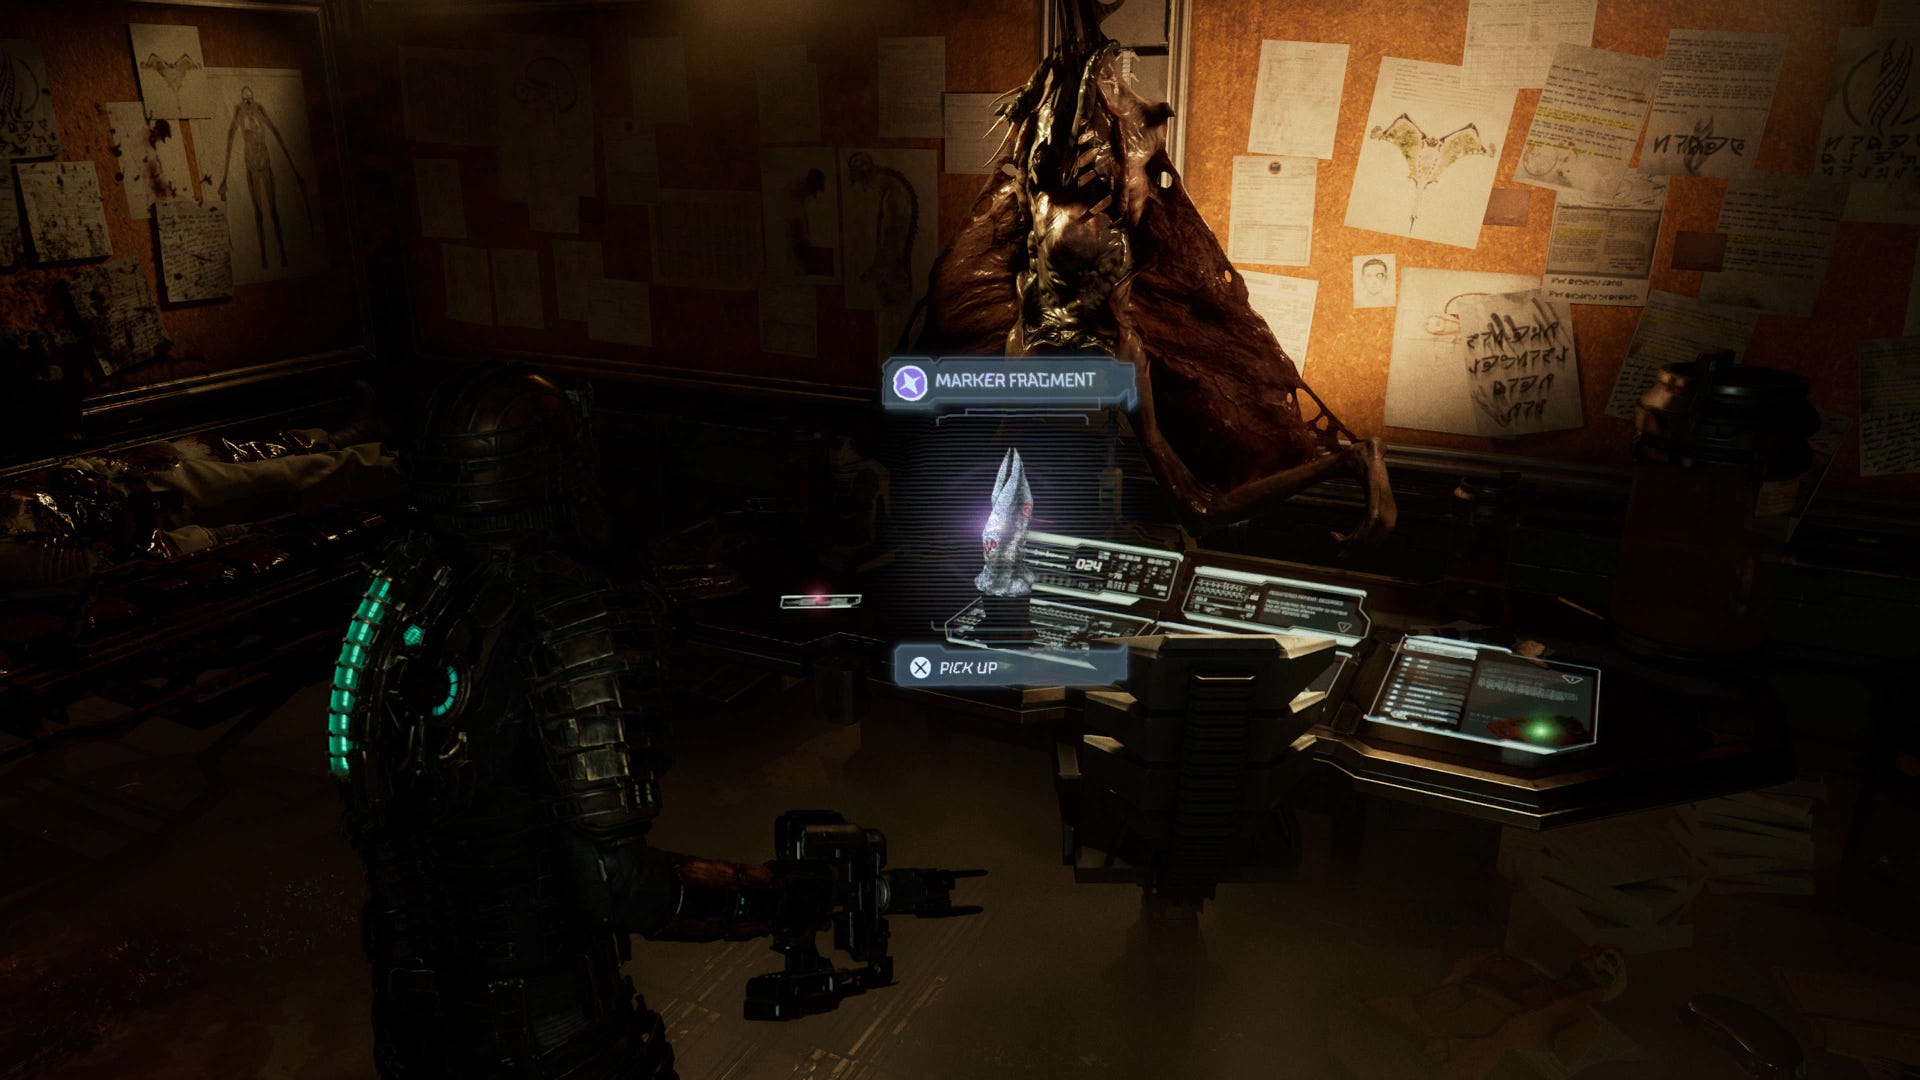
Pick it up, and continue with Chapter 5 until you reach the Cryogenics room where you'll find the next Marker Fragment.
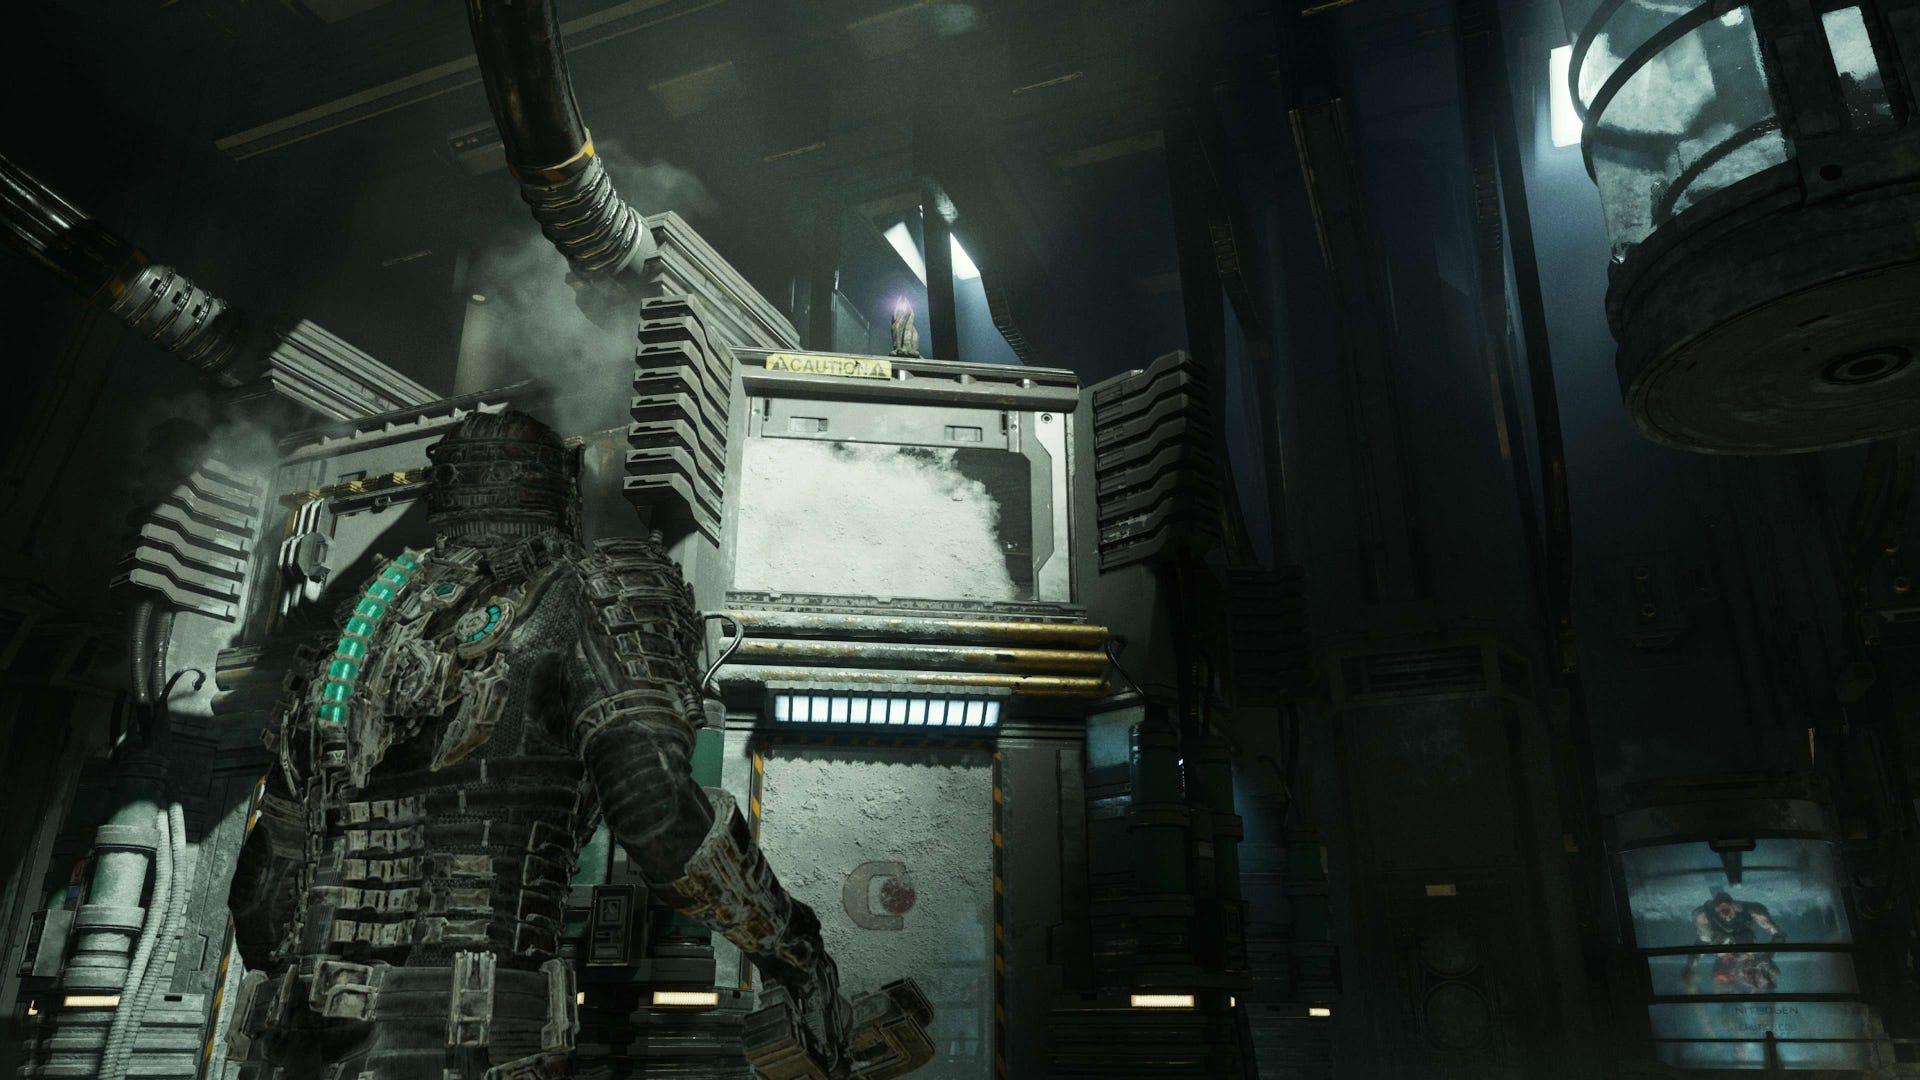
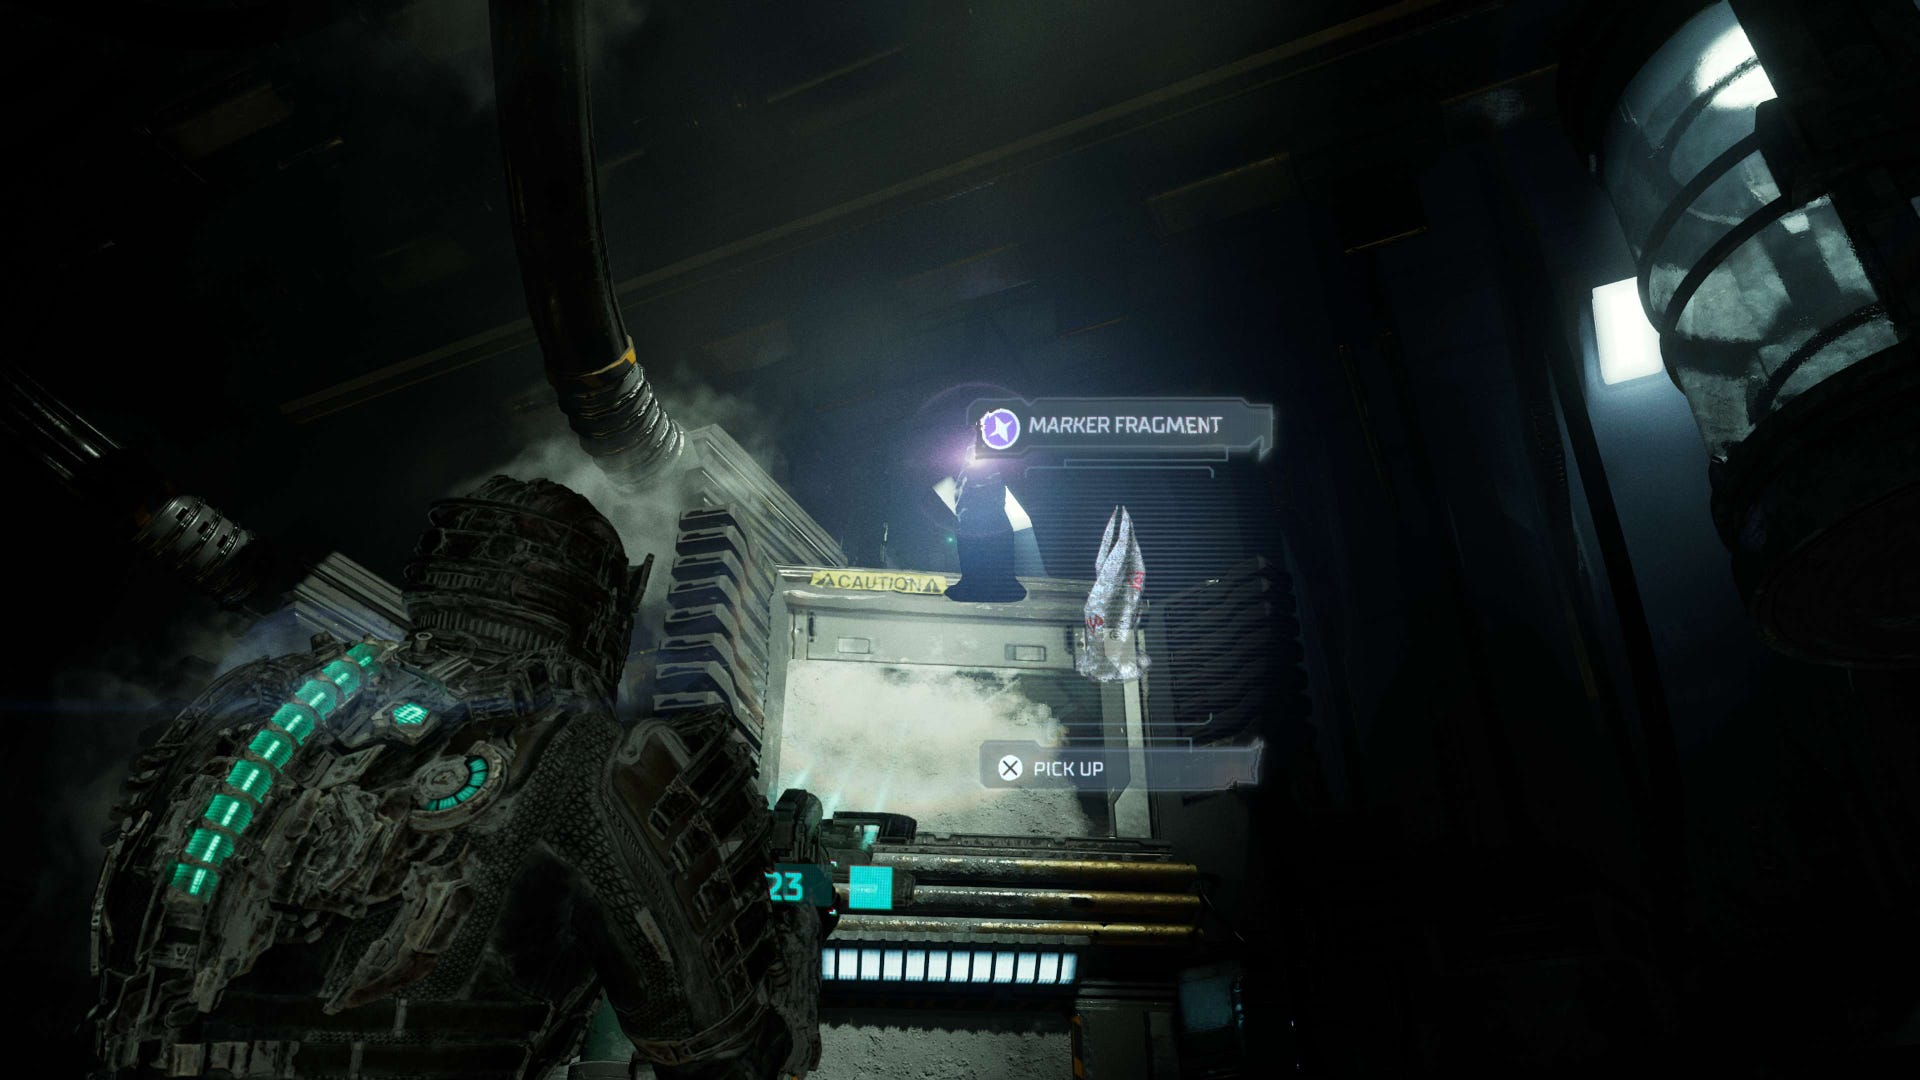
Chapter 5 Marker Fragment location B in Dead Space
Location: Cryogenics
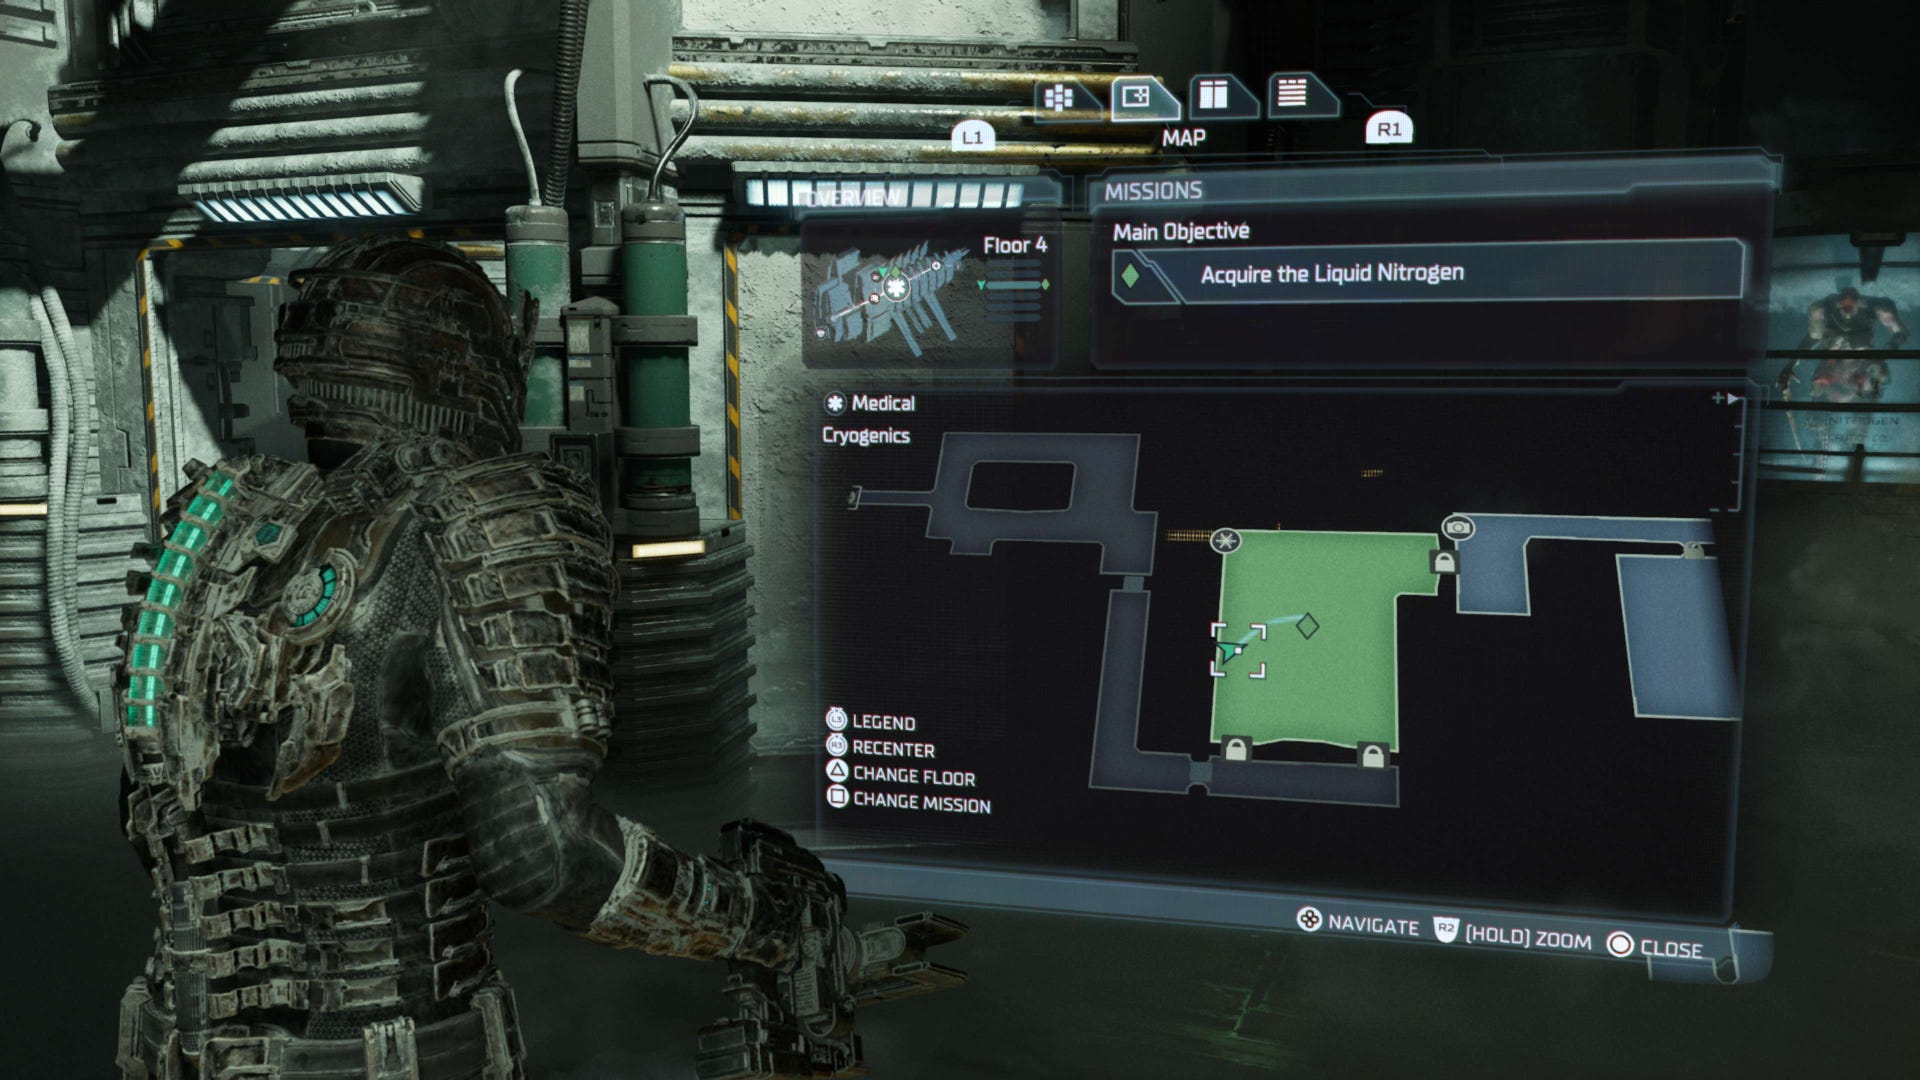
Once in the Cryogenics room - following the objective 'Acquire the Liquid Nitrogen' - you'll notice the canister inside of the central chamber.
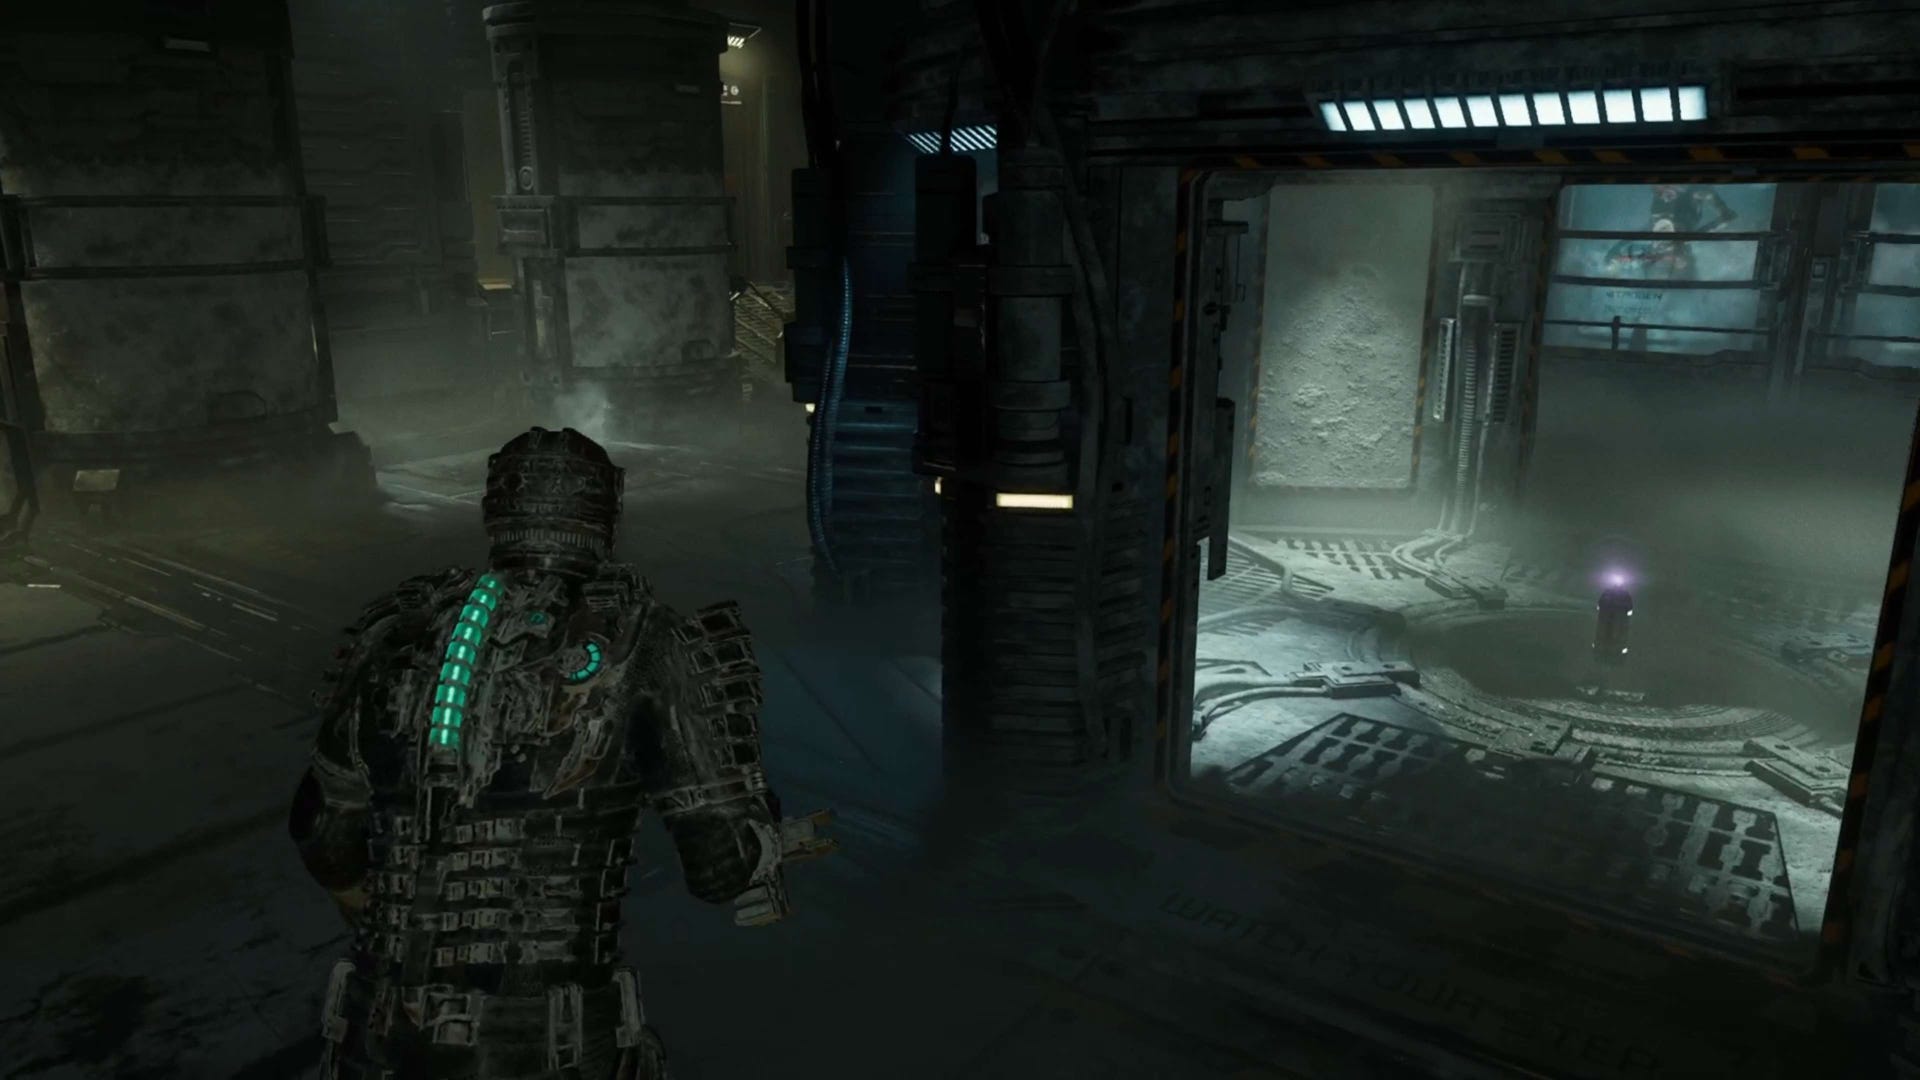
Before picking up the Liquid Nitrogen canister - though it doesn't matter either way since you can just grab this collectible after the upcoming encounter - look on top of the central chamber in which it is housed.
You should see on the top of the chamber - on the corner opposite where you entered the room - sits your sixth Marker Fragment.
Using Kinesis, pull the collectible towards you and pick it up, then continue on as normal until you reach Chapter 6.
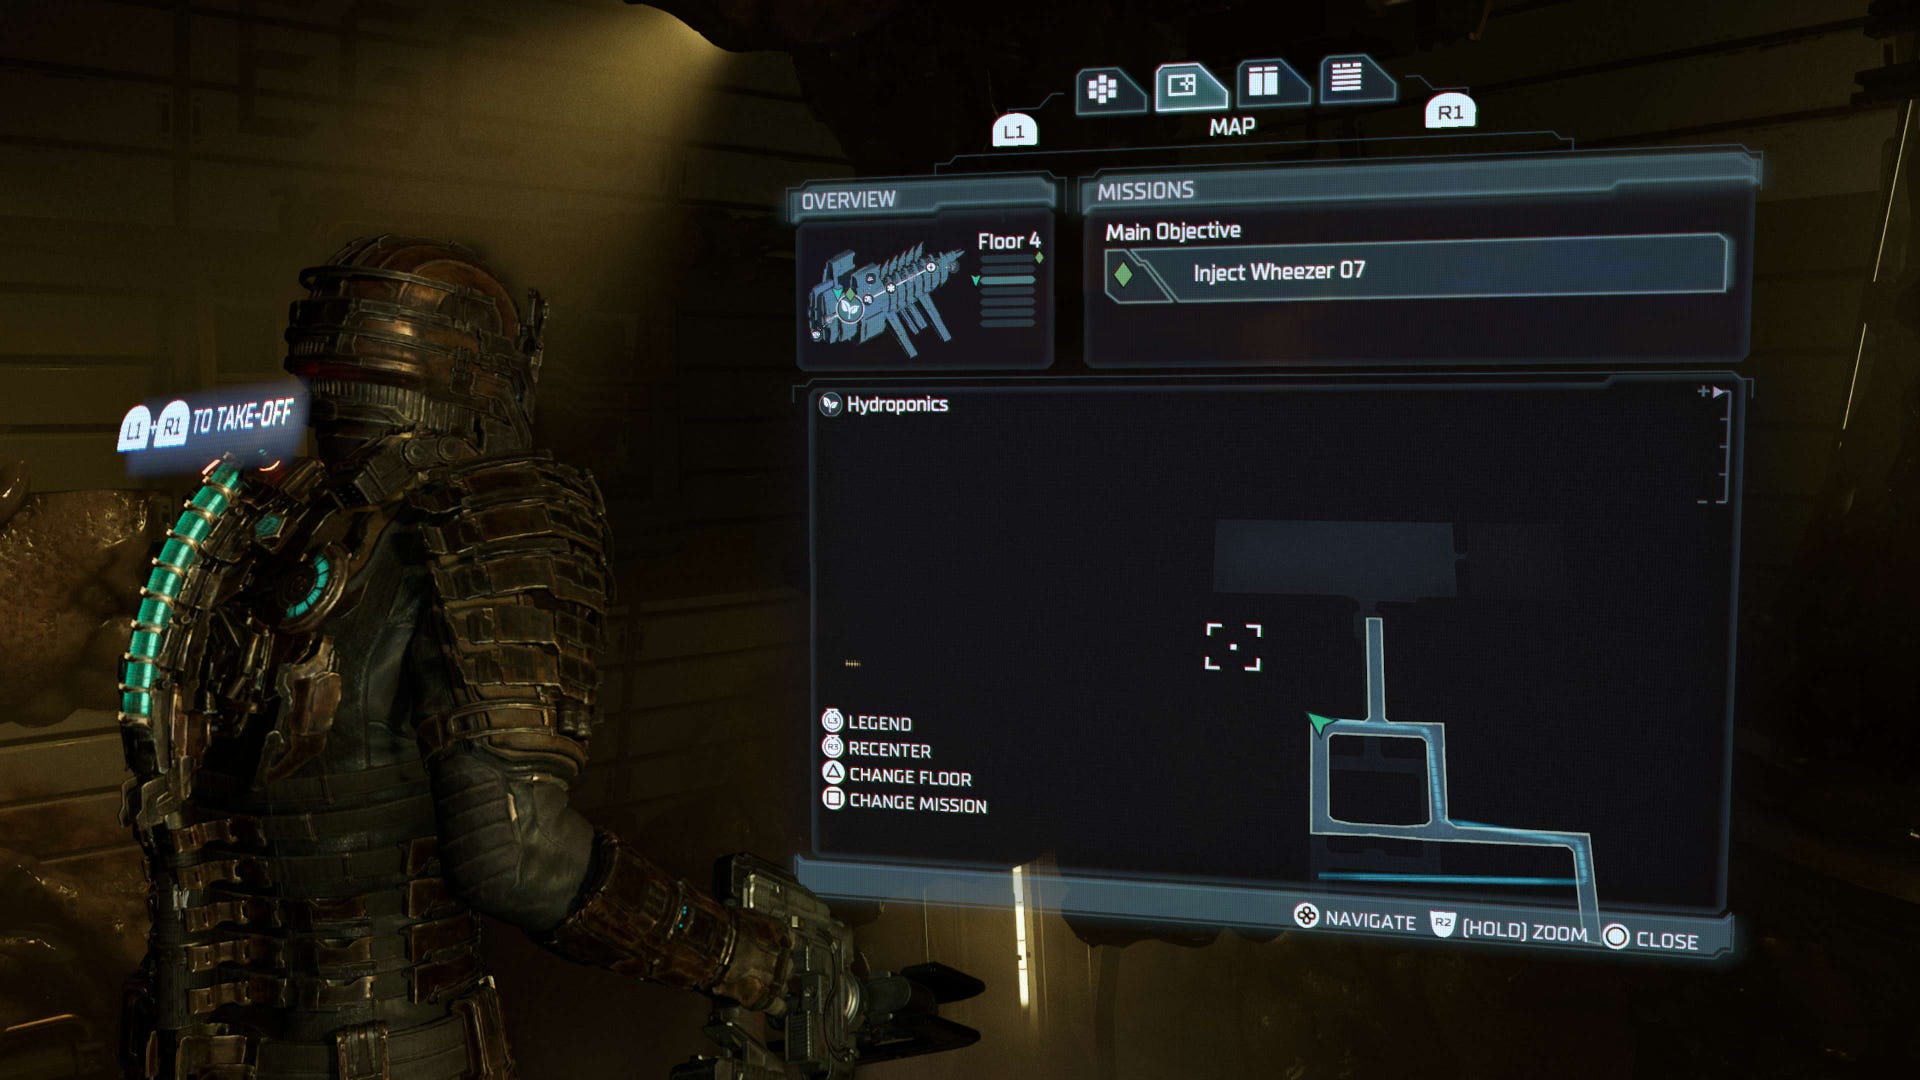
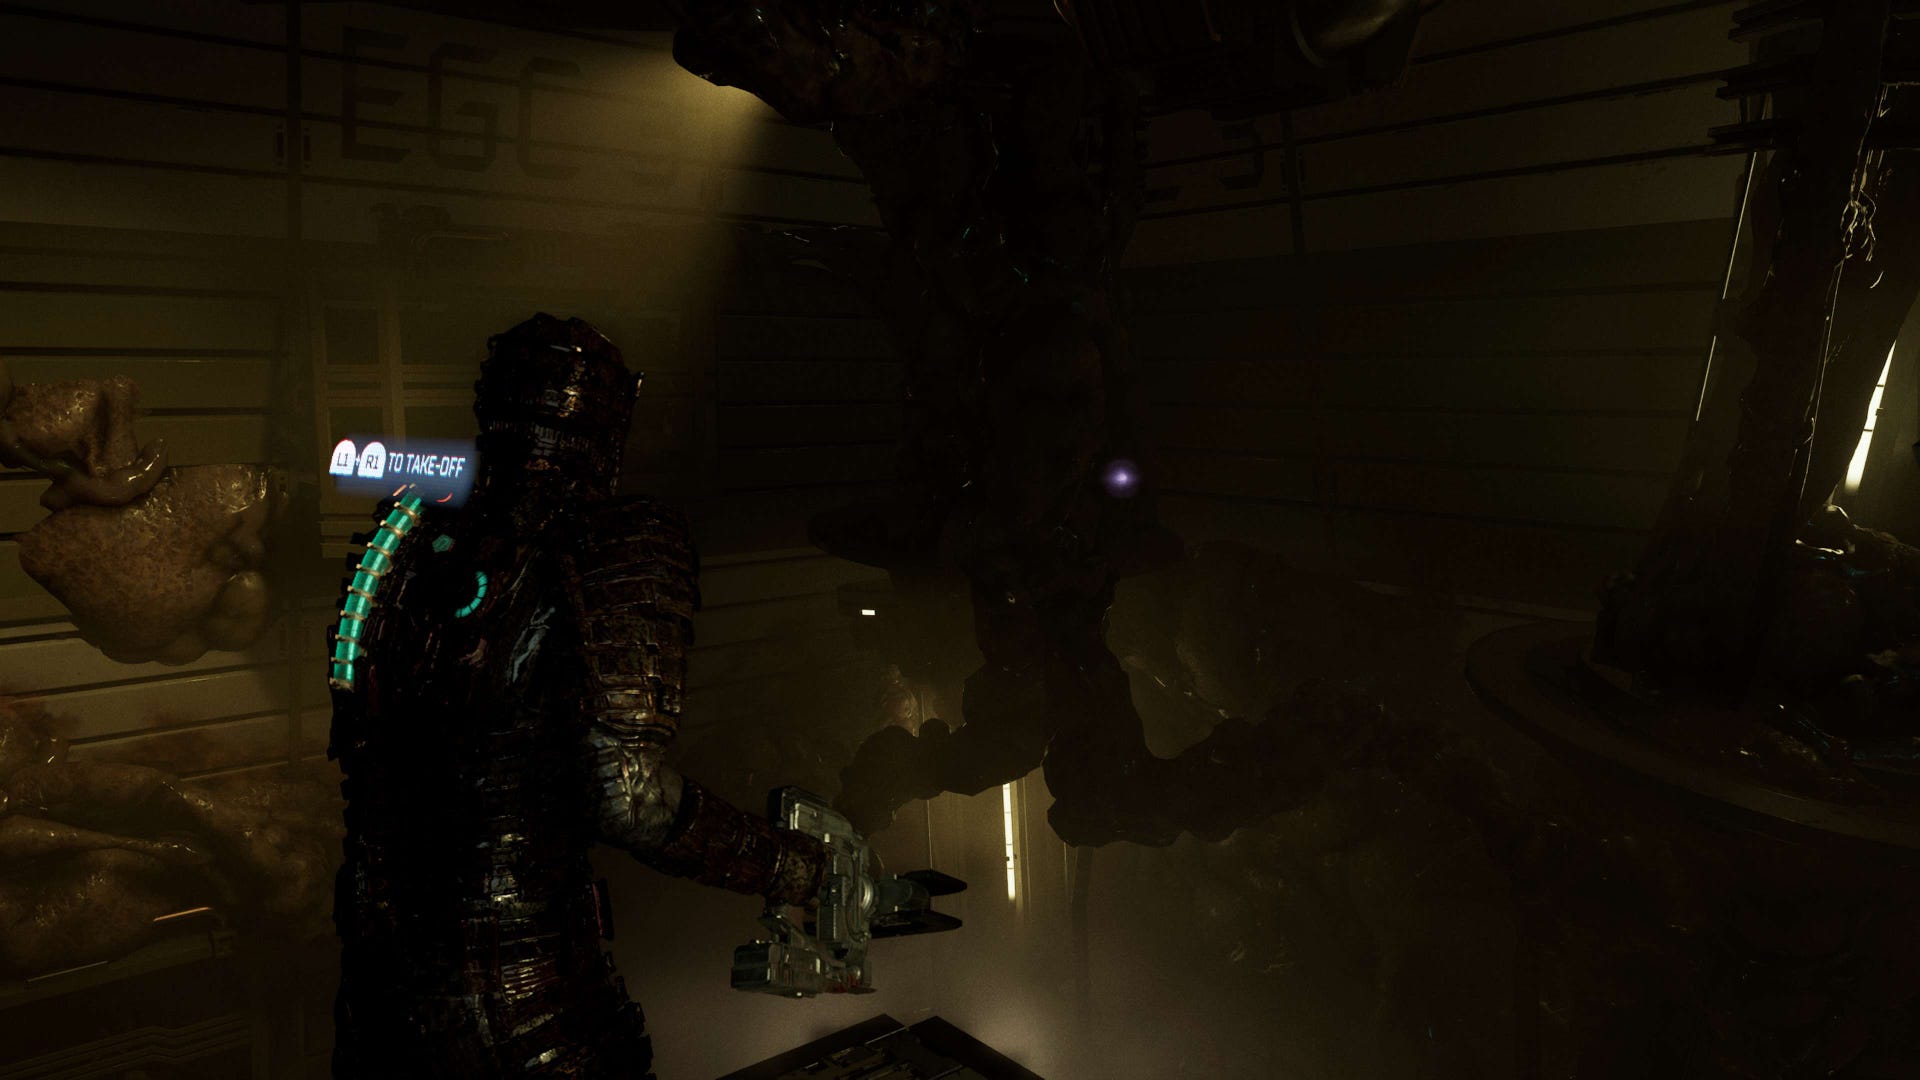
Chapter 6 Marker Fragment location in Dead Space
Location: Hydroponics - East Grow Chamber
Chapter 6's Marker Fragment is a little further in, requiring multiple objectives to be completed before being able to access it.
You'll want to inject Wheezers 1-5, and then progress with locating Wheezer 6 - follow your objective markers if you're unsure on where to.
Once you've reached the circuit breaker, you'll need to turn off the gravity by using a keycard found within a room opposite the circuit breaker, and a power cell found in the corner opposite to that of the room containing the keycard.

Once the circuit breaker has been powered and gravity is turned off, then ascend upwards to the location of Wheezer 6 - you should be at the highest floor in the East Grow Chamber, where there'll be a square platform surrounding an elevator at the centre of the room.
Whether before or after completing that objective, you'll want to head to the corner directly opposite the one where Wheezer 6 is found - floating nearby the large Necromorph growths in the opposing corner is your seventh Marker Fragment.
You can also pick up Holt's Rig near this location needed to get Master Override.

Chapter 7 Marker Fragment location in Dead Space
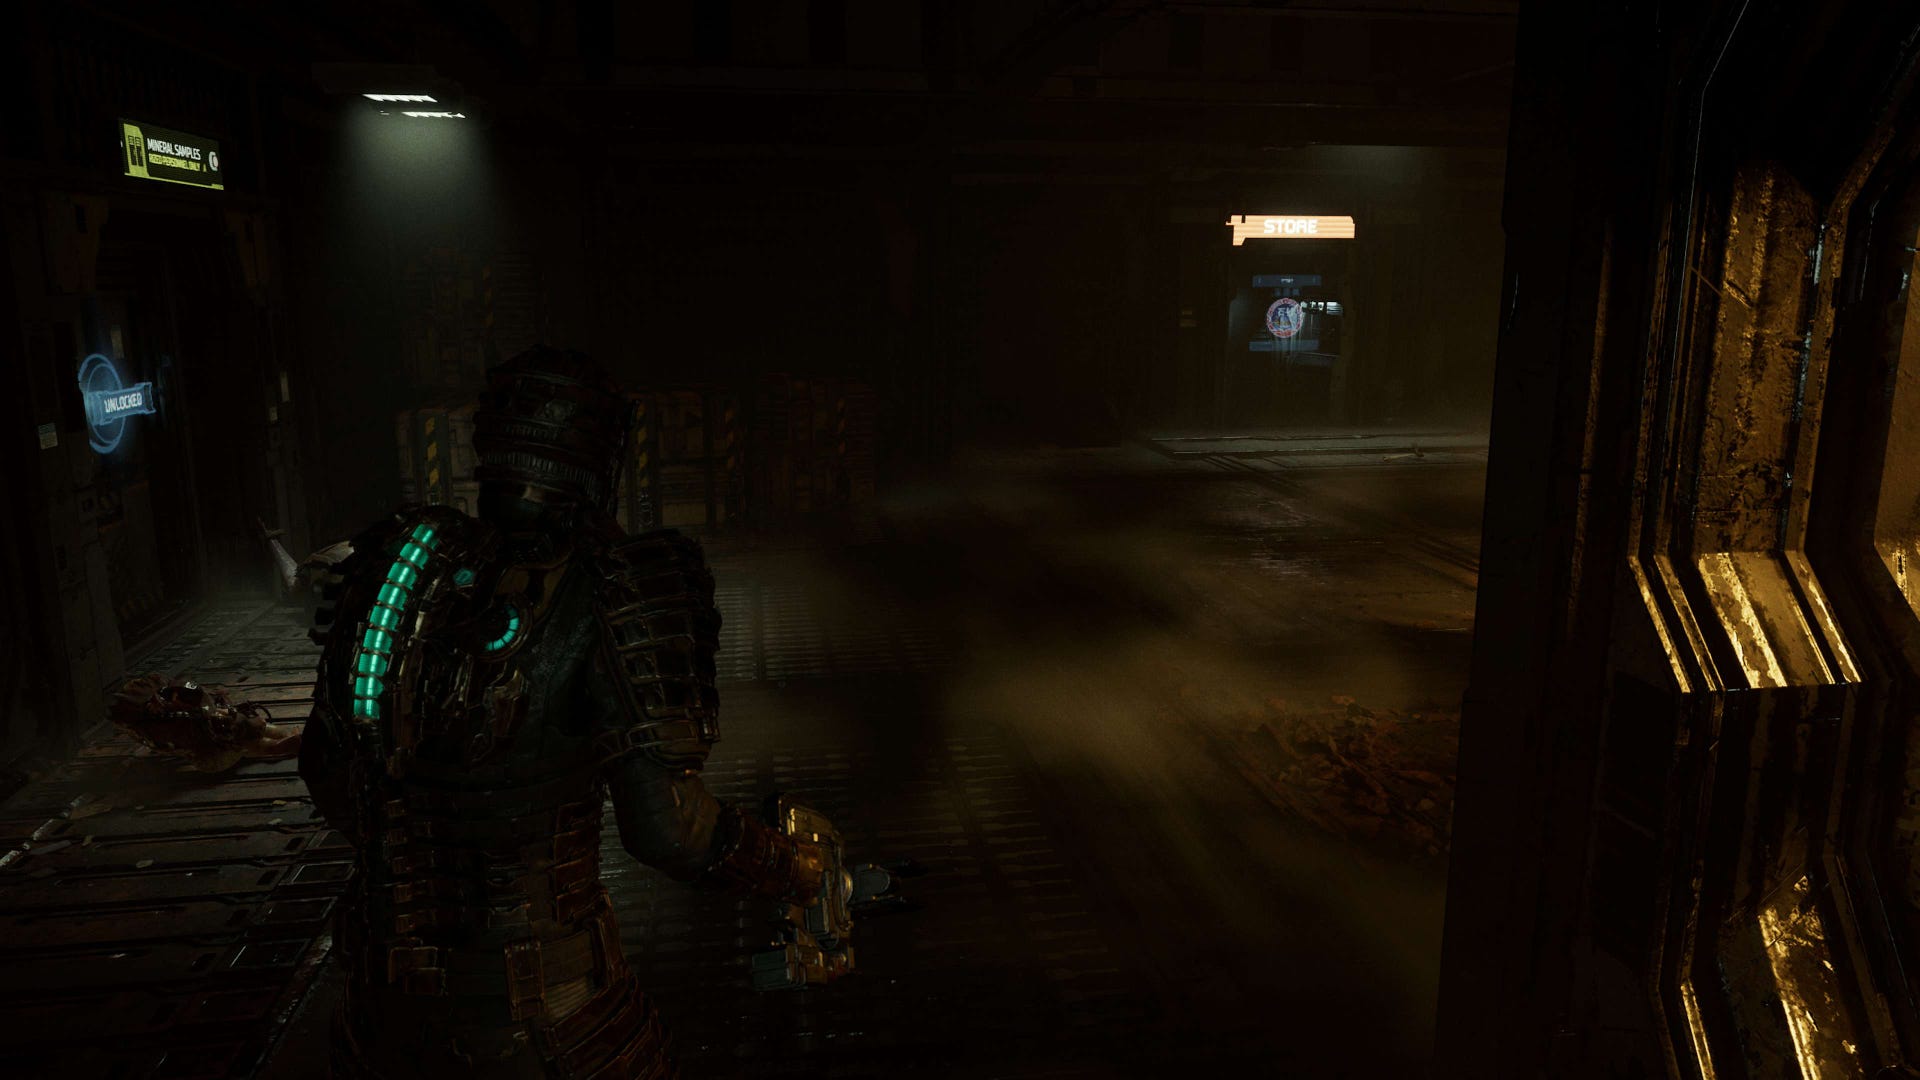
Location: Mining Deck - Mineral Samples
For your eighth Marker Fragment, you'll have to continue on with the story until you reach Chapter 7 and complete the objective 'Find the Admin RIG', which will then allow you to access the Mineral Samples room where the collecitble is found.
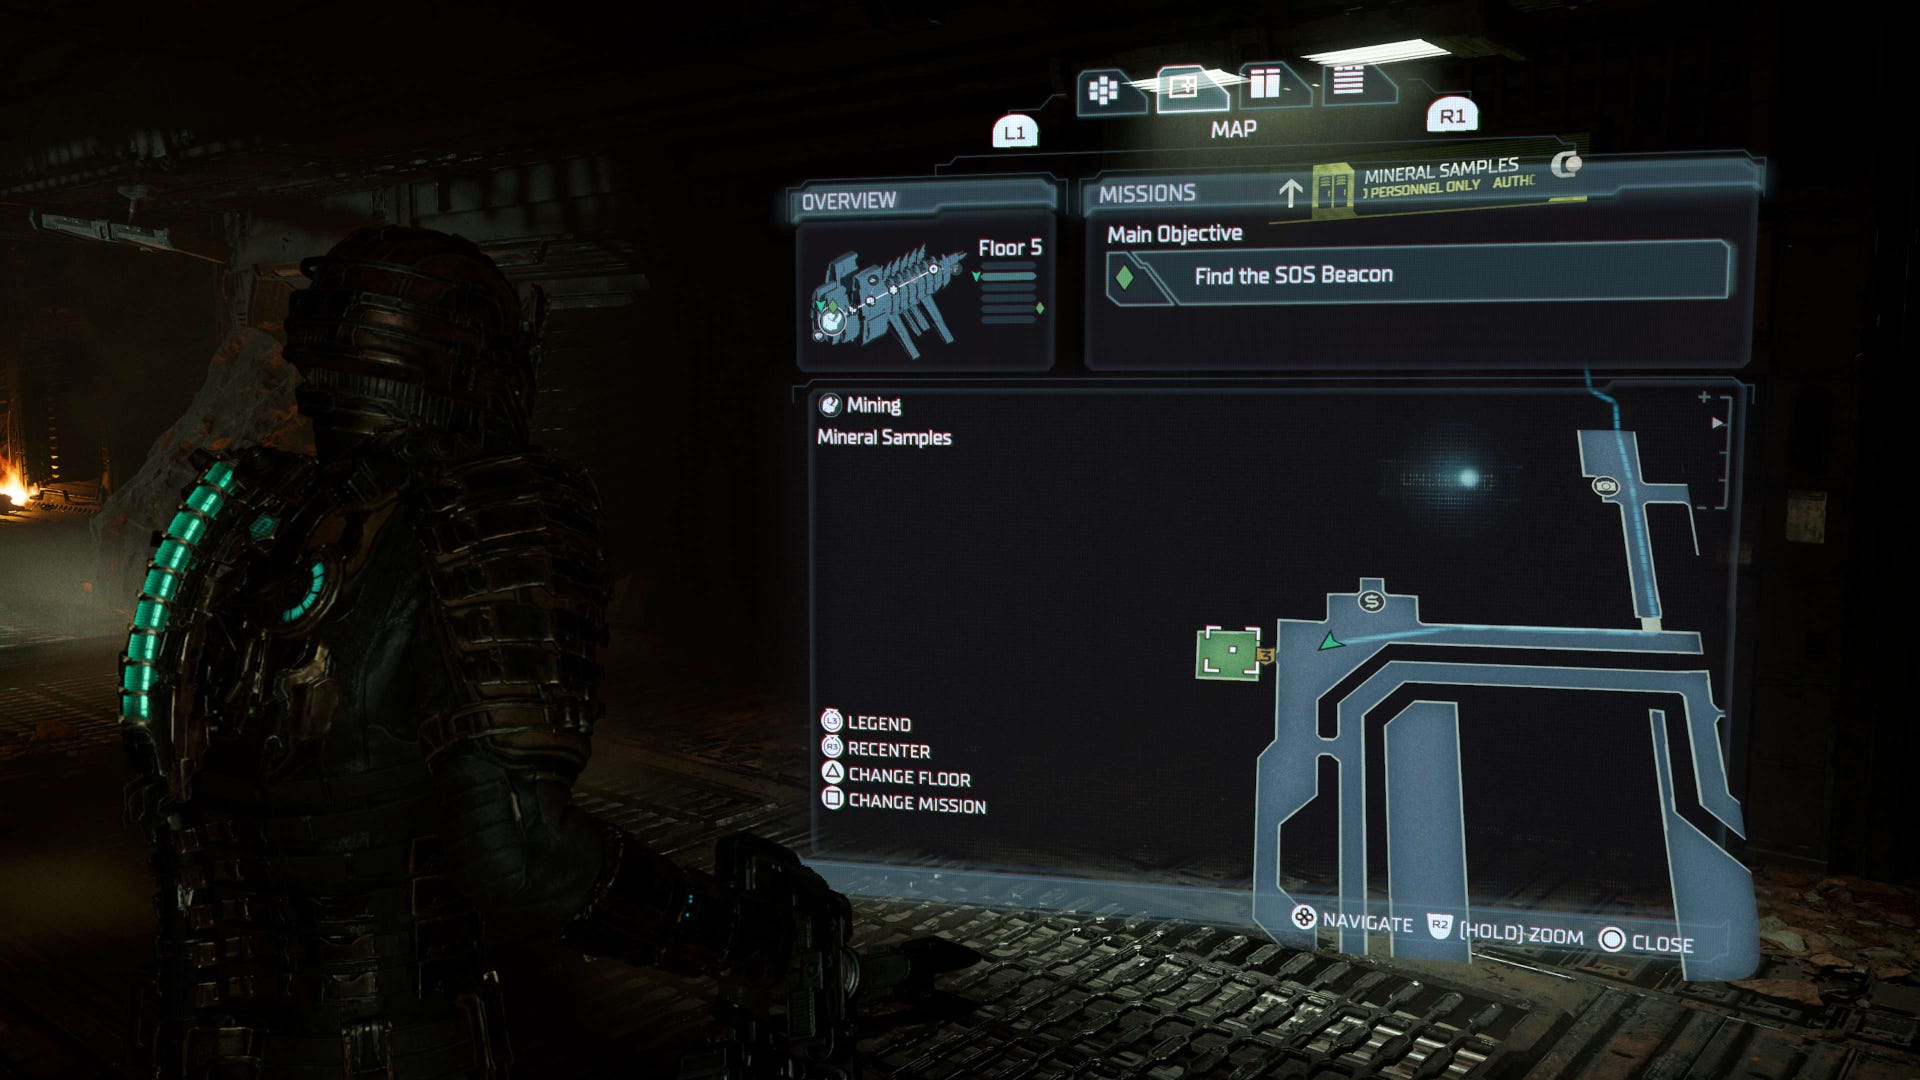
Track and complete the objective, clearing the floating debris and opening up access to the next room that'll let you pick up the Admin RIG - with this you'll be able to access level 3 security clearance rooms, including the Mineral Samples room.
Backtrack through the Processing Chamber where you've just come from, but head into a destroyed opening on the opposite side of the area.
This will lead you into the Mineral Processing Area.
As soon as you enter, turn right and head into the 'Mineral Samples' room - facing the nearby store, it's to your left.
Inside this room, you'll find your eighth Marker Fragment located on a shelf.

Chapter 8 Marker Fragment location in Dead Space
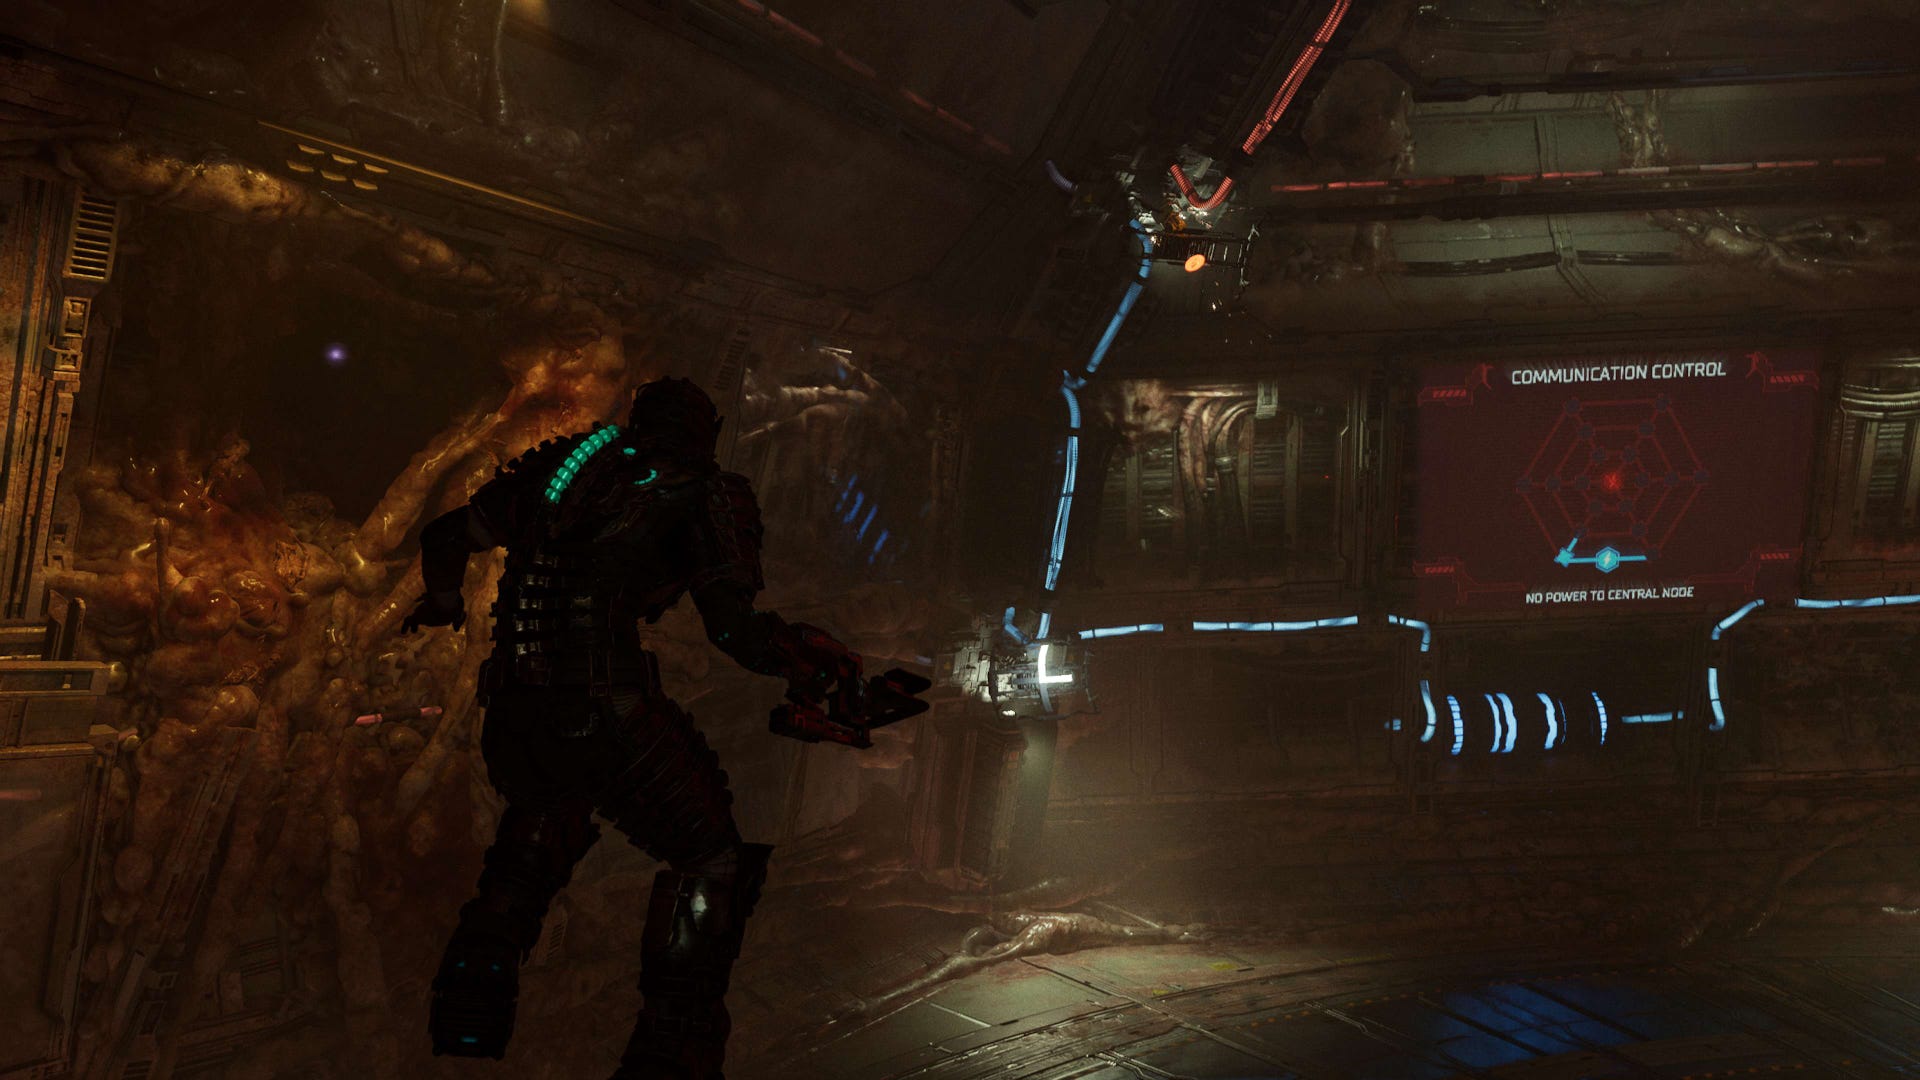
Location: Communications - Comminications Array
Once you reach Chapter 8, you'll be looking for the ninth Marker Fragment.
This particular collectible is best found during the objective 'Fix the Comms Array', within the massive hexagonal Communications Array room, where you have to complete the puzzle by connecting the correct directional antennas to continue.
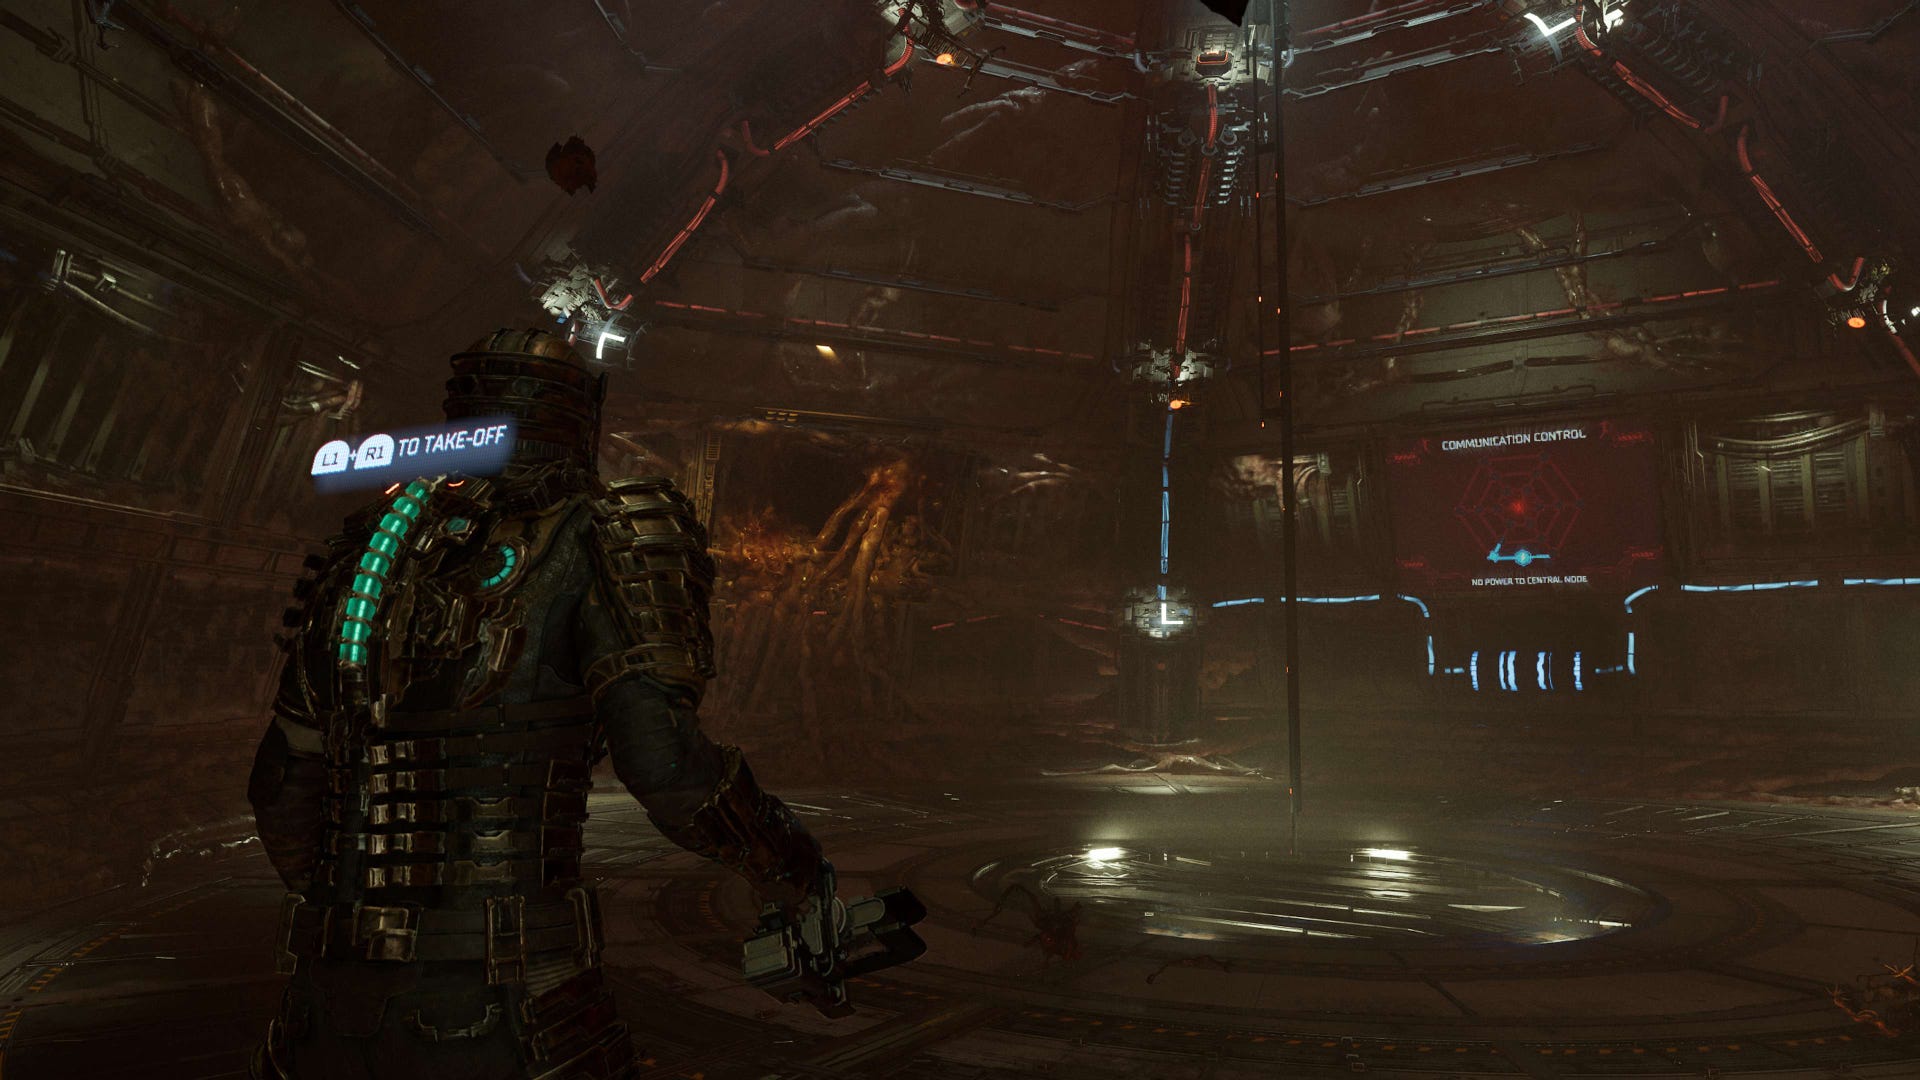
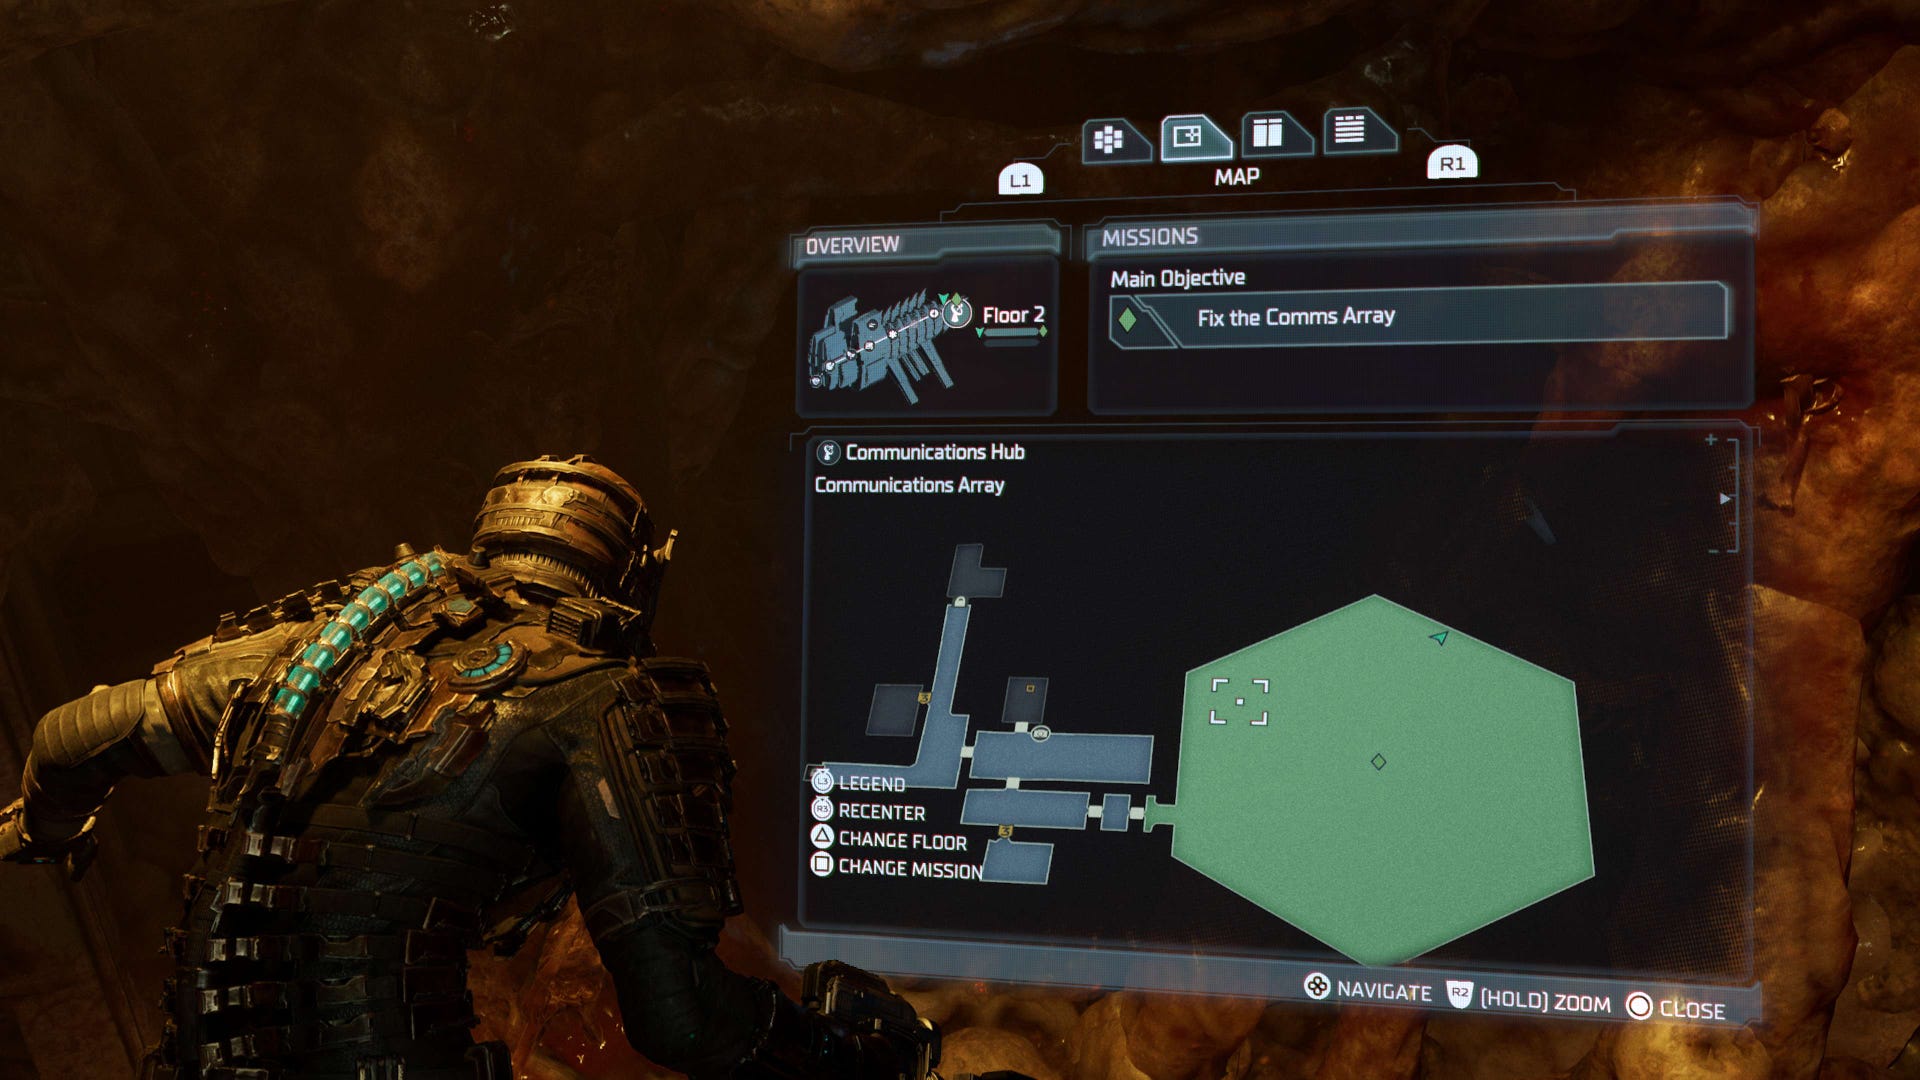
When you enter this room, rather than heading over to where you'll be completing the puzzle, look over to the far left of the room - you'll see a huge Necromorph growth sprawling out from within a darkened hole in the wall.
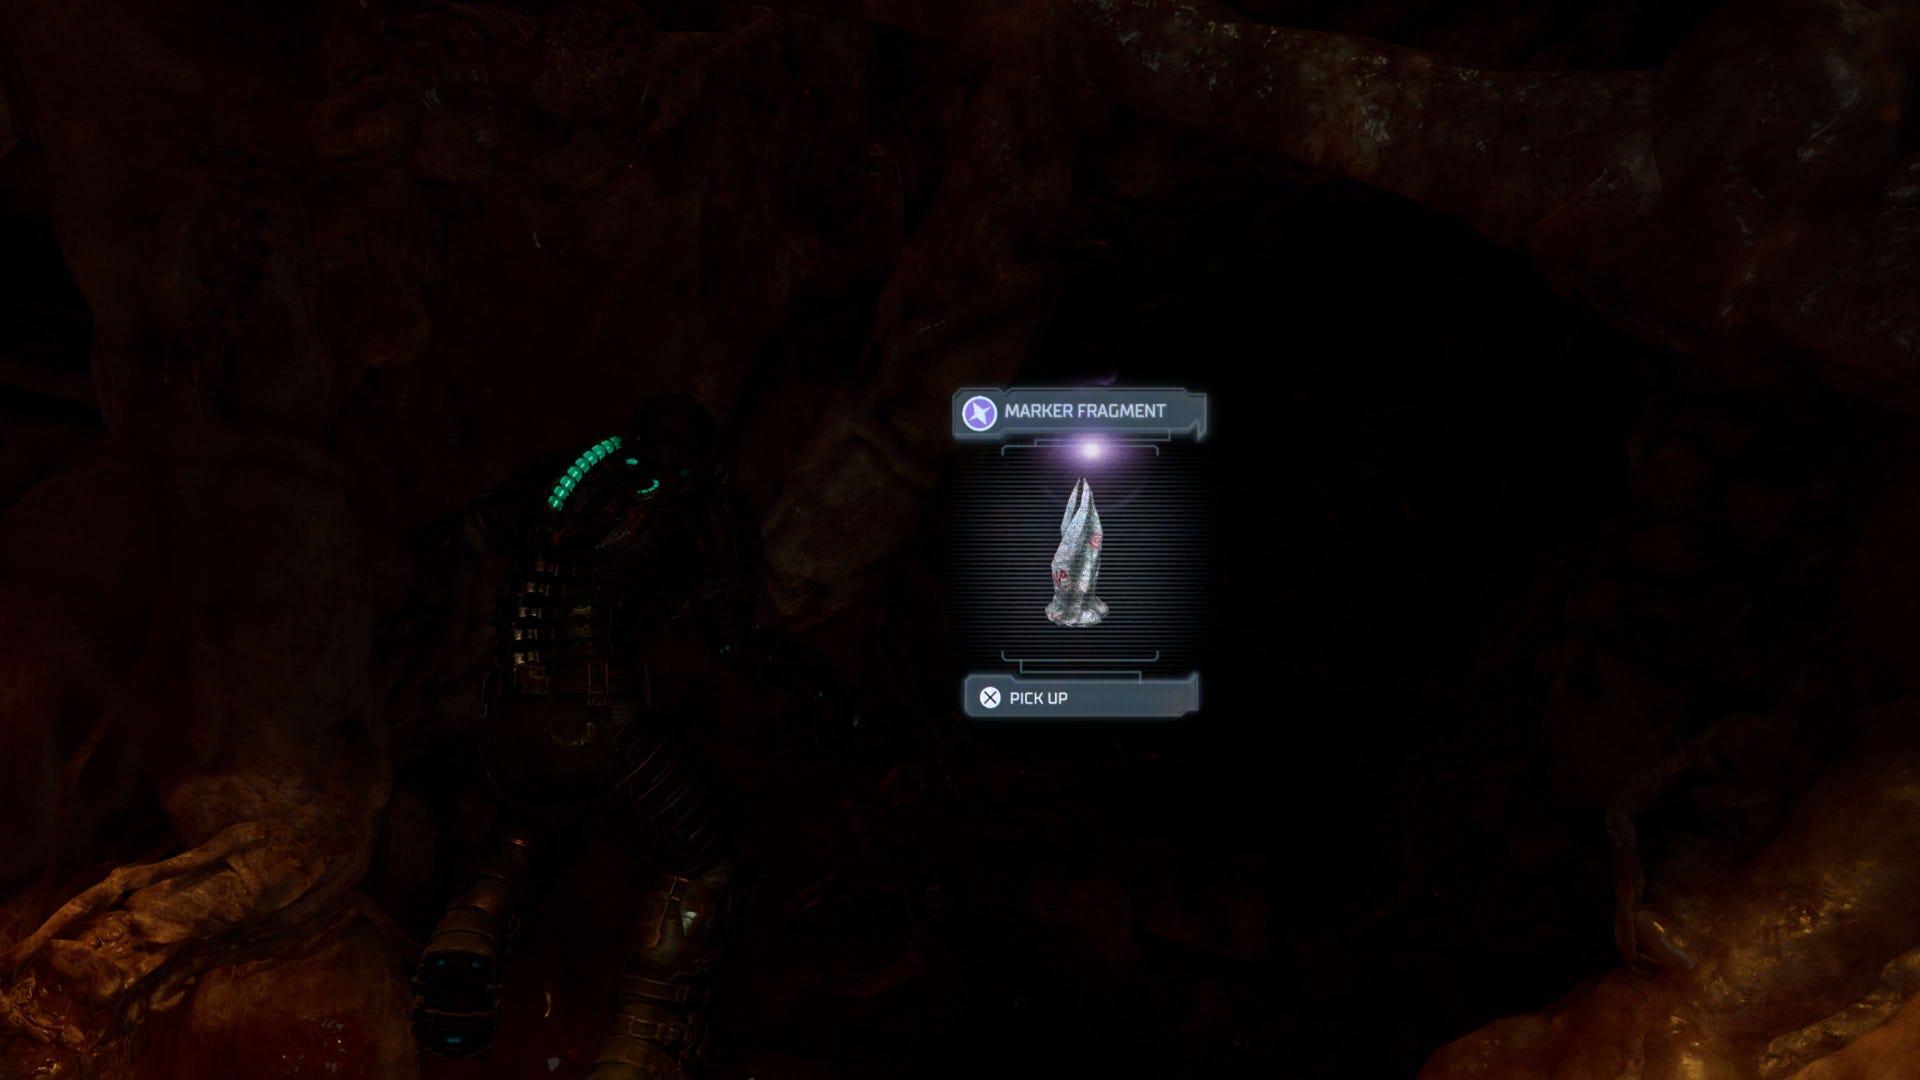
Head over to this and within you'll find the ninth Marker Fragment hidden inside.
Following this, since there are no Marker Fragments to find in Chapter 9, you'll want to keep playing until you reach Chapter 10 where your collectible hunt continues.
Chapter 10 Marker Fragment location A in Dead Space
Much like Chapter 5, there are two Marker Fragments to be found in Chapter 10 - both can be picked up as you're working to destroy the Tendrils throughout the chapter.
Location: Crew Deck - Deluxe Shift Bunks
For the first of the two fragments, you'll want to play through Chapter 10 until you are given the objective 'Destroy Tendril in Deluxe Quarters' - once you have that objective, follow it until you reach the Deluxe Quarters.
You'll know once you've reached the area as the room will be thrown into quarantine - eliminate all the enemies first, then head into the Deluxe Quiet Bunks located in the top left of the map, via the connecting corridor.
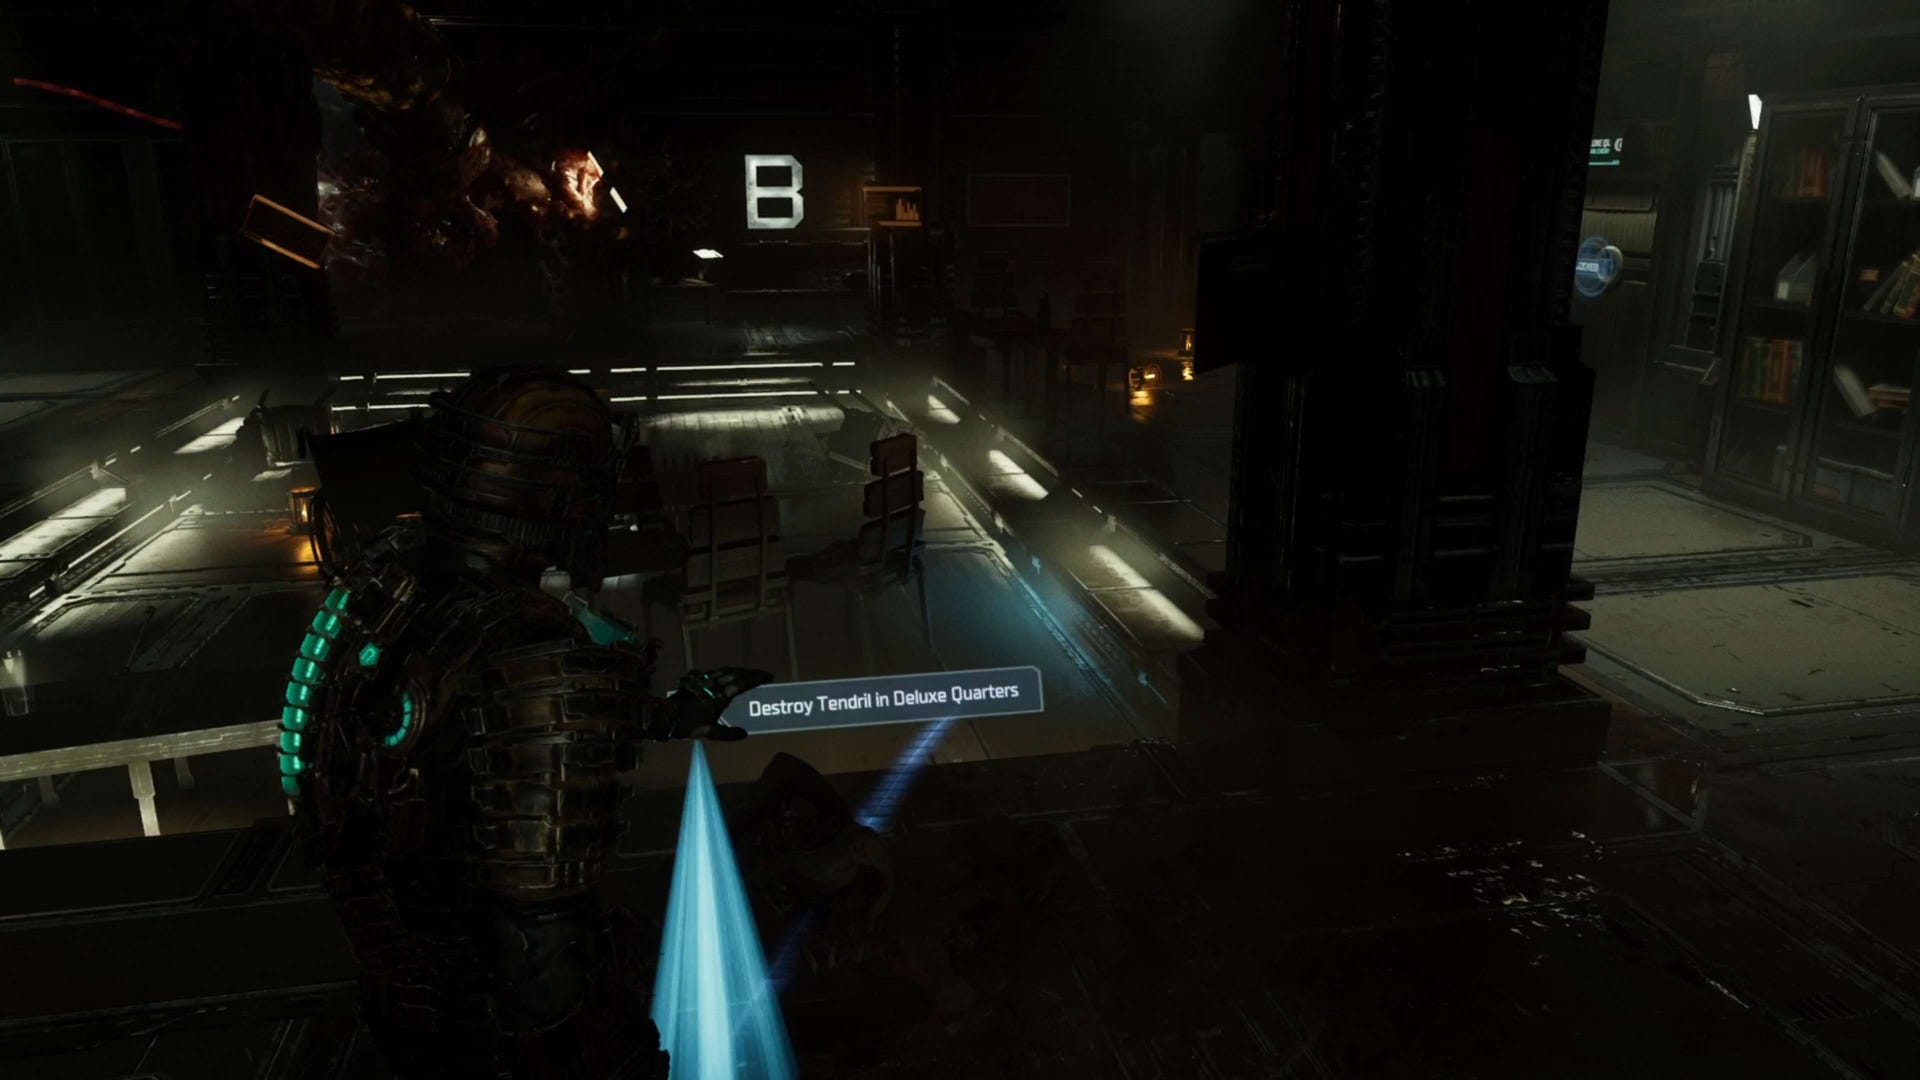

Once you're in the Deluxe Quiet Bunks, you'll find a power cell, which you can use to power a circuit breaker found at the lower left end of the corridor that connects the Deluxe Quiet Bunks and Deluxe Quarters.
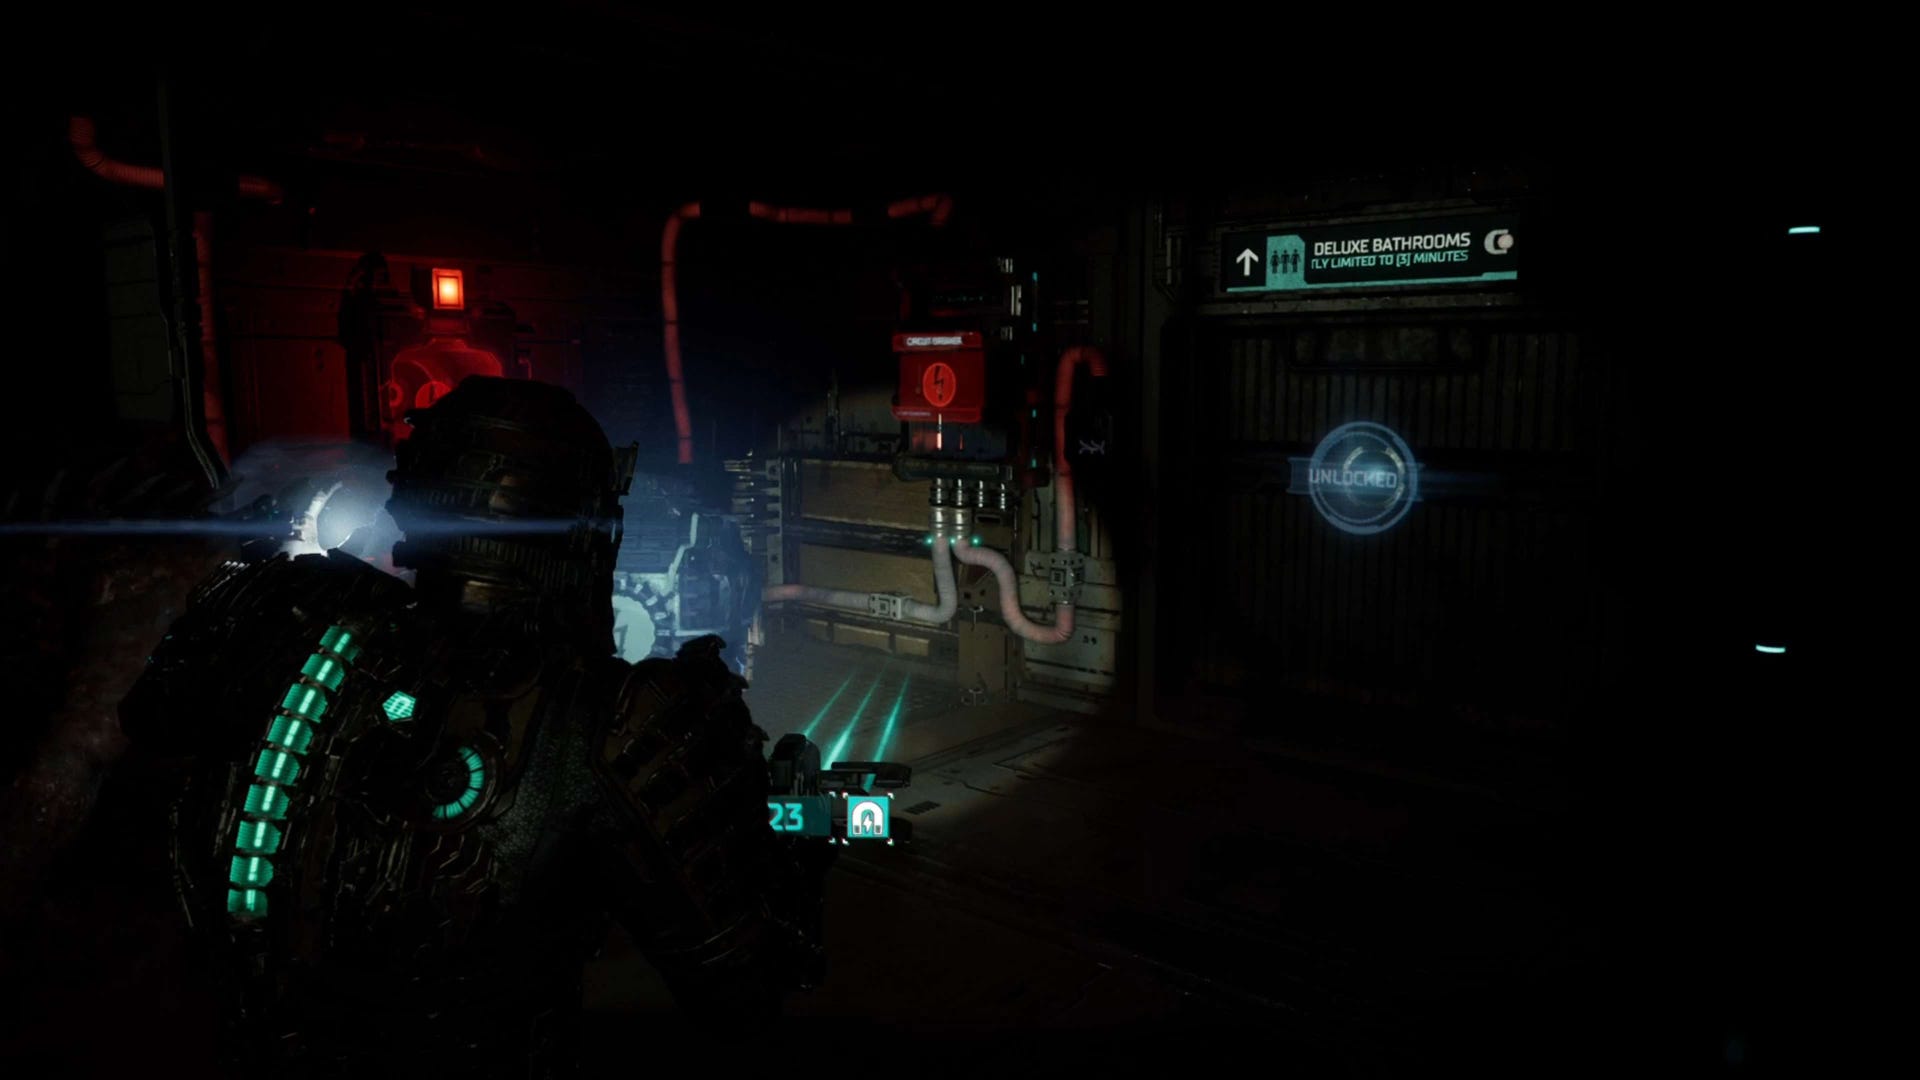
Reroute the power to the doors and return to the Deluxe Quarters - the room which you encountered the quarantine lockdown in - and you should now be able to access a door that'll lead you to the Deluxe Shift Bunks, which you can see at the lower end of the map, beneath the square-shaped Deluxe Quarters room.
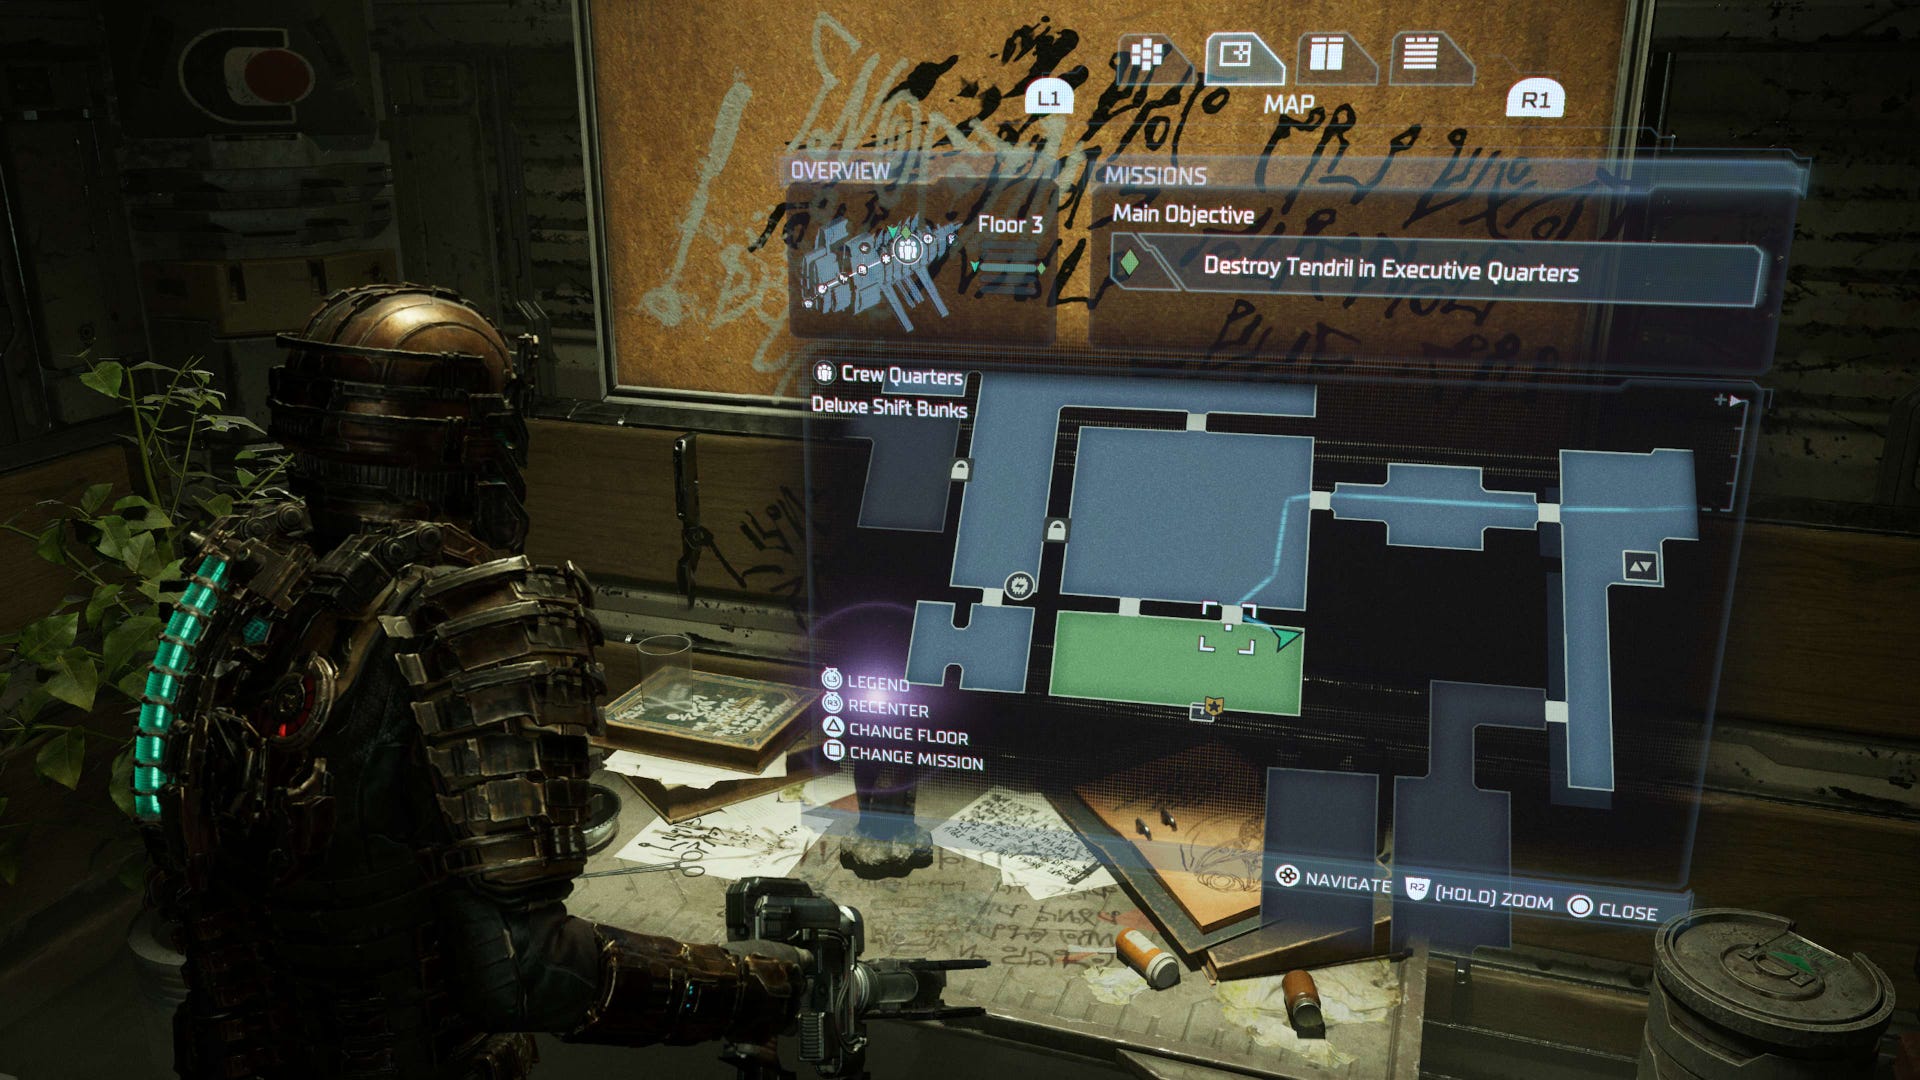
It's within this room you'll find your tenth Marker Fragment sitting on a desk - if you get lost, be sure to refer to the images included here, and keep checking your in-game map to be sure.
It's also worth noting there's a second room titled Deluxe Shift Bunks at the top end of the Deluxe Quarters, but that one isn't the room you need for this collectible.
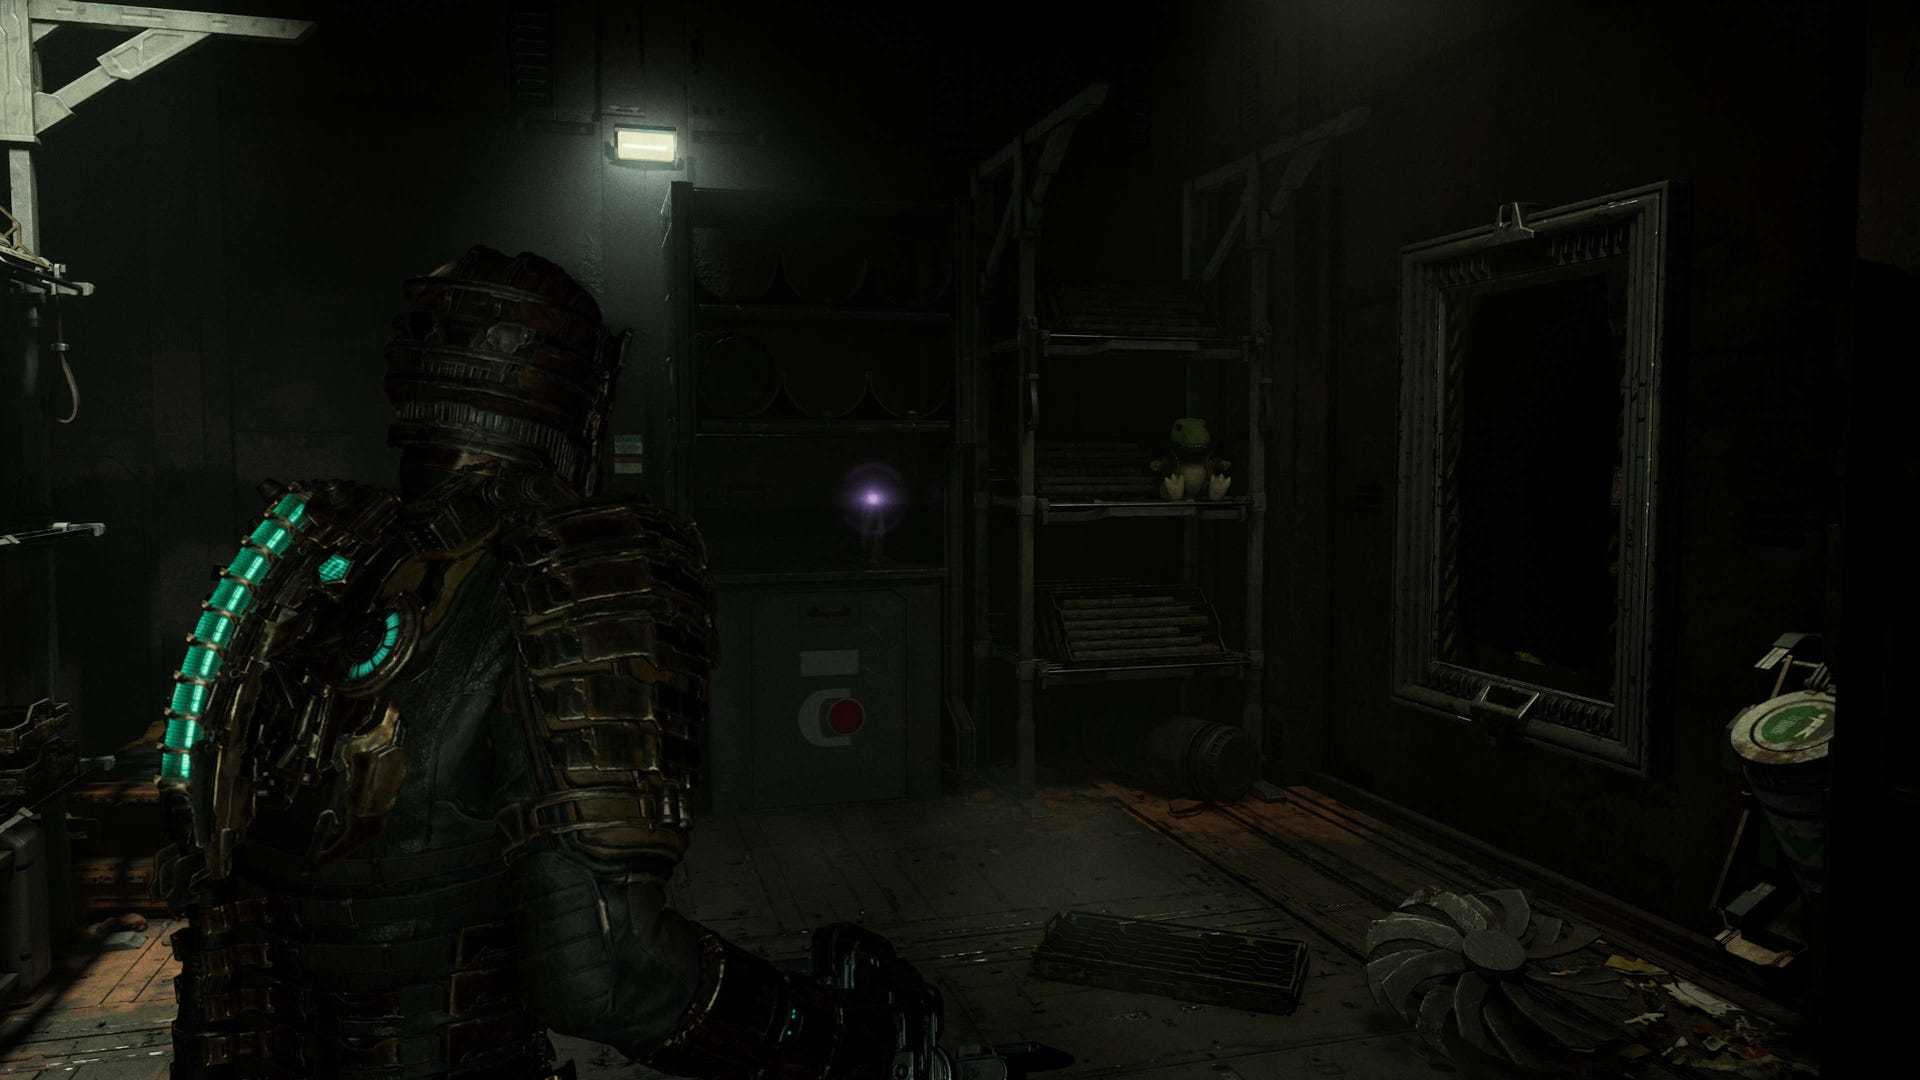
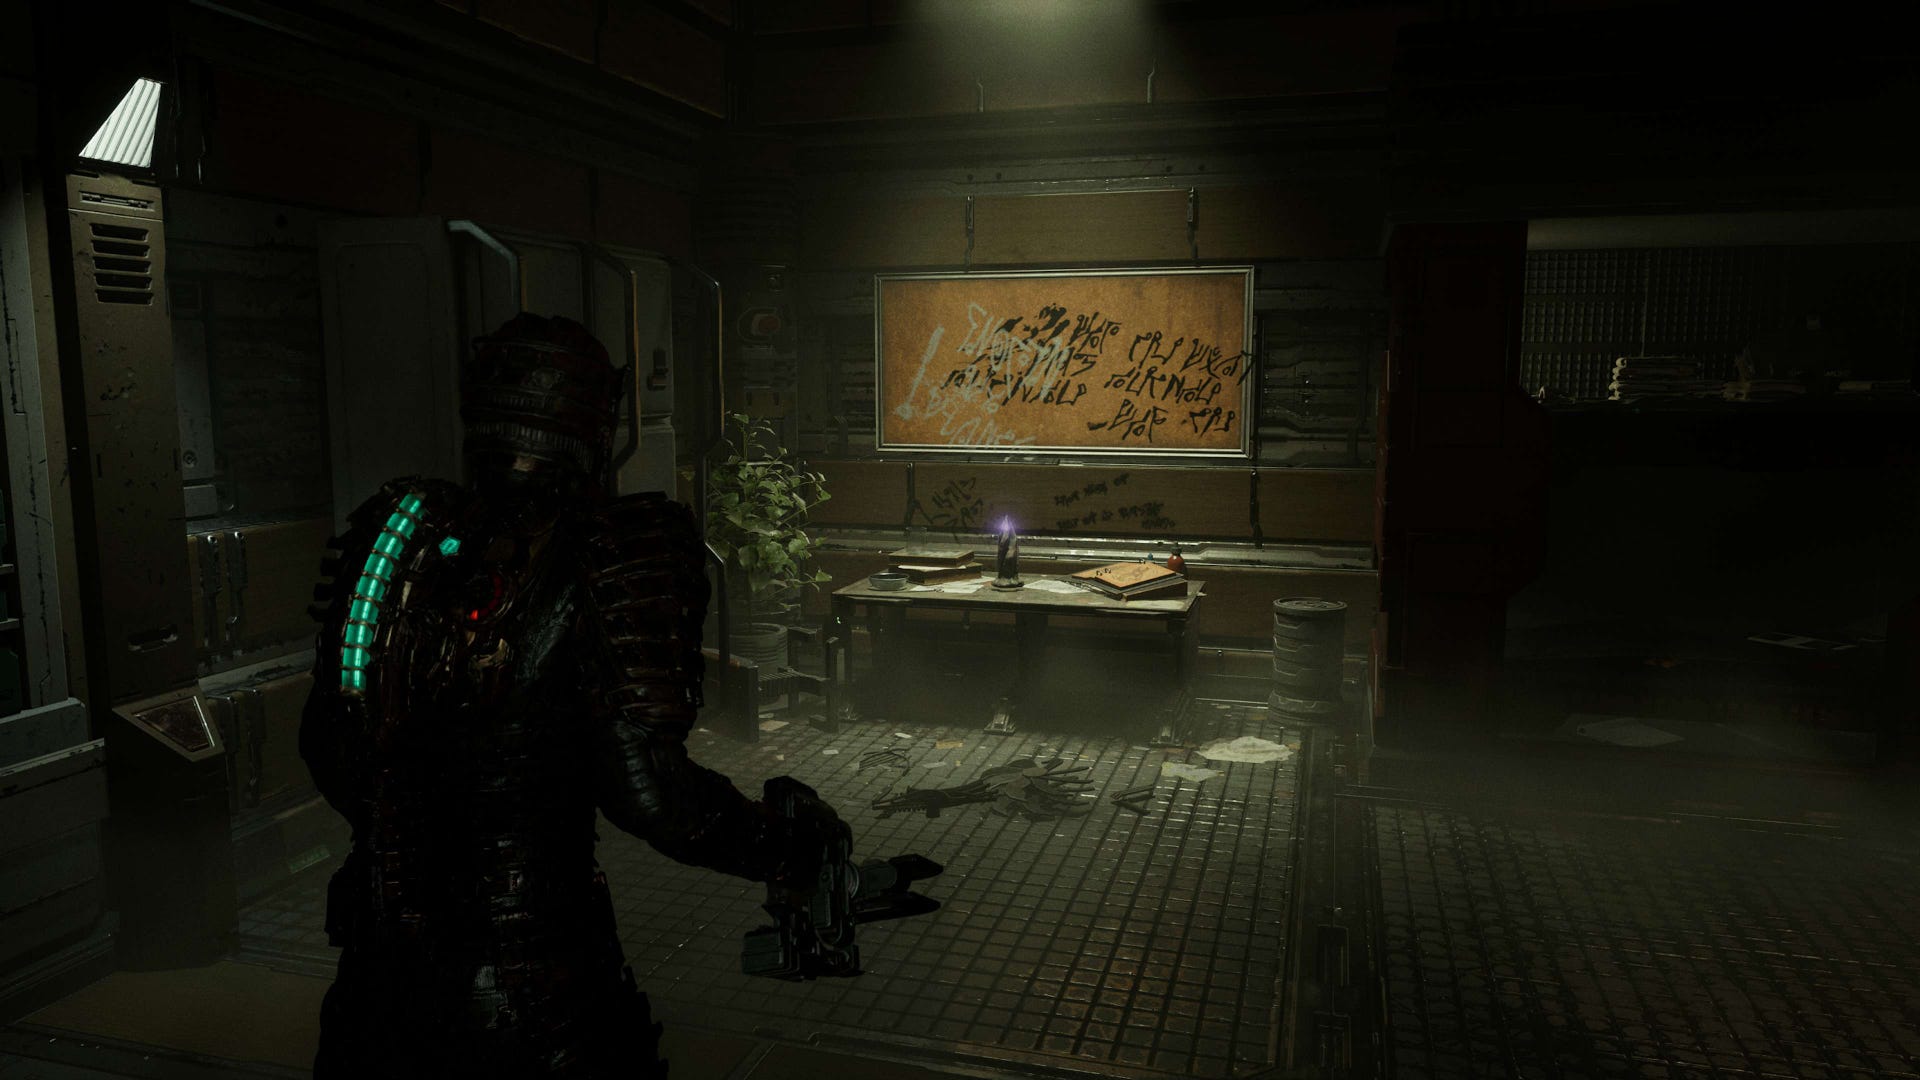
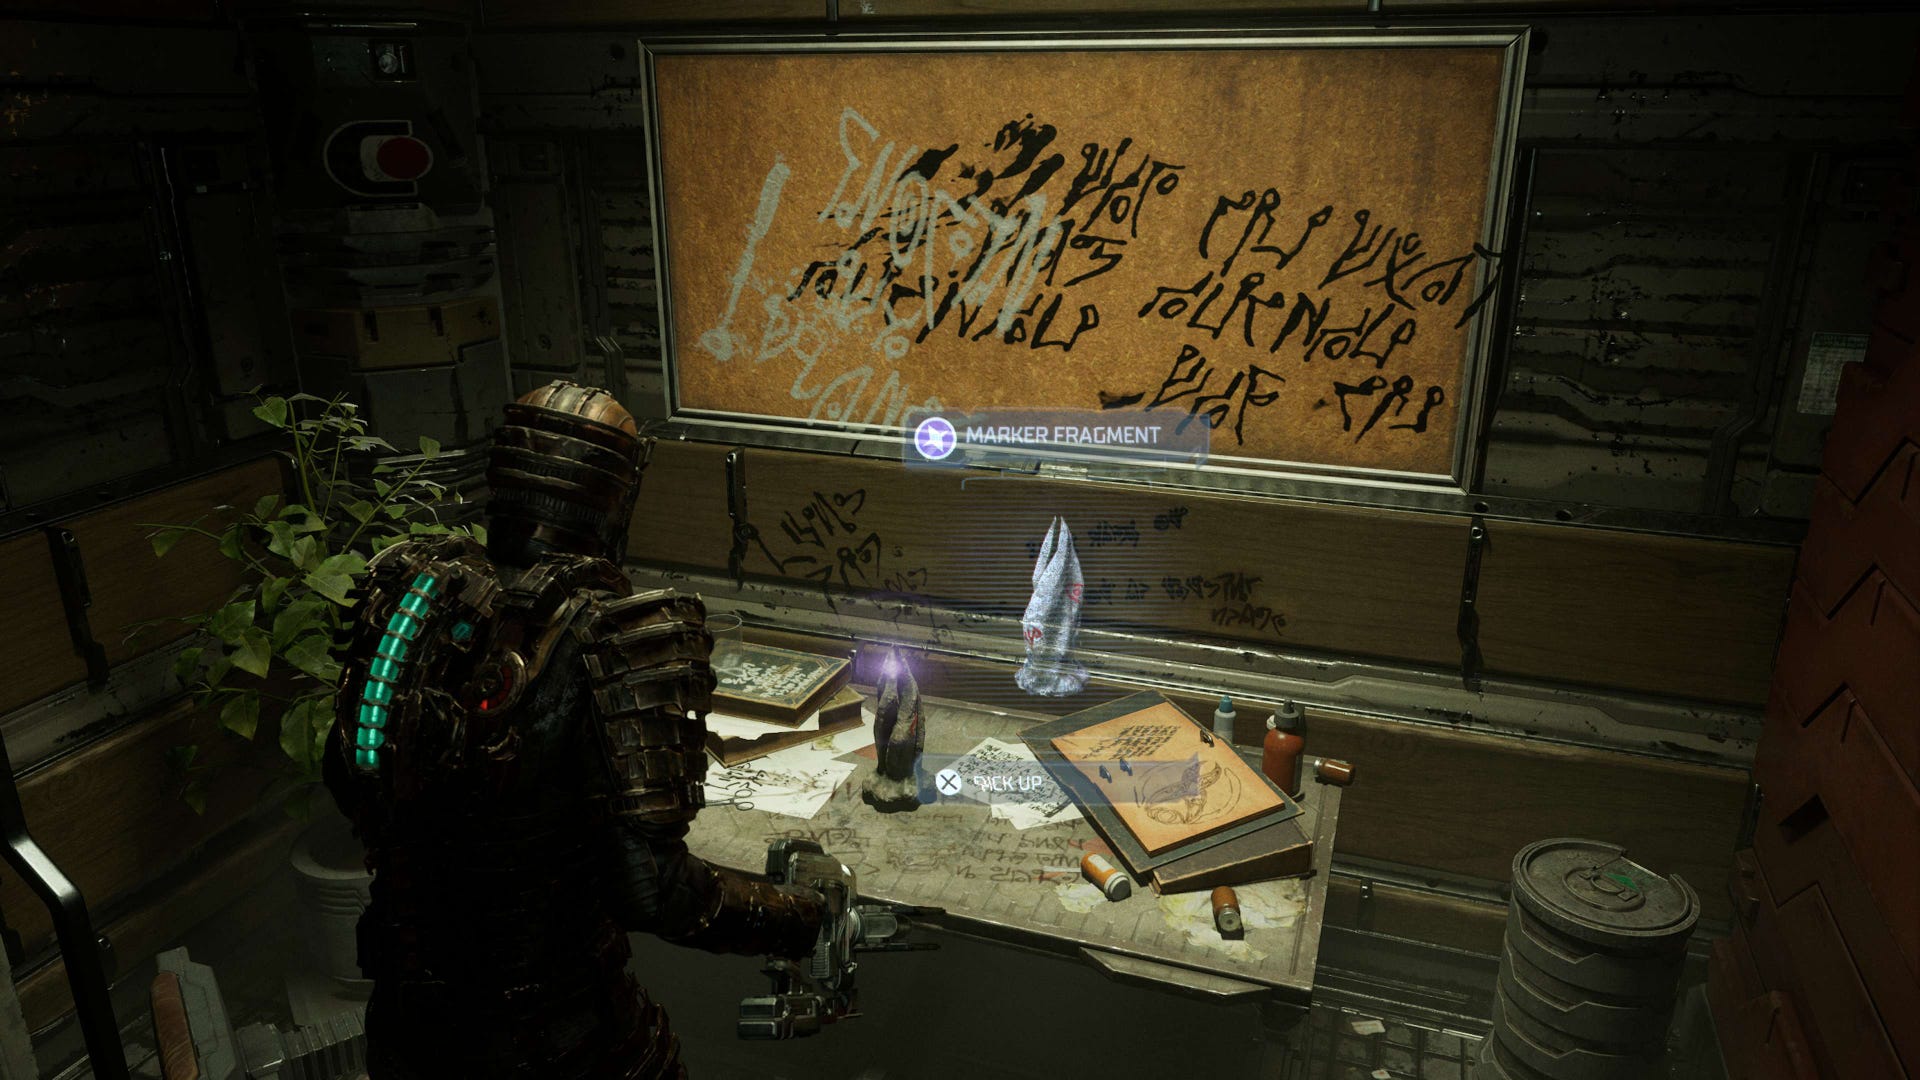
Chapter 10 Marker Fragment location B in Dead Space
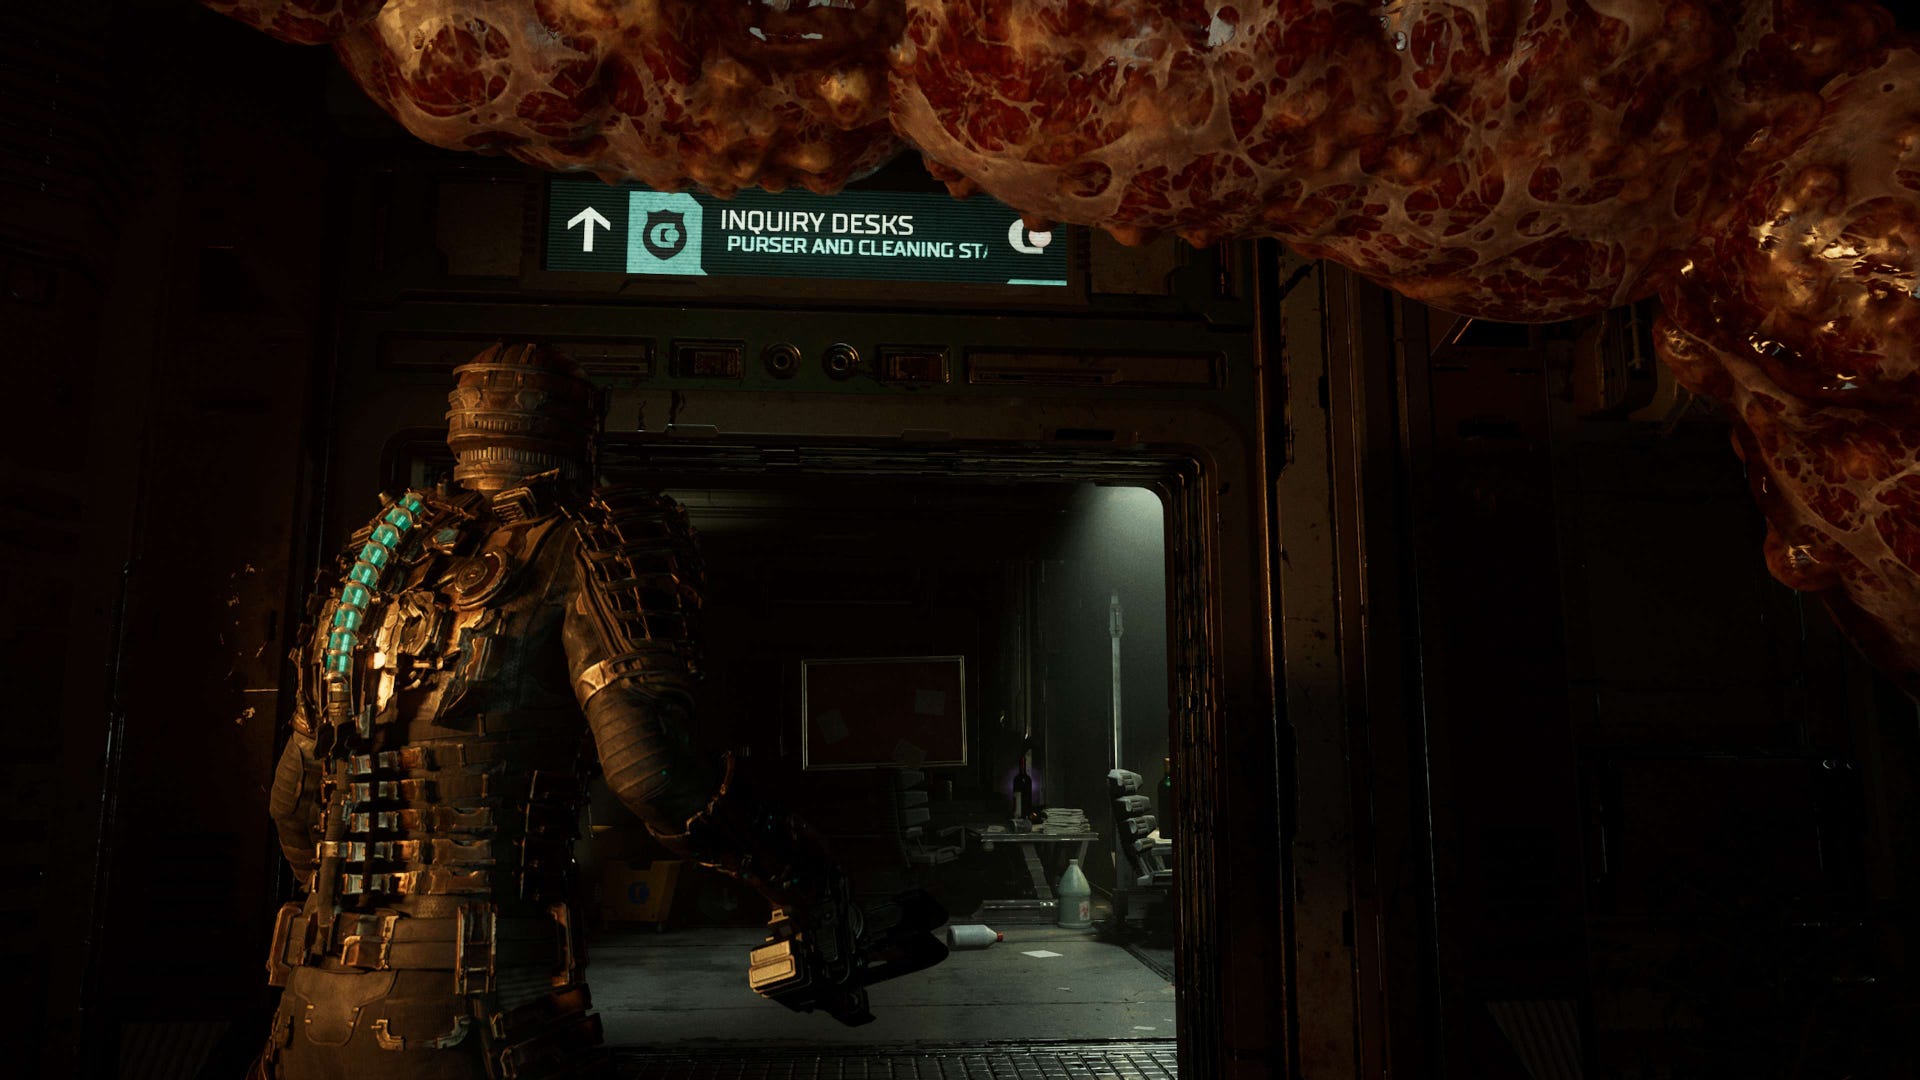
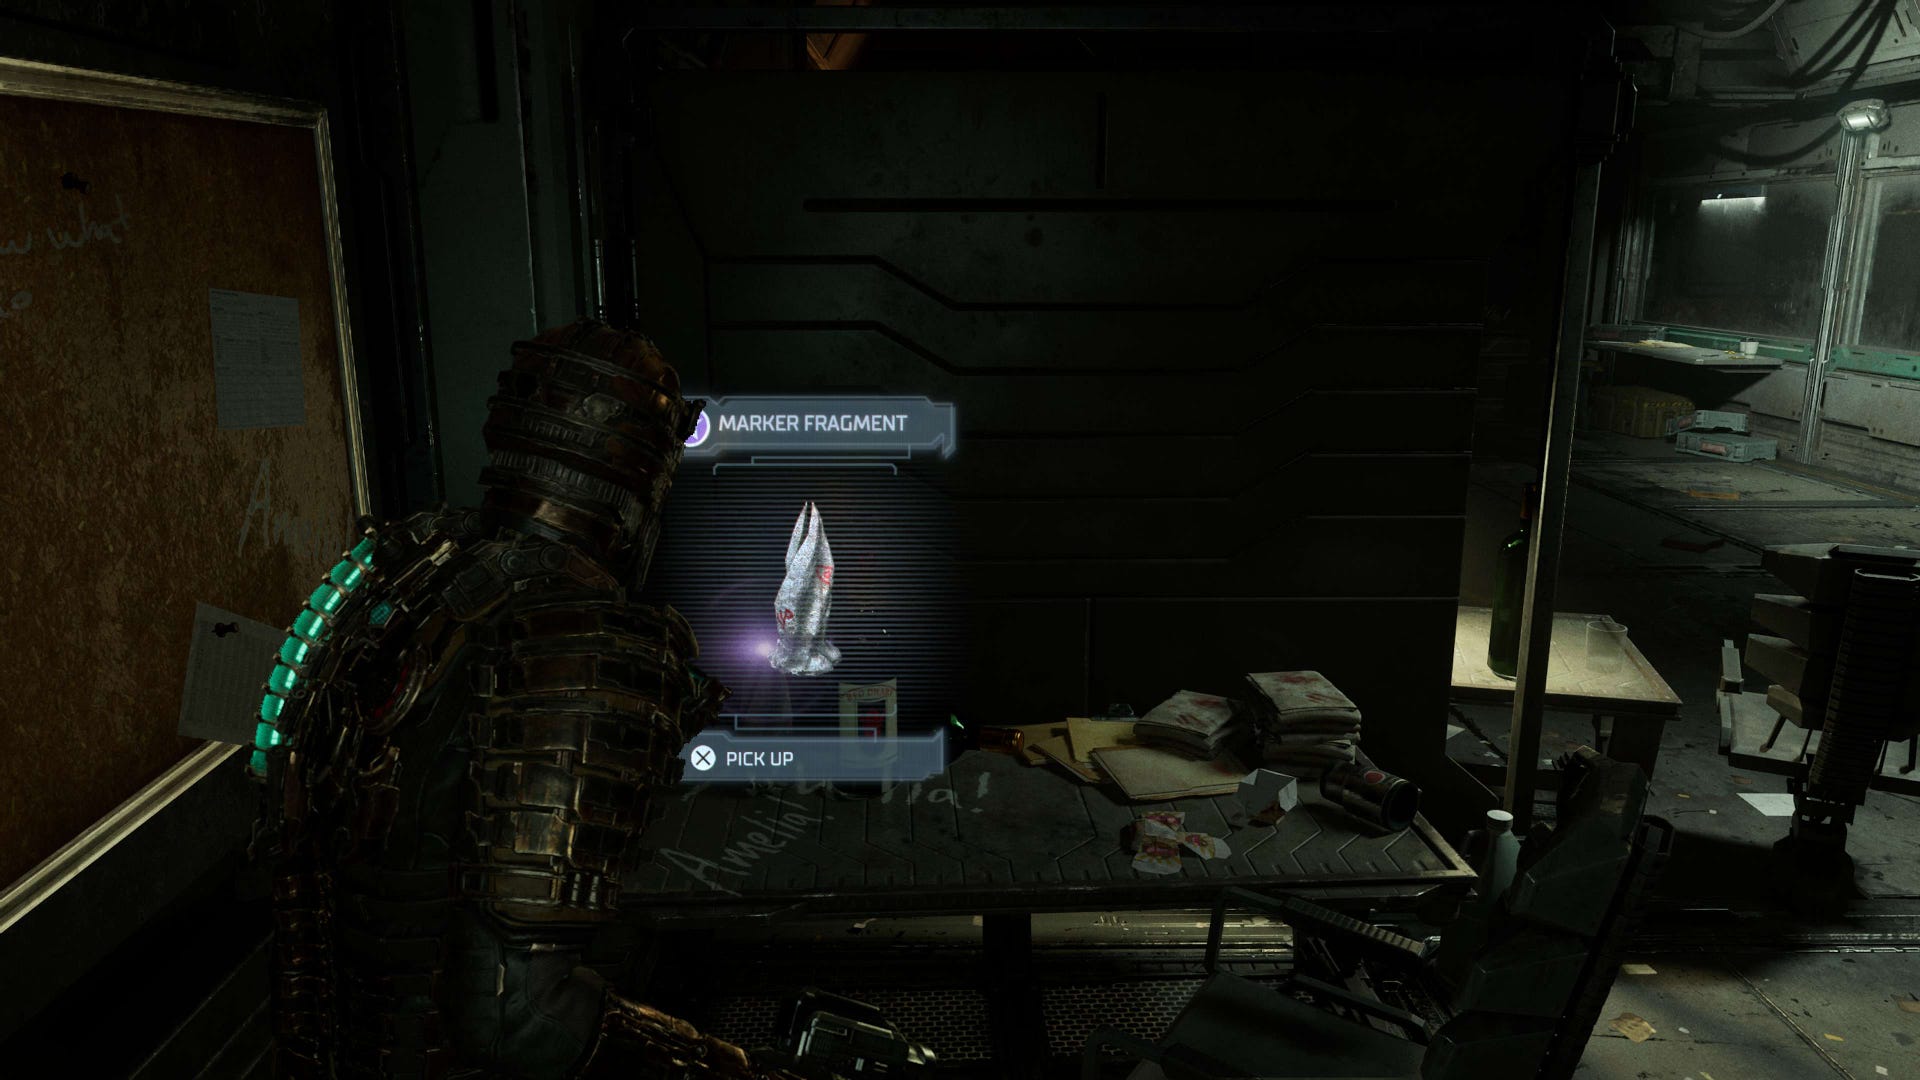
Location: Crew Deck - Chief Steward's Office / Inquiry Desks
Moving onto the second Marker Fragment of the chapter - and the eleventh in total - this one's in the Inquiry Desks room and is a bit simpler to find.
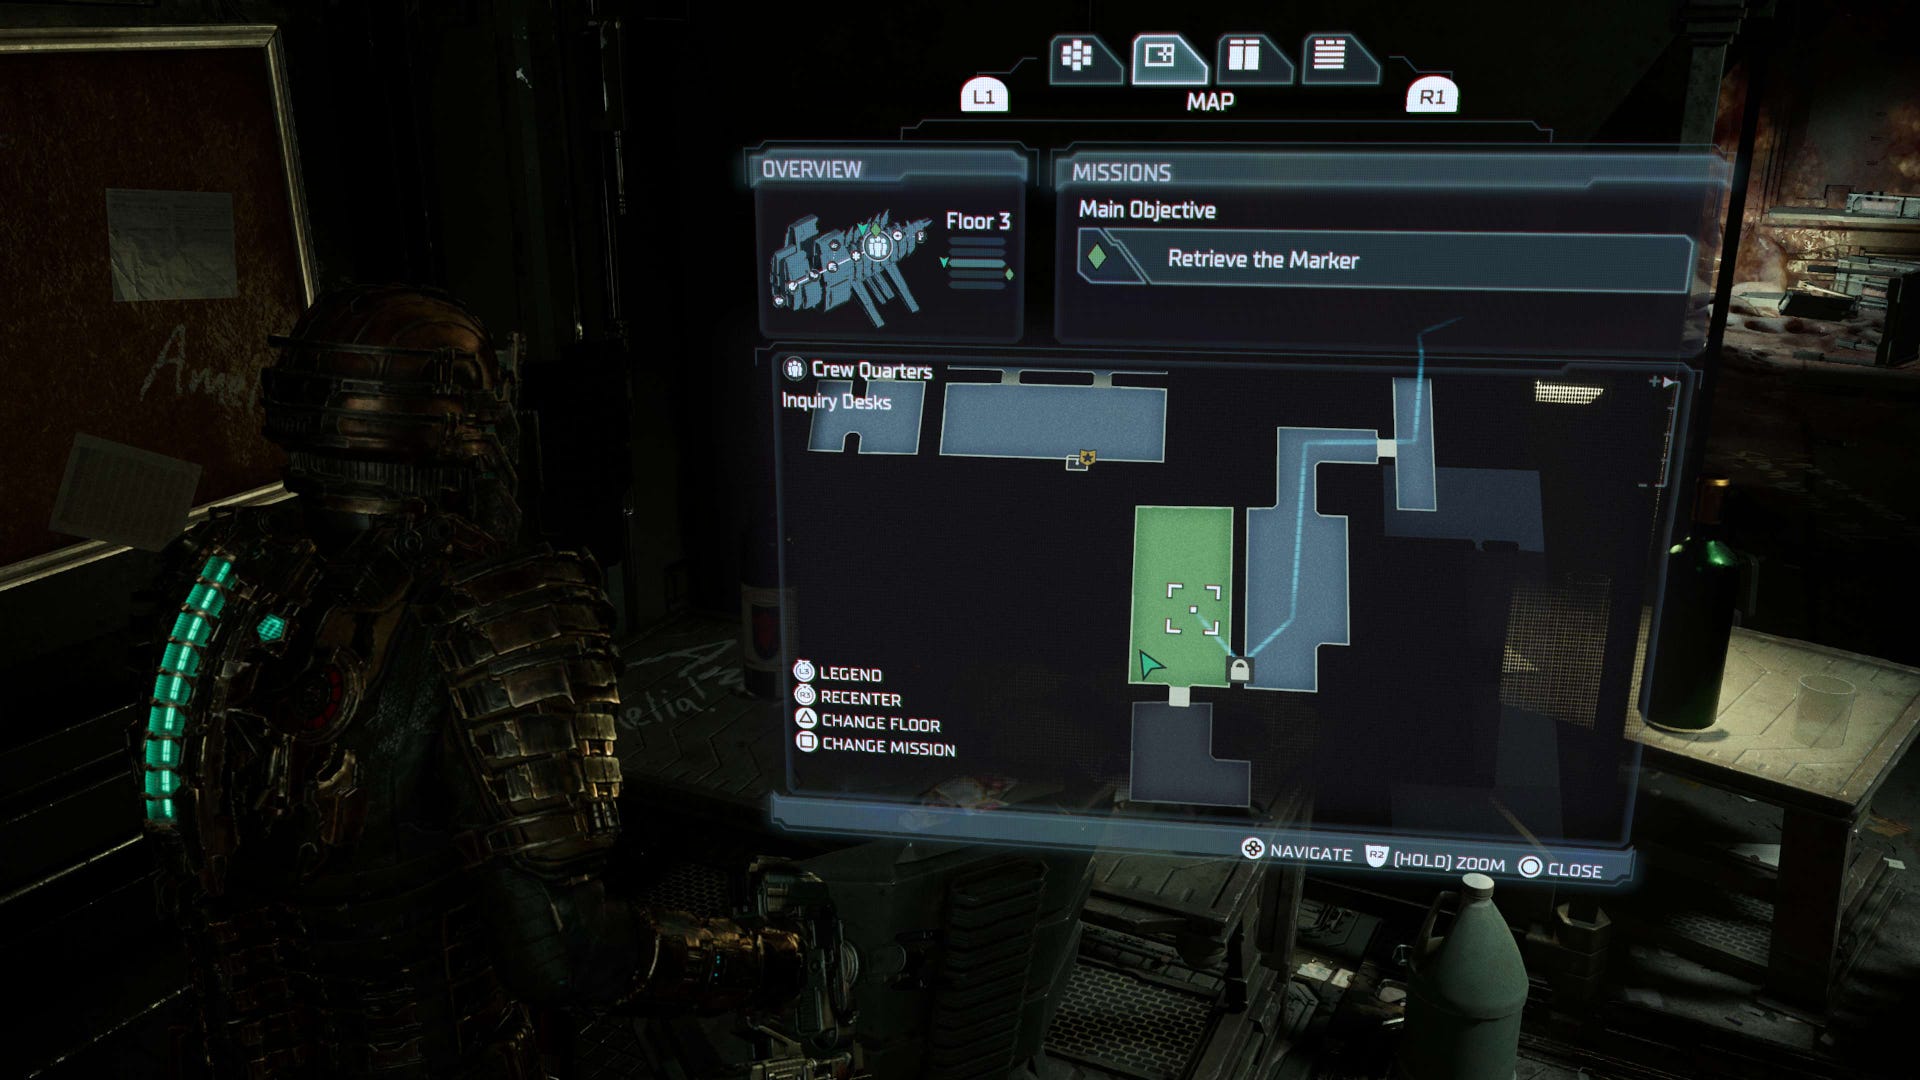
Continue with Chapter 10 as usual until you reach the location of the objective 'Destroy Tendril in Chief Steward's Office' - it's before completing that objective you'll encounter a cutscene with Dr. Kyne.
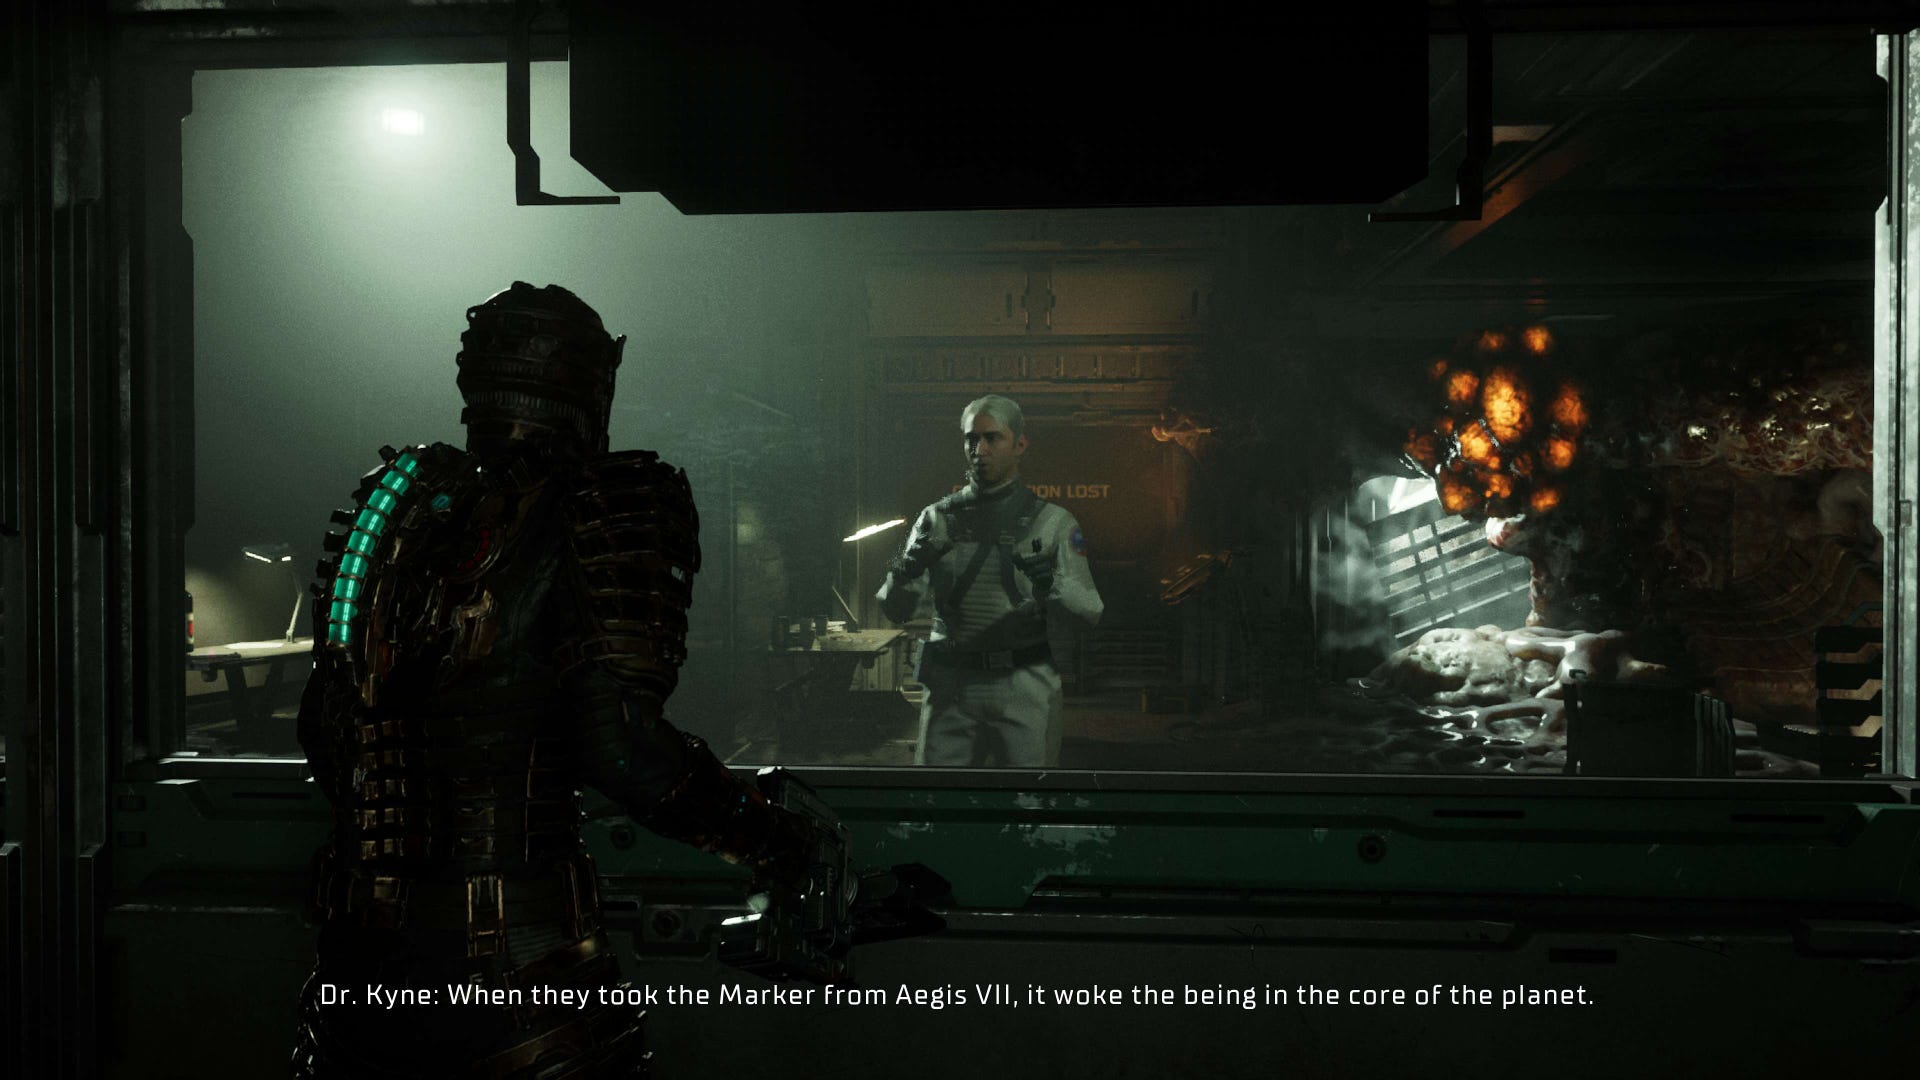
Following the cutscene, enter the Inquiry Desks room and directly ahead of you on a desk is the eleventh Marker Fragment - nice and simple!
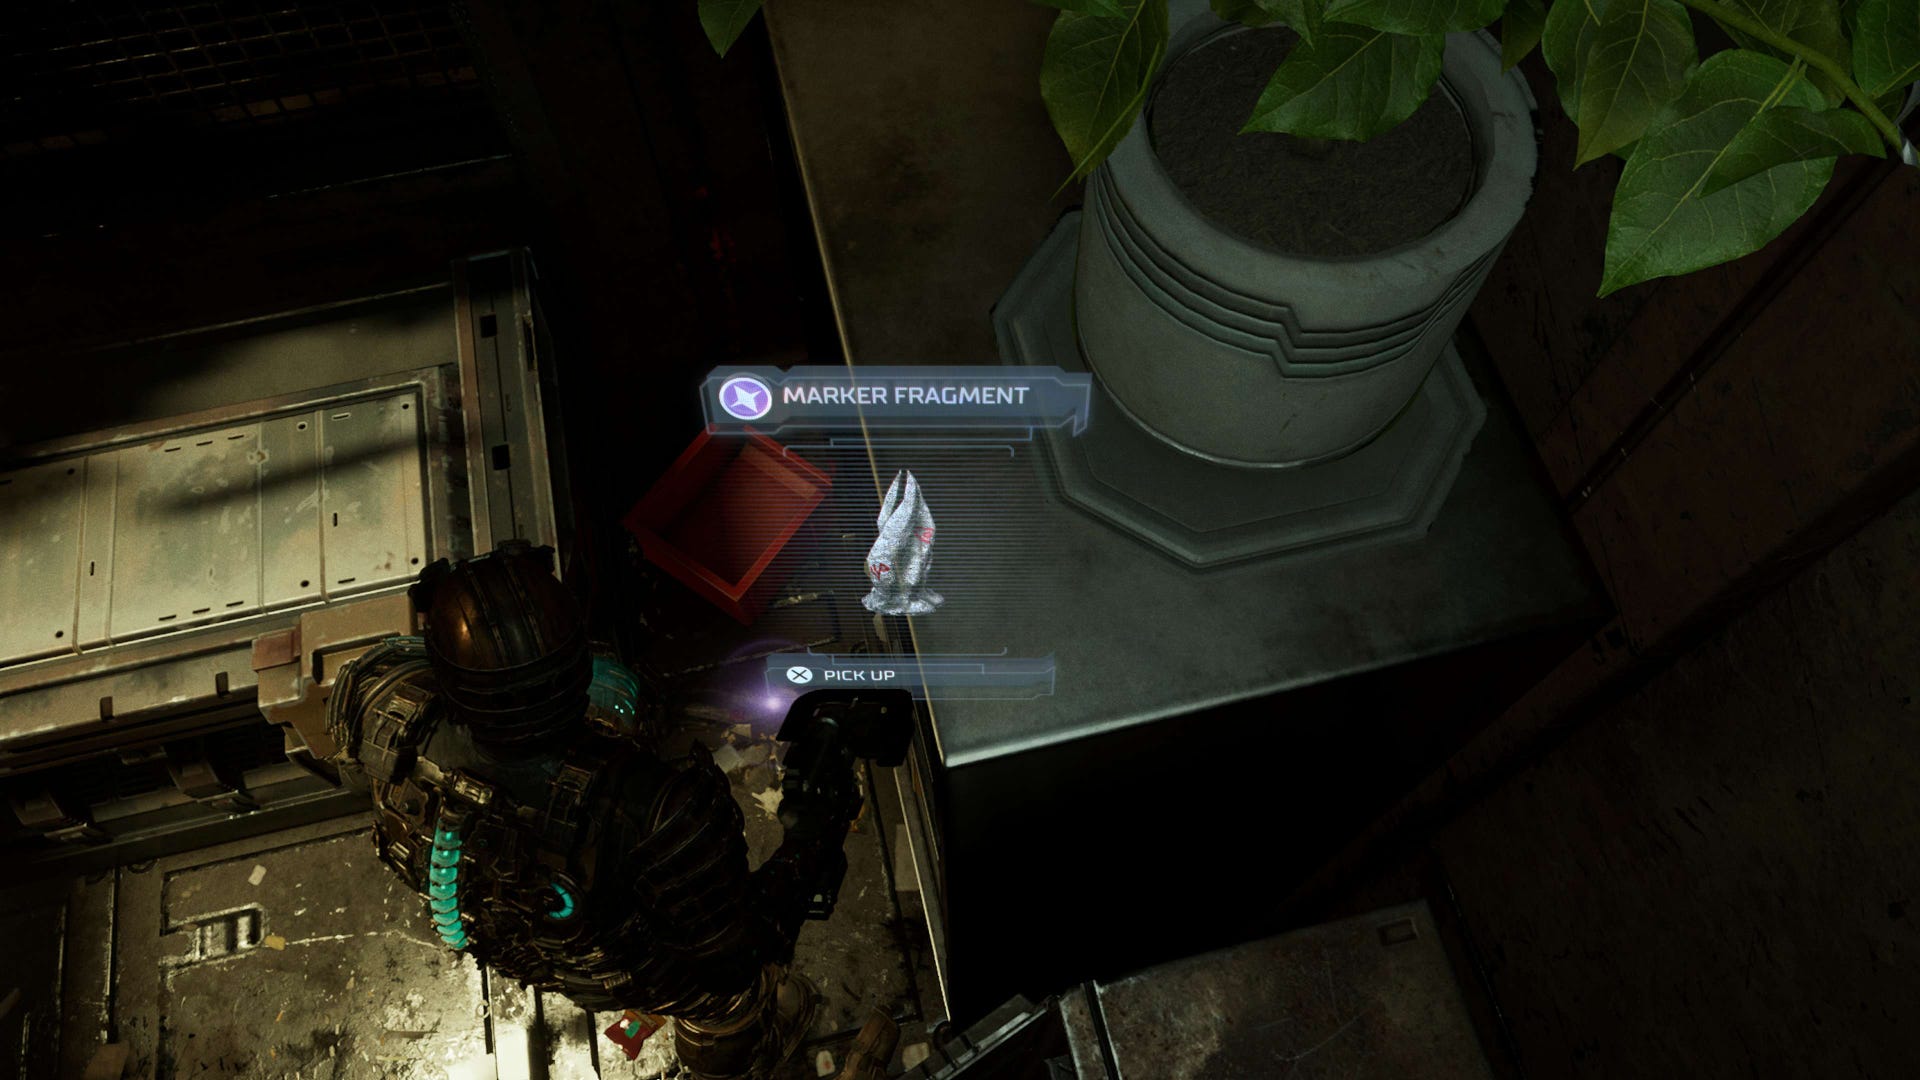
Chapter 11 Marker Fragment location in Dead Space
Location: Cargo Bay
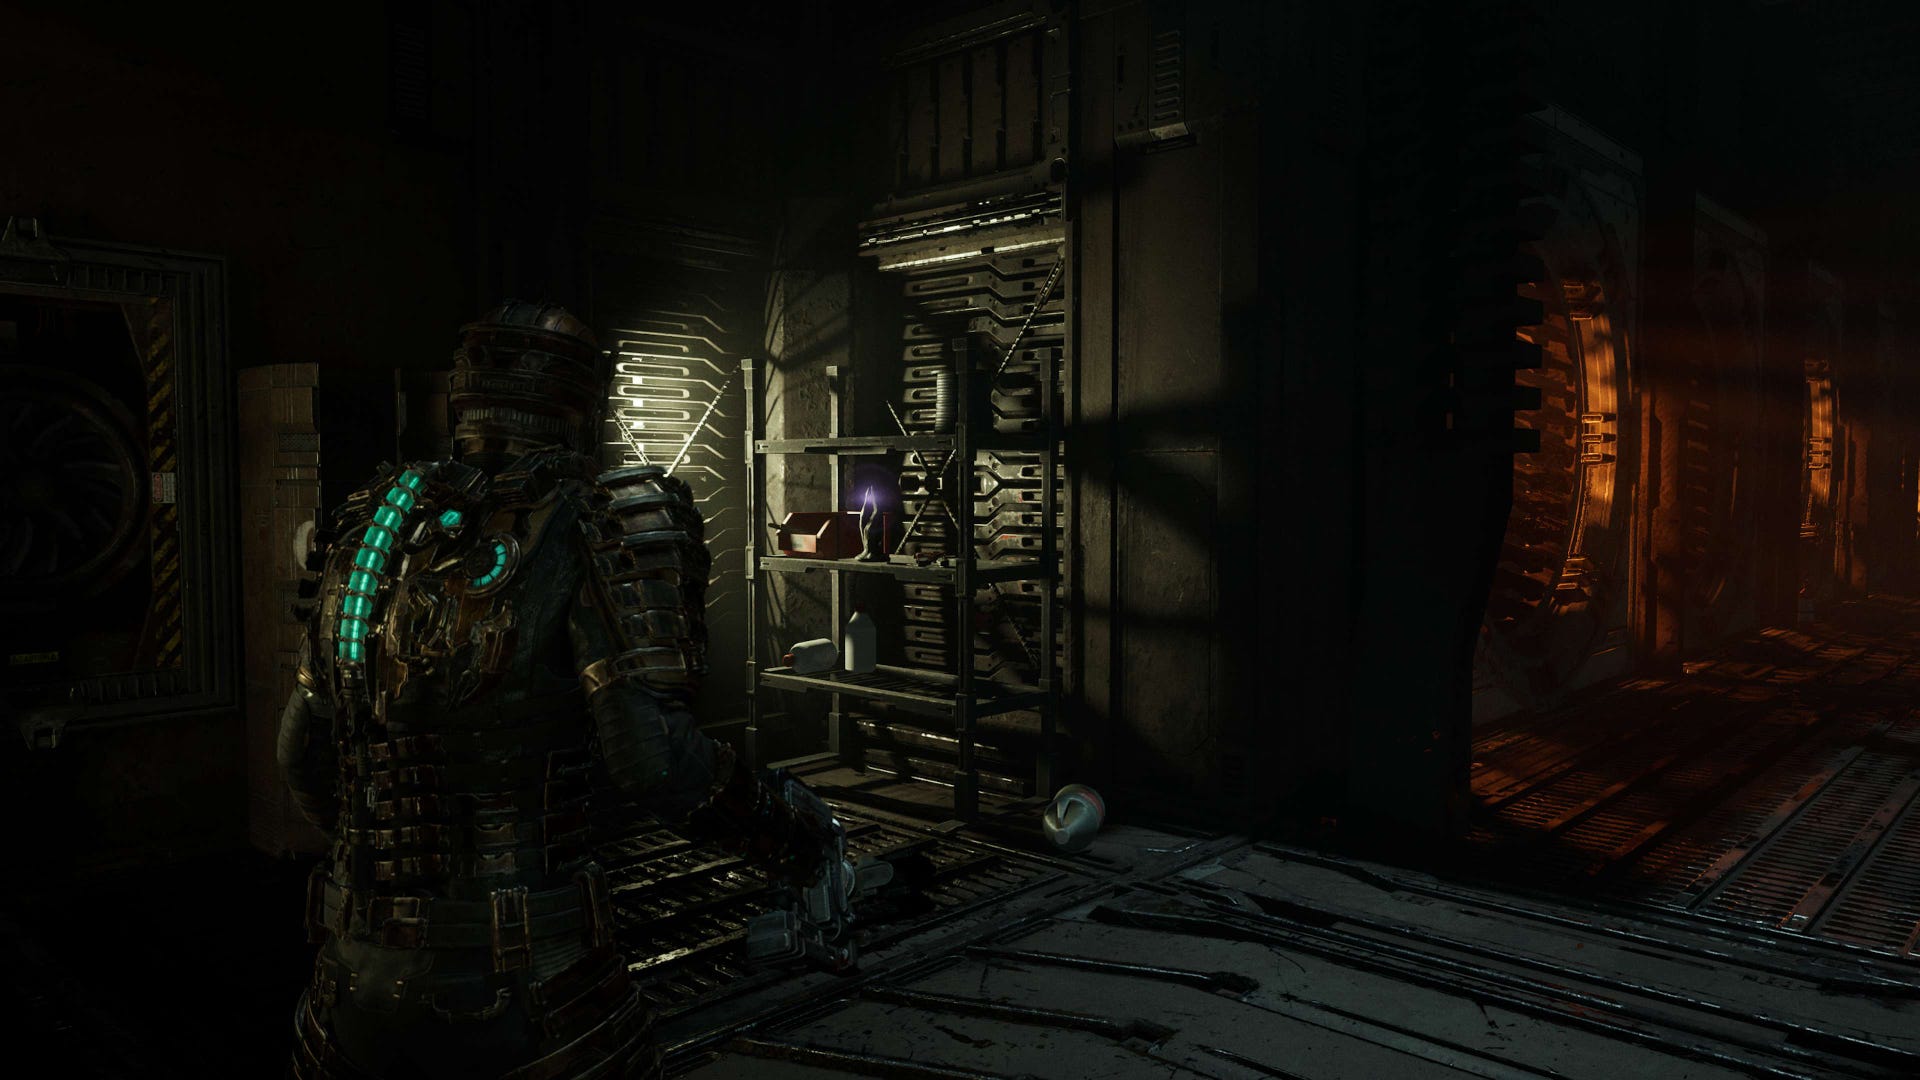
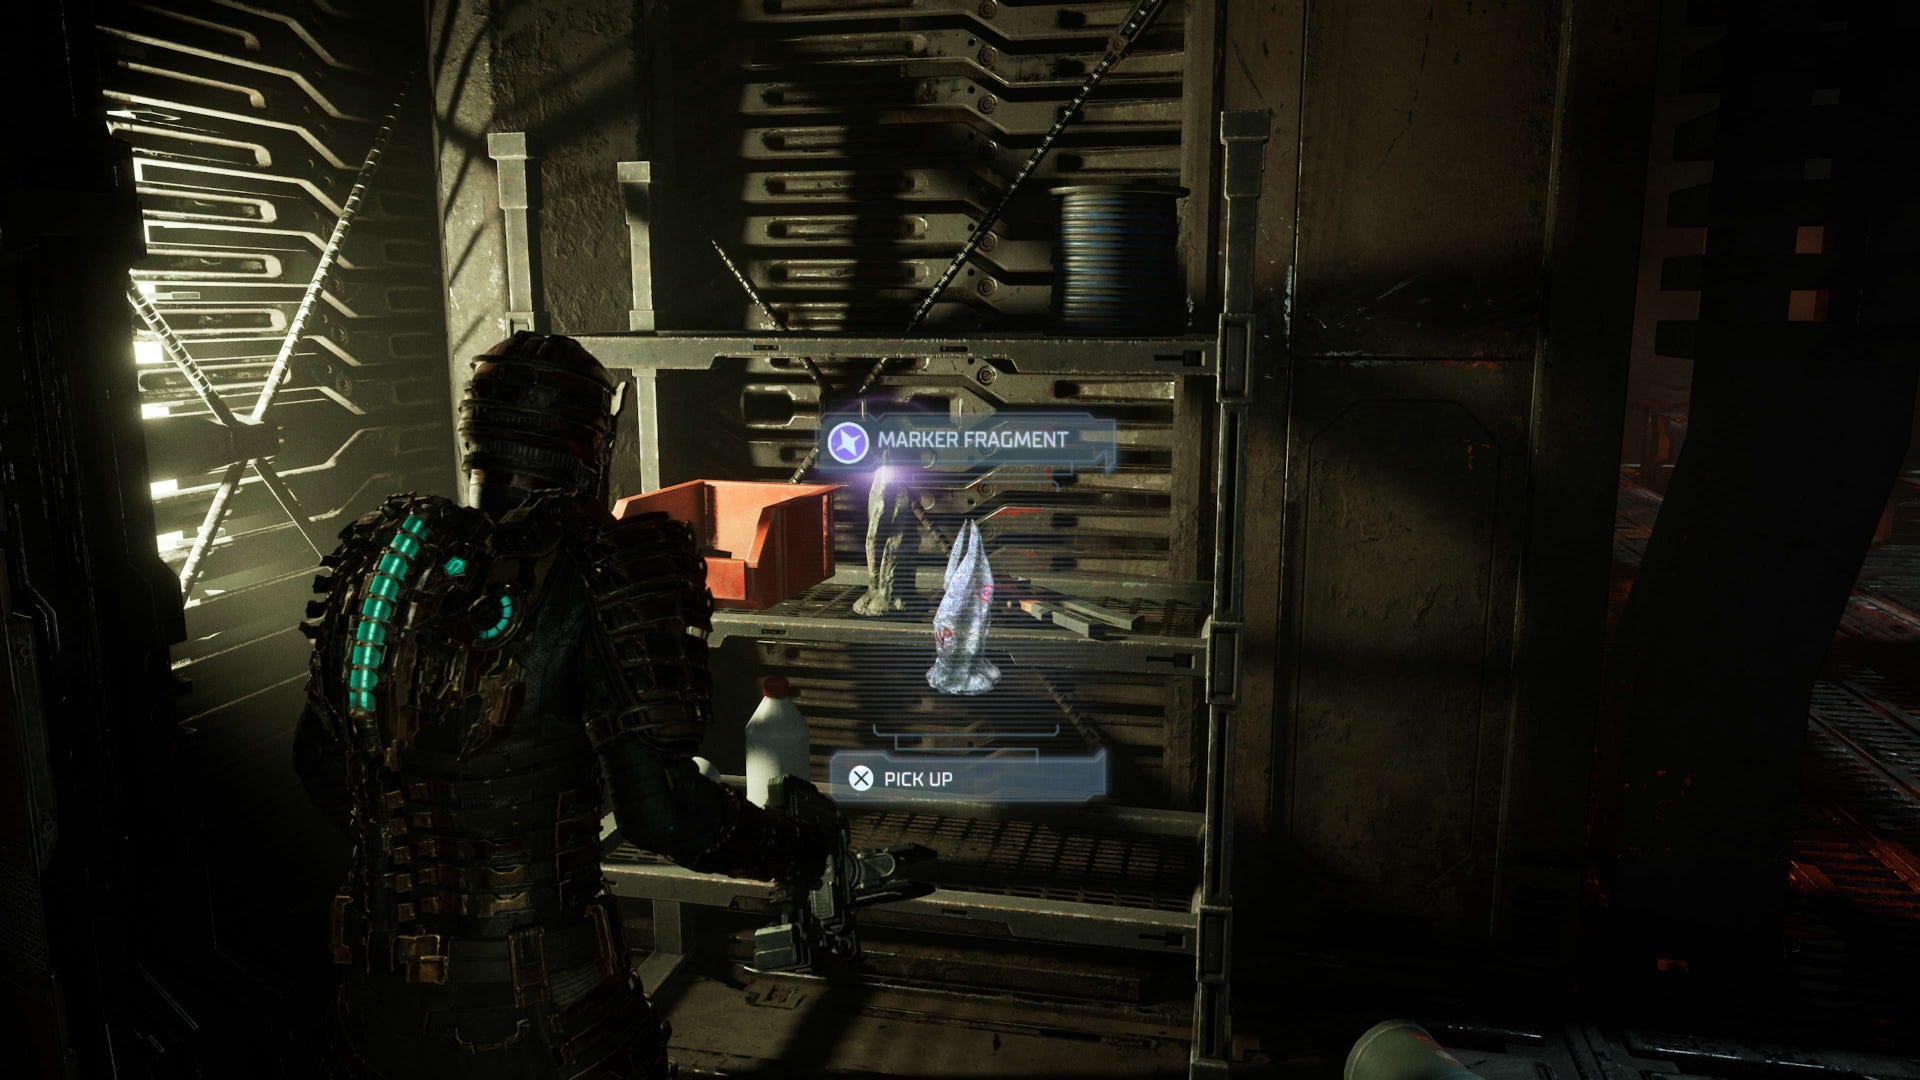
The twelfth and final Marker Fragment to find is found within the Cargo Bay during Chapter 11.
Before continuing with the objective, head over to the corner directly opposite the elevator you descended on, and you'll find a set of shelves.
Sitting on one of those shelves will be your twelfth and final Marker Fragment - congratulations!
Finish up the remaining objectives in the Cargo Bay, but before progressing any further with the story you've got one final objective before you fully lock in access to the secret ending.
We can help guide you through the Ishimura with our weapons and suit locations, Marker Fragment locations for the secret ending, secret break room codes, Security Clearance Levels, Master Override, the Scientific Methods side quest, and the Peng Treasure location. We've also got solutions to the comms array satellites and Centrifuge puzzles, a Trophy and Achievements list, and strategies on how to beat the Hunter, Leviathan, and Leviathan Remnant bosses.
How to activate the secret ending in Dead Space and earn the 'Reunion' achievement/trophy
At this point, you're about to reach the point of no return in the story - finish up any side missions and exploration duties you wish to attend to, but first and foremost, you'll want to lock in the secret ending now you have all twelve Marker Fragments.
As a reminder, you should have one Marker Fragment from each of the following locations, though the Crew Deck has two - you can check the location name for each collected fragment in the Key Items section of the inventory:
- Administration (Chapter 1)
- Medical (Chapter 2)
- Engineering (Chapter 3)
- Flight Deck (Chapter 4)
- Dr. Mercer's office (Chapter 5)
- Cryogenics (Chapter 5)
- Hydroponics (Chapter 6)
- Mining Deck (Chapter 7)
- Communications (Chapter 8)
- Crew Deck 1 (Chapter 10)
- Crew Deck 2 (Chapter 10)
- Cargo Bay (Chapter 11)
Once you've got them all, go to the nearest Tram Station, enter the tram and set your destination to Crew Quarters.
From here, head through the doors to the Crew Deck and into the Common Area, then take the elevator in the back left of the room down to Floor 1.
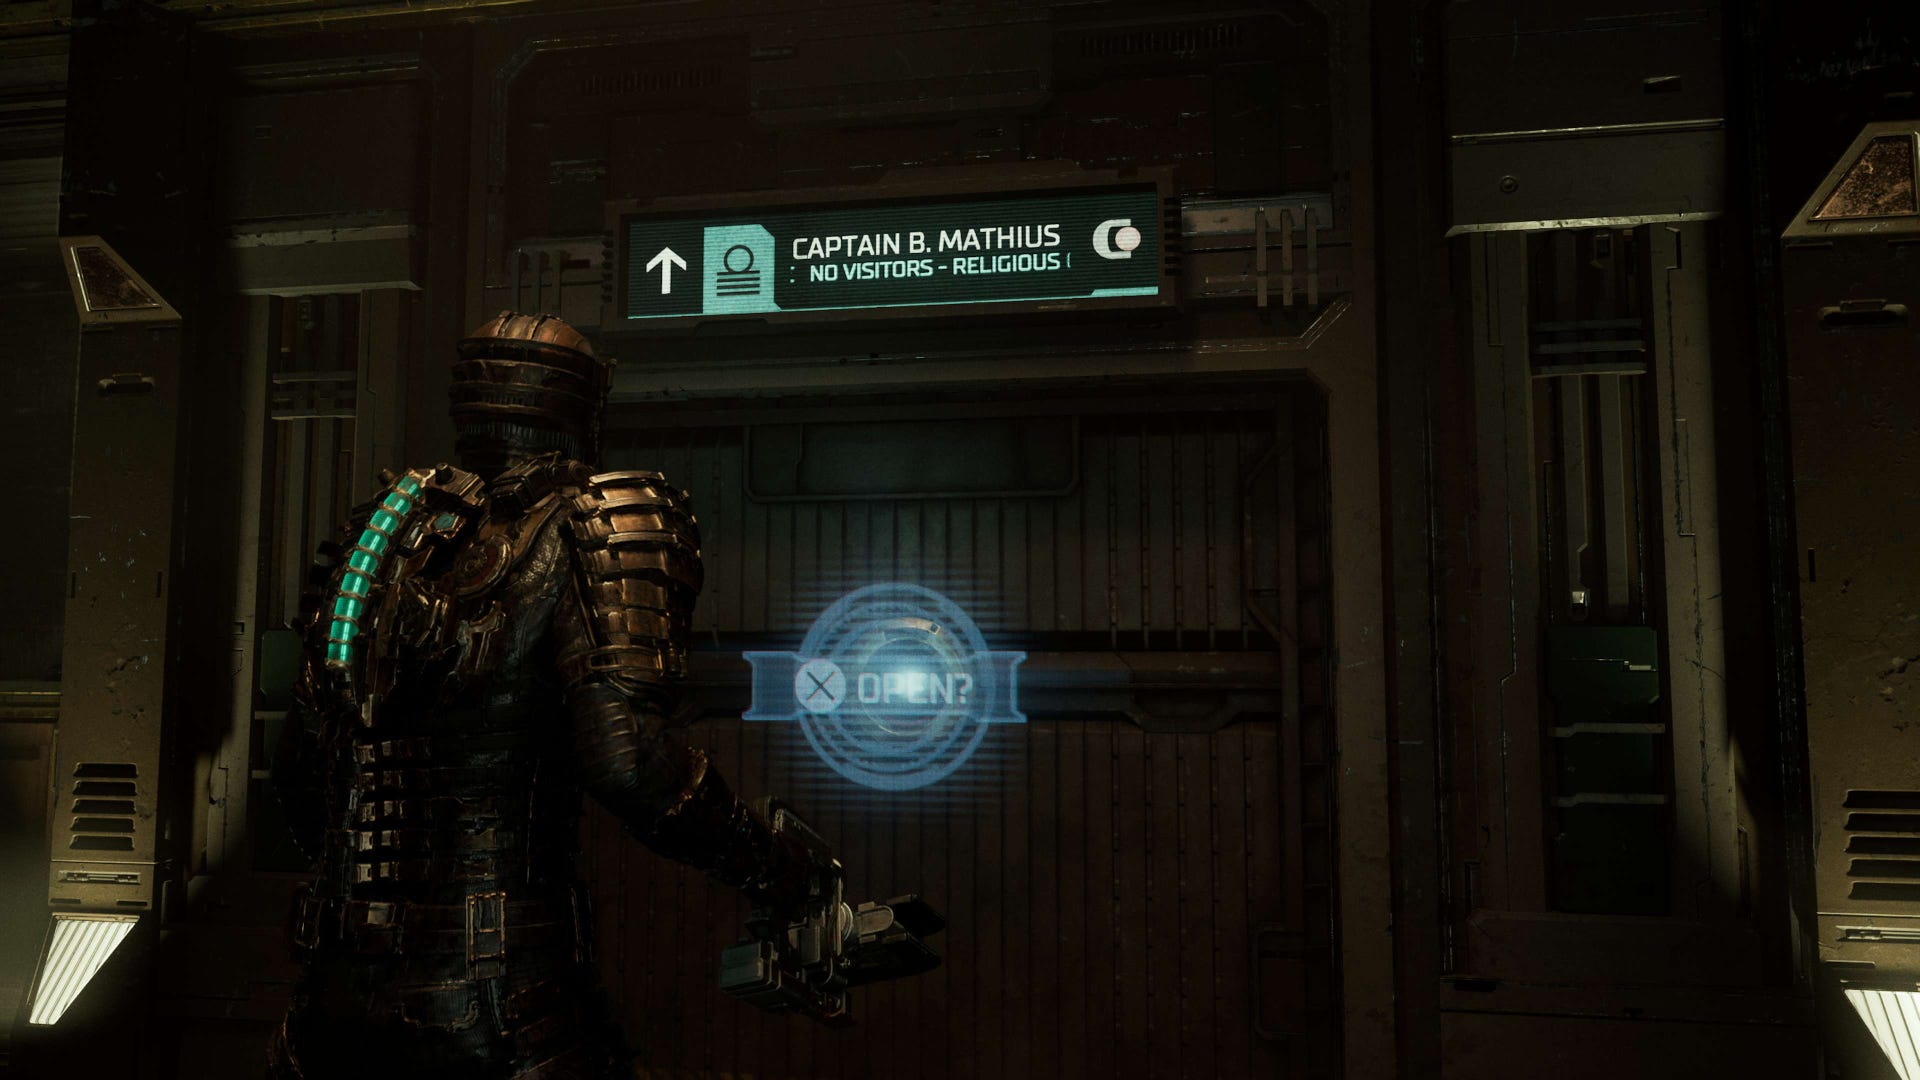
Upon exiting, go through the door ahead into the Central Nexus through the broken window and up the nearby elevator to the upper floor - head around to the right, towards the other end of the room, past a save station and through a door labelled 'To Executive Quarters'.
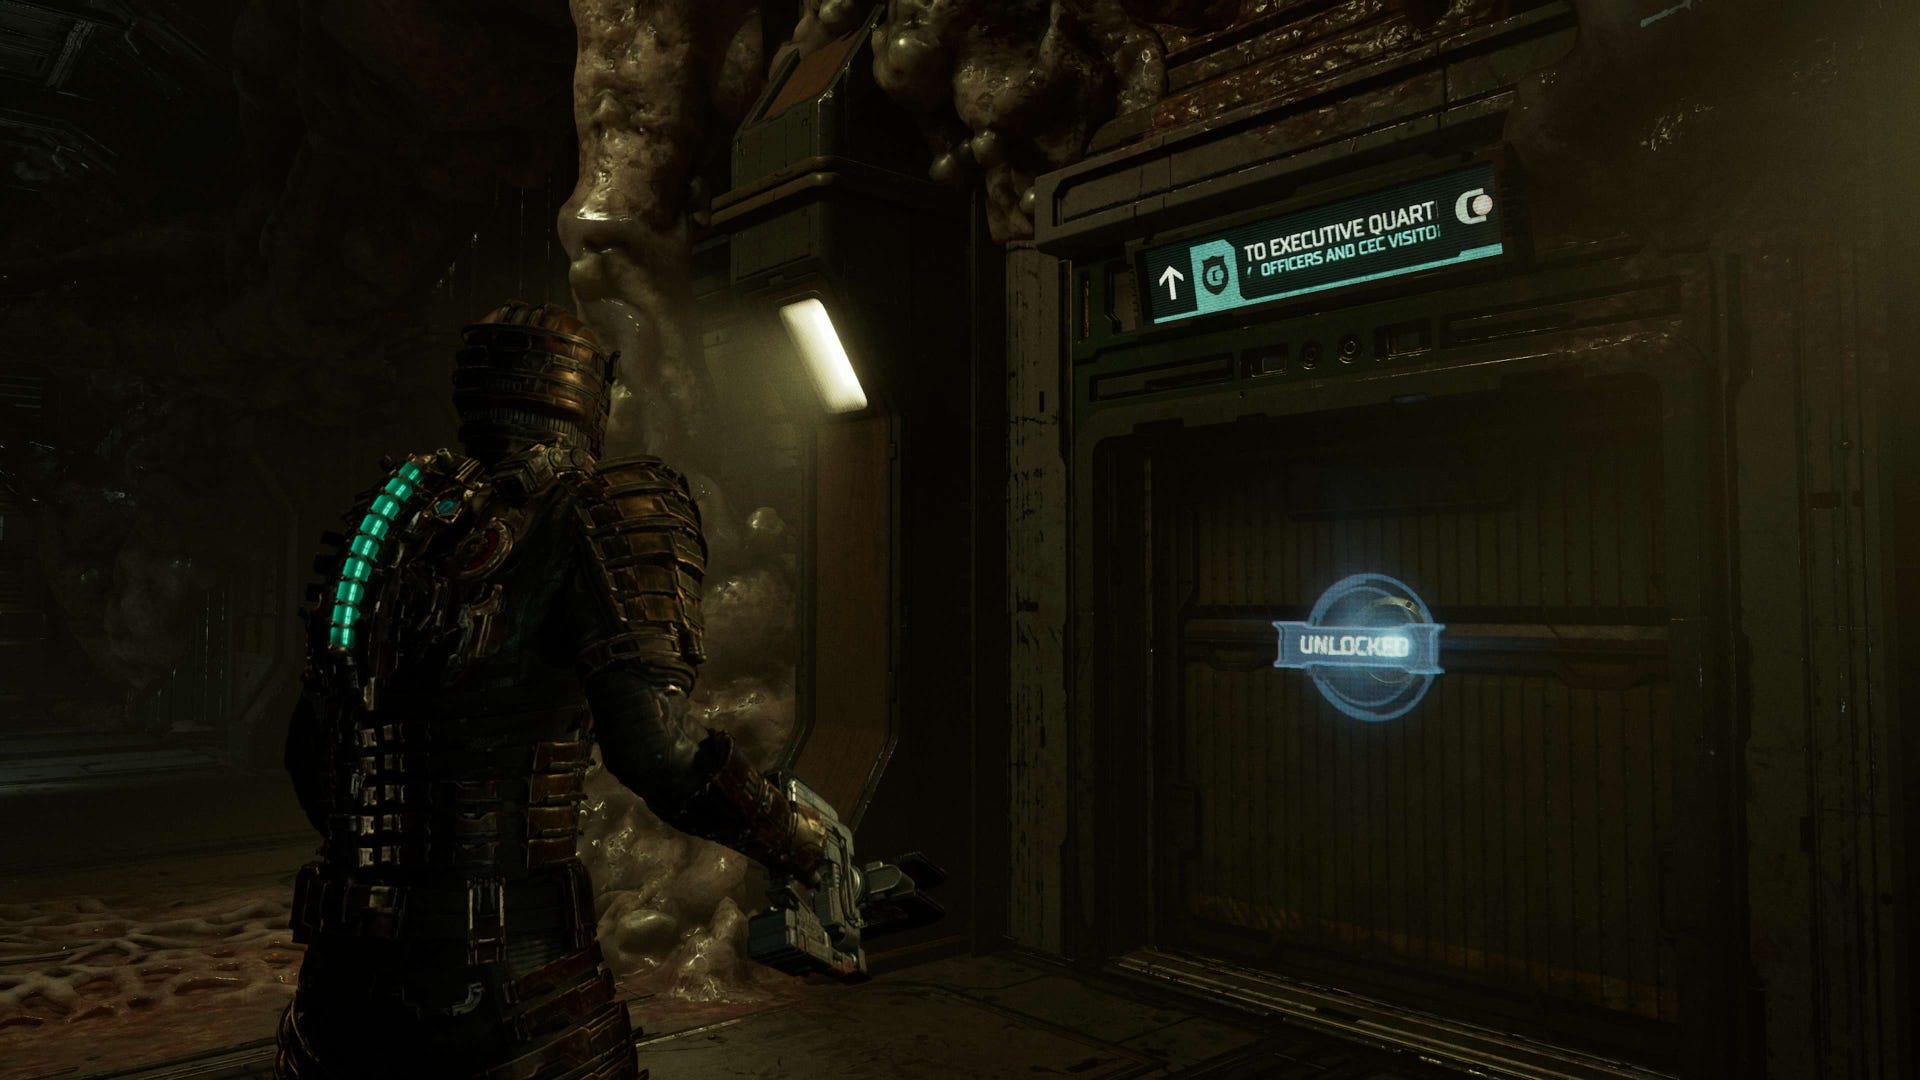
Continue through the corridor and into the Executive Quarters.
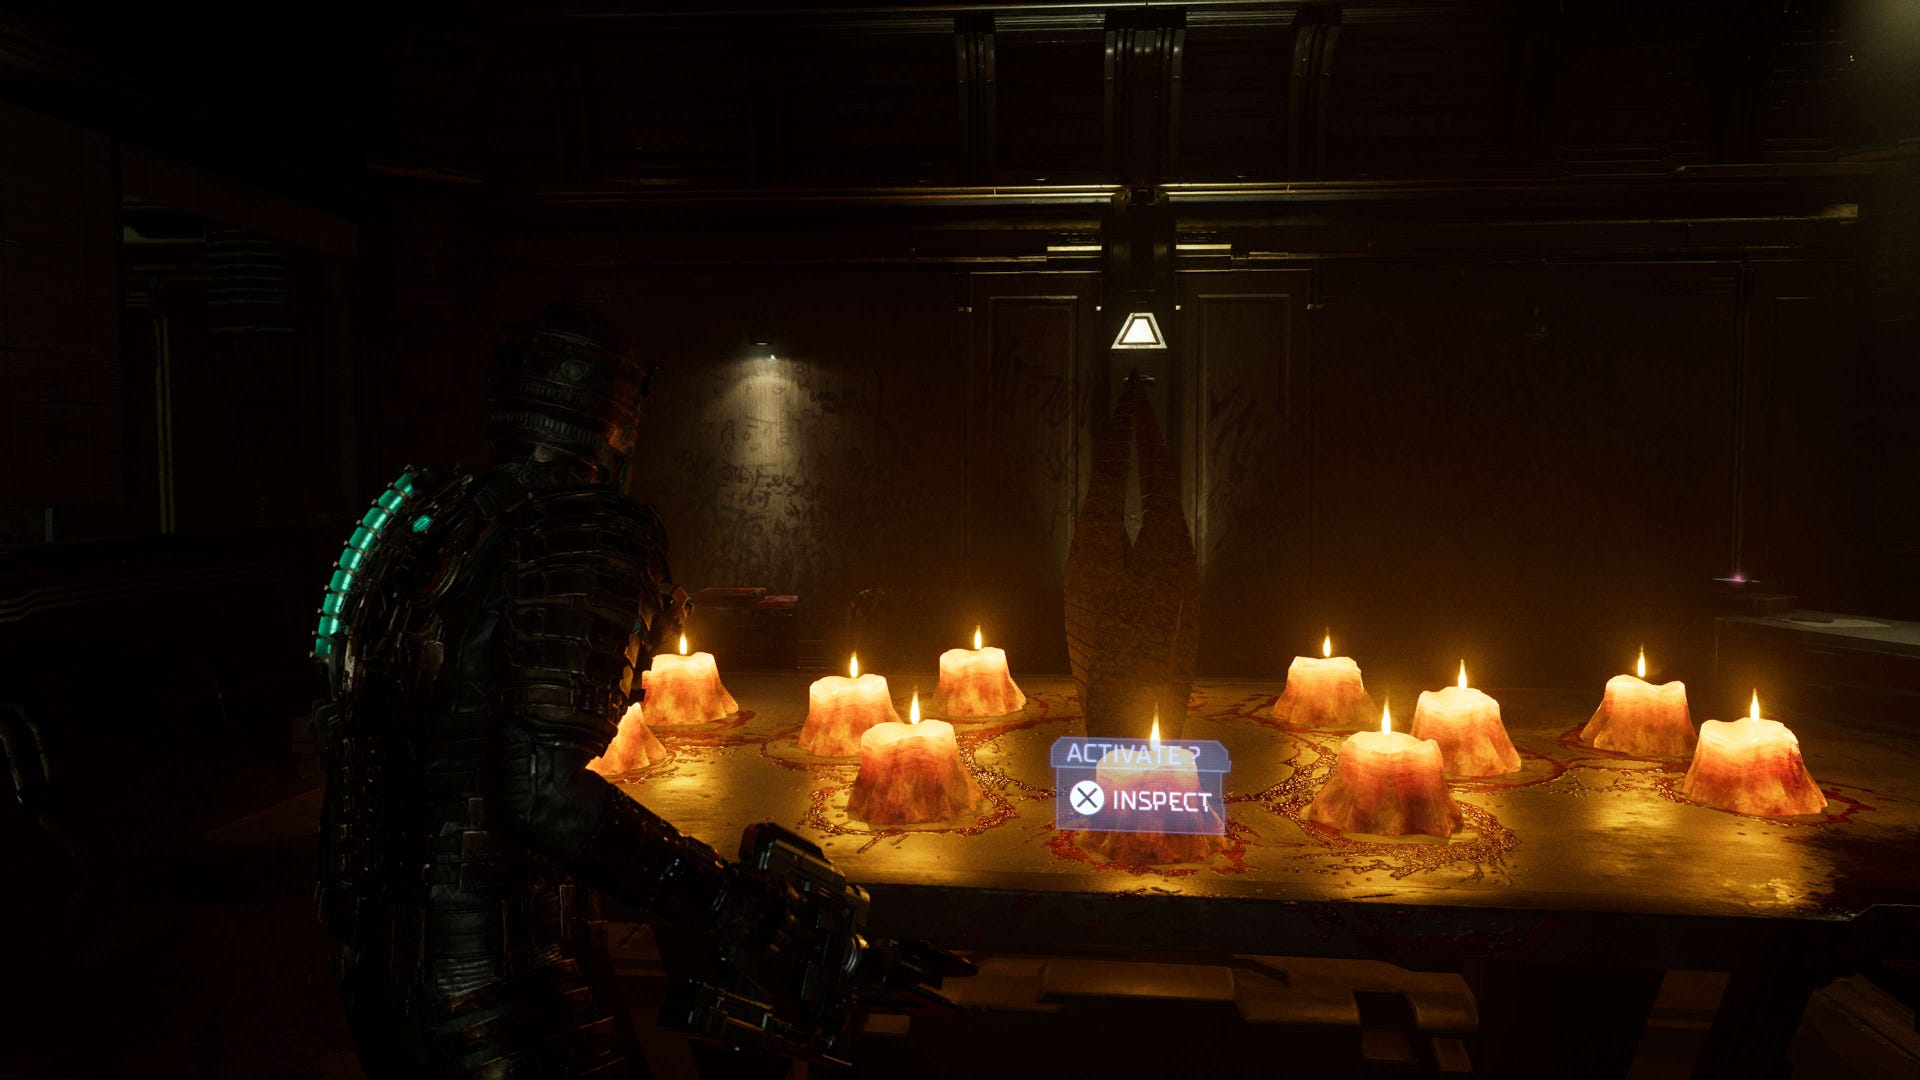
On your left will be the office of Captain B. Mathius - labelled on the map as the office of 'Lt Commander V. Holt' - and here is where you'll find an interaction prompt next to a table which will activate the secret ending.
Following that interaction, continue on with the story as normal whenever you're ready, completing Chapter 11 and continuing past the point of no return message.
Upon completion of the following Chapter 12, you'll be able to witness the secret ending, receiving the 'Reunion' achievement or trophy, as well as any other relevant achievements you've hit the criteria of - congrats!
If you're a completionist on the hunt for more to do, be sure to check out our trophies and achievements explainer running through everything you need to do to hit 100%, as well as our other guides giving you tips and recommendations on the best weapons to use and how to find them, as well as where to find the secret 'Peng' treasure.