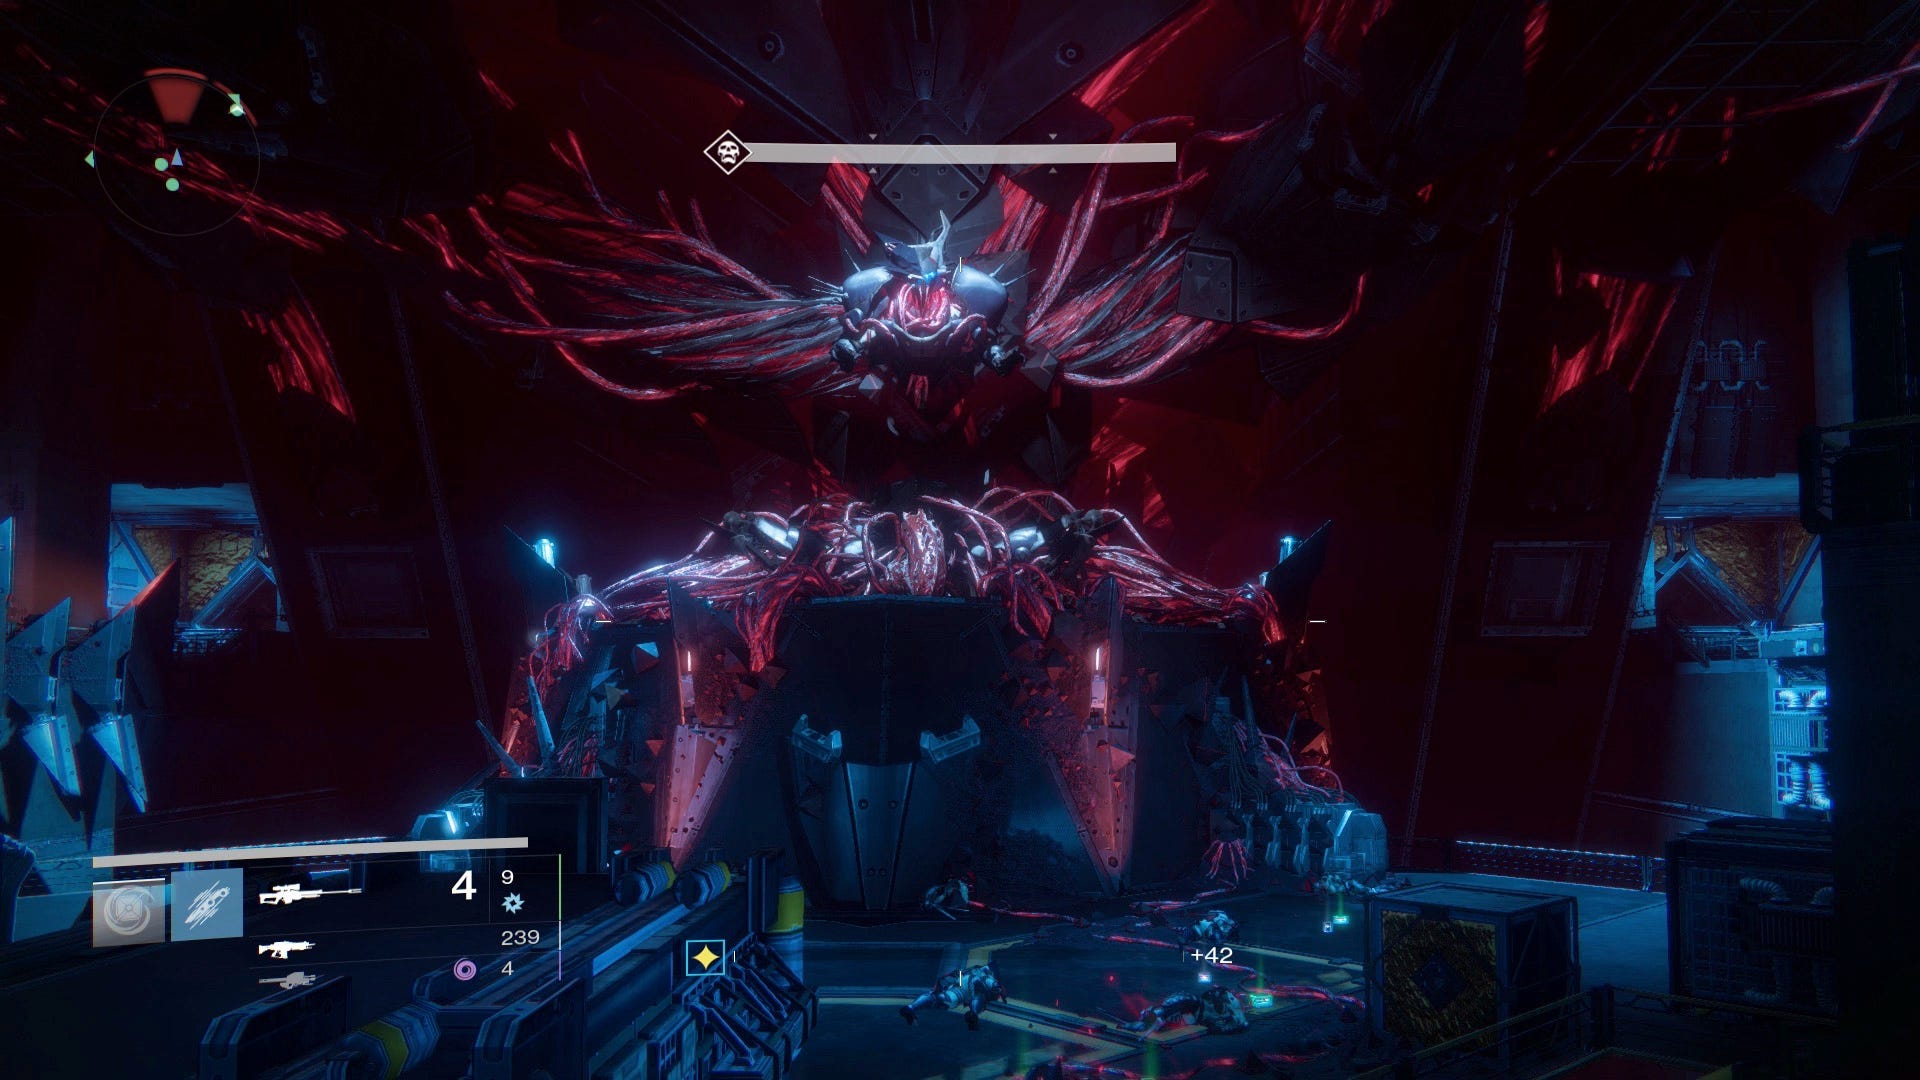
Destiny Wrath of the Machine Aksis boss - How to beat final boss Archon Prime, Cannons, Servitors and Empowered explained
What to do with those Cannons, Servitors and later, all those Empowered players.

Time for the third and final part of the latest Raid with Wrath of the Machine's Aksis, Archon Prime. As you can imagine, it's perhaps the most challenging series of battles that requires good communication to progress. It's in two parts - don't worry, there is a checkpoint in-between - and be aware you'll need to make sure you're a decent level to survive the onslaughts of enemies that come your way - you can use our how to reach Light level 385 article if you need to go away and grind for a little while before returning. Good luck!
Wrath of the Machine Aksis boss part one - what to do with the Null, Shock, Scorch Servitors
A summary of the steps to beat the first Aksis boss phase:
- Split the teams into three teams of two - left, middle and right, and designate a player on each team as a Cannon wielder and a bomb thrower.
- Attack enemies until a Scorch Captain appears in your area; kill them, have one player collect their Cannon and make note of the element.
- Then, each area will be visited by a Servitor, all of a different element. Have each player visit the Servitor that corresponds with their Cannon's element and kill them, dropping a bomb.
- Have a different player collect the bomb and throw it into one of the nodes in the centre of the arena. Timing doesn't matter.
- Repeat the process, which sees two nodes, three nodes and then nine nodes to throw bombs at. The last phase has three Servitors per area, meaning nine bombs.
- If you fire 7 of the 9 bombs at the nodes, you'll be successful and trigger the next phase.
Note! Heroic difficulty and Challenge Mode introduces additional mechanics and challenges during this battle. Once you are accustomed to beating Aksis normally, see our Wrath of the Machine Hard mode and Challenge Mode articles to see what's new.
Detailed breakdown to beat the first Aksis boss phase:
Similar to the first encounters of the Raid, you'll need to split the Raid party into three teams of two players - left, middle back where you start, and right - and designate those two players into a Cannon wielder and a bomb thrower.
Clear enemies in each section. In the first 'wave' is a powerful Vandal, which pays to clear as soon as you can (a Sword will help here) followed by a Scorch Captain of a particular element. Make note of this element, kill them, and have the designated player collect the Cannon. Don't use it yet.
Soon after, in each area a Servitor of each element will appear in all three areas. Here, the Cannon players need to go to the corresponding area the element is in and kill them; you need to charge each shot for it to be effective, so fire and hold the trigger, and when the charge is at its highest noise pitch, release for maximum damage.
The clearest way to highlight which Servitor is where is to call out the element of the Servitor, as those with Cannons will know their own elements. Note that during this phase the bomb throwers should stay in their area, as when the visiting Cannon carrier visits and kills the Servitor, a bomb will drop.
The reason we have separate bomb throwers is because those who use the Cannon have a cooldown that means they cannot pick up a bomb. The bomb thrower will collect their areas bomb and throw it at one of the nodes in the centre. In the first phase, there are just two nodes - to the left and right of the boss - and three bombs. You have one left over, but don't worry about that. Also, timing here doesn't matter, so throw as soon as you're ready. The third might be handy as a left over if something goes wrong, but otherwise it's a surplus.
The cycle will repeat, and when it comes to the bomb throwing phase, there will be three nodes, two in the same place as before, and now one below in the base of the middle area. All three nodes need destroying, and again, timing doesn't matter. Throw as soon as you're ready.
The final phase amps it up with three Servitors per area, and yes, all are different elements. They should arrive in waves, so be clear where which element is arriving for the Cannon carriers to run to. There are nine nodes for the nine bombs, three in the same location, and more to the sides in various positions.
To keep things simple, the left and right teams should take out the furthest nodes so the middle player has clear options of where to throw theirs, in case of confusion. As long as you land seven of the nine bombs, the encounter will end.
Other things to know about the first Aksis boss phase:
- To start the encounter, one of the players in the middle has to sprint forward into the haze of red SIVA.
- You could stick to the prior teams as the first part of the Raid to keep things simple, but since both players will be coming up against tougher enemies and have to deal damage, it might help to pair the highest and lowest level players in pairs.
- With each Scorch Captain's element being unpredictable, it pays for all players to have attacks of each element at hand (a Special, Heavy and Super) so they can quickly dispatch them.
- Don't let the Servitors travel to the glowing red panels at the base of each area, as it'll destroy them.
- While you only need to land 7 of the 9 bombs in the final phase, it obviously helps to play as if you need to land every single one to be safe.
If successful, the first part of the Aksis fight will be over, giving you a Raid Gear drop and a checkpoint. Now, get ready for part two...
Want more Destiny: Rise of Iron guides, tips and tricks? Then read our Wrath of the Machine walkthrough and guides, complete list of all Dormant SIVA Cluster locations, tips on how to reach Destiny's max Light level, how to complete the Exotic Gjallarhorn Quest, Khvostov 7G-OX Quest and Thorn Quest and new modes Vanguard Elite Strike Scoring and SRL.
Wrath of the Machine Aksis boss part two - what to do with each Empowered player
A summary of the steps to beat the second 'Empowered' Aksis boss phase:
- As before, split the teams into pairs going left, middle and right, and have one player dealing with Scorch Cannons and the other on throwing bombs.
- Avoid Aksis and kill enemies until the elemental Captain arrives, and use their Cannon on the corresponding Servitor of the same element elsewhere in the arena.
- Throw all three bombs that drop from the Servitors at Aksis to drop his shield.
- By this point, three players will be 'Empowered', who must stun Aksis when he wraps around the arena by leaping onto his back. After the third stun, roll out damage until he wraps back to the centre.
- After the warp and stun phase, Aksis will trigger a SIVA Density Critical attack, so all run to the same pillar at the back of the arena to avoid damage.
- The pillar will disappear. Reset positions and repeat, standing on a new pillar at the end each time, giving you a total of five rounds. If his health is low enough, then deal a final bout of damage to win.
Note! Heroic difficulty introduces additional mechanics during this battle. Once you are accustomed to beating Aksis normally, see our Wrath of the Machine Hard mode article to see what's new.
Detailed breakdown to beat the second 'Empowered' Aksis boss phase:
Much of this second and final phase is very similar to the first one, with the addition of a second part where you can stun and deal damage to Aksis with Empowered players, a process which takes a deal of co-ordination to get right.
So, once again split into three teams of two, positions left, middle back and right, and designate each one player within each team the role of dealing with Scorch Cannons and the other throwing bombs.
The first part of each wave is largely the same as before, clearing enemies until the elemental Captain shows up. Make a note of his element, kill him, take his Scorch Cannon, and use it on the corresponding Servitor that shows up elsewhere. A total of three bombs will drop, and have the bomb throwers lob the explosives directly at Aksis, all three of which will drop his shield. If you fail to do so, the team will wipe, so it's a vital step.
So far, so similar, but there are a few important differences. For one, enemies are now Shanks, which when grouped up can wipe out players quickly, so it's important to stay on top of crowd control. Aksis is also in the picture, firing at players as he warps around the arena - either on the wings or at the front - with cannon bursts or clouds of SIVA which limit where you can stand temporarily.
The trick is learning the safe spots where he cannot see you, which will stop him firing in your direction. If SIVA clouds appear around you, retreat back until they disappear and you can come forward again.
The other thing is that during the above phase, three of six players will randomly be 'Empowered'. This is state that allows you to stun Aksis after you have thrown all three bombs and he starts warping around the arena. He warps to one of four places; at the back of the left and right wings, middle front below his stage, and middle back, where everyone spawns in where they start.
You want an Empowered player positioned on each wing, looking after the left and right points respectively, as well as the centre front warp point. The third player will be at the far back for the middle back spot. Organising where each random player goes is the most difficult part of the battle, and we elaborate on how you can do it successfully in the first bullet point below - but for now let's discuss what you do next.
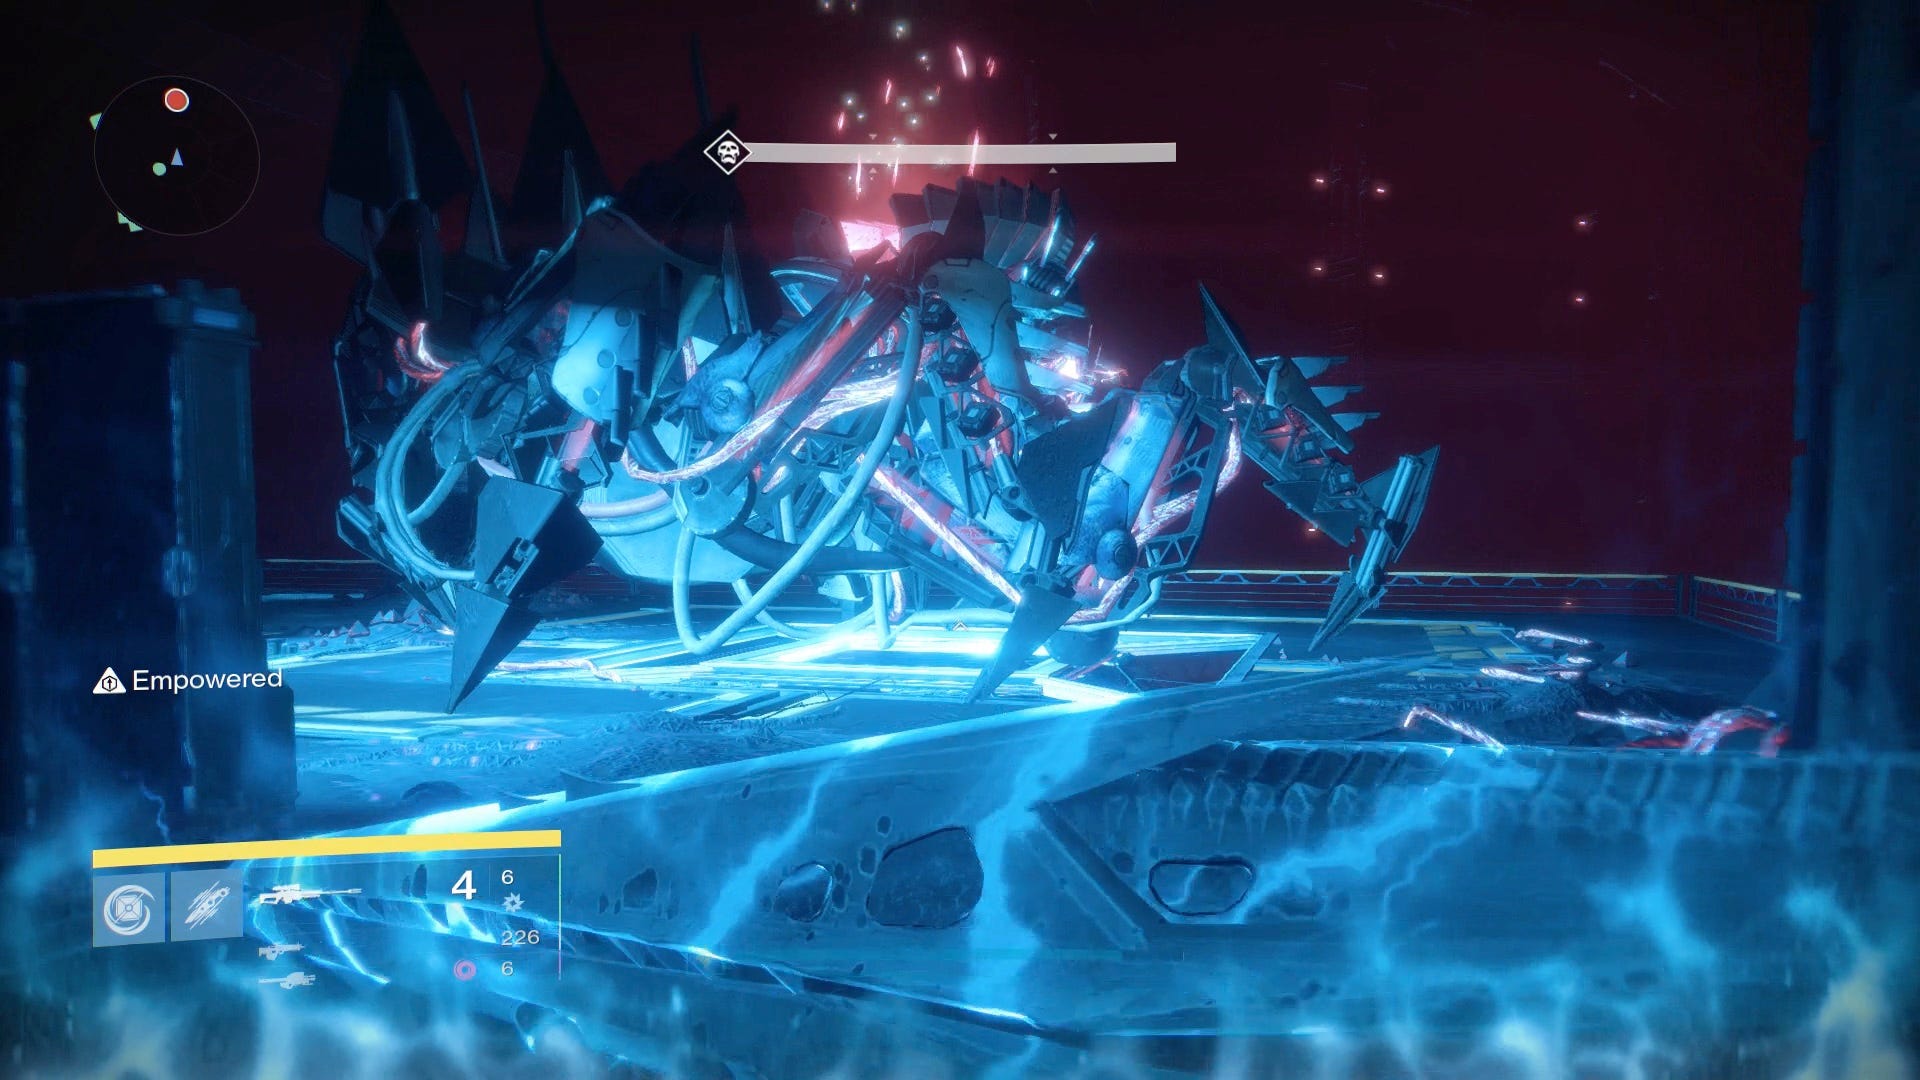
When he warps in, the nearest Empowered player will jump onto the red glowing point on his back, press the button prompt to slam dunk and stun him. (If he warps centre middle, then both players on the wings should try and get him to be safe - if you position yourself correctly, you should have plenty of time to make that sprint and leap.)
If successfully stunned, he will enter a short phase of damage, and another random set of players will be Empowered. He will then warp another two times to the other positions, each time with another random selection of empowered players, and on the third and final phase, he will be stunned for much longer, which is where the bulk of your damage will come from. Give him all you got.
After the third phase's stun - or if you fail to stun him in the prior two - he will trigger a SIVA Density Critical attack, which requires players to stand on one of the pillars at the far back of the arena. Make sure you stand on the same column (we went left to right to make things easy to remember) as it will disappear once the attack is over, and you will need all four to get enough rounds in to deal enough damage to Aksis over the course of the battle.
The process will then repeat, giving you a total of five rounds (including an Enraged phrase) to bring his health down to around 10%, where he will warp to the front. Deal a final bout of damage quickly to win the fight.
Other things to know about the second 'Empowered' Aksis boss phase:
- The trick to this Raid boss is successfully communicating the position of Empowered players as quickly and cleanly as you can. Three of the six players will be chosen at random as the Captain arrives, but do not call out who is Empowered just yet - you need to keep the voice channel clear so you can work out the position of the Servitors first. Not only that, but the Cannon wielders will be moving around to their respective elemental Servitors. It's at this point - about when the bombs start dropping - that the team's positioned will be settled, and that the Empowered players should start calling out their positions. There is a chance more than one Empowered player will be left, middle or right at this point, and that's fine - you just have to quickly settle on where the other one should go. It's very easy for two players to call their position and assume the others are filled, so stake your claim, repeat your location to be safe, and be willing to run elsewhere if you need to. This is more important during the following two warps before the long damage phase, as you have less time to organise yourselves.
- After Aksis is stunned, while it's possible to get some damage in before he warps, but the number one priority is for newly Empowered players to get into position ahead of the next warp. As such, if you are Empowered, don't worry about dealing damage, focus on communicating positions, moving and watching your designated warp point. It's the third and final phase that's the most important, as it's much longer and so allows you to get the most damage in, so reaching it every time is crucial to actually getting his health down enough to finish the battle.
- When you are dealing damage, especially if your team is ranging 360 to 370, you want to use your most powerful attacks as fast as you can. Sounds obvious, but in the heat of battle and moving it's easy to forget to reload and stock on ammo. Those with Shock Cannons should make use of them as they deal a lot of damage, make sure you have plenty of Special and Heavy ammo on you before the third phase (pop a synth when standing on the back pillar between rounds, or if you're not empowered, quickly as he warps) and hold out using useful Supers (the Hunter's tether to increase damage for all players, and Celestial Nighthawk Golden Gun are good shouts). We managed to 'complete' every phase and not get enough damage to trigger the final attack, and after a visit to the Tower where we swapped around our weapons (Black Spindle is always a winner) we managed to increase our damage output much better. Higher Light levels also help, too, but provided you're all prepared each round, it's absolutely doable.
- When the Empowered leap onto the back of Aksis, make sure you get plenty of height with a triple jump or extra agility if possible. This is important if he warps centre front, as one of the wing players has to jump across to make it. Don't be frustrated if you mess it up the first few times, get some practice in.
- Aksis will always warp to a different spot than the one he's currently on. This can be possibly useful for the left and right Empowered players, allowing them to rule out one of the two positions they are keeping tabs on.
- If the Cannon players are struggling to get the Captain down in the first part of the battle - whether due to other enemies, or just simply dealing damage fast enough - then going invisible and using a sword is always a good bet. Otherwise, another player who has picked up a Cannon can help, but it's a risky strategy, and you'll want to prioritise those rockets for the damage dealing phase if you can.
- As always with any Raid boss, don't expect to succeed at first. Write off the first hour or so as practice; even though some of the mechanics copy over from the first phase, it is more difficult staying alive initially, and communicating with the addition of Empowered players isn't easy. The fact you can continue going even if you fail to stun him correctly allows you to go to the next round, continue to practice crowd control and work on communication without any pressure of finishing the whole battle, so do yourself a favour and don't wipe when you play for the first few attempts.
Once you've finally taken Aksis down, the Raid is complete - give yourself a big pat yourself on the back! Get your Gear spoils, and if you've yet to use your SIVA Cache Key that week, then pop open the chest for extra spoils.
Before you head back to a social space, you can finish the Outbreak Prime puzzle and start the Challenge the Corruption Quest. Jump off the front of the area, to the left of where you spawn, to find a ledge taking you to a laser-filled room, and the chest that kicks it all off.
Along with any Dormant SIVA Cluster locations, Wrath of the Machine's Hidden Chests and Isenfyre Token you may have missed, consider this another incentive to come back.
Now you've done it once, you've hopefully gained a couple of Light levels, and it should all hopefully be a little easier next time. Remember that you can only run it once per week to get new rewards, so come back after the Tuesday weekly reset, especially as it's one of the few sources of 400 Light Level gear.
Whenever you're ready for a tougher challenge, return to our Destiny: Wrath of the Machine guide and walkthrough for tips on Hard mode and Challenge Mode.