How to make movies with PlayerUnknown's Battlegrounds replay mode
Beginner, beginner, chicken dinner.

As regular viewers of our YouTube channel will know, myself and the rest of the video team are huge fans of PlayerUnknown's Battlegrounds. It's not just the game we've fallen in love with though, I've also been spending an unhealthy amount of my time with the Replay Mode.
Using this virtual theatre, players are able to re-watch past matches from whatever perspective they like, providing a great way to learn new tactics and flanking routes.
The Replay system serves another purpose though, that of making movies. I've already made two for our YouTube channel and you can find both embedded throughout this article.
Making these cinematic masterpieces was a lot of fun, but because PUBG's replay system is a little janky, the learning process proved to be quite fiddly and very time consuming. So, in order to help all you aspiring filmmakers out there create your very own Oscar-worthy cinematics, here are 10 top tips for making movies in PUBG's Replay mode.

Recording the footage
First things first, you'll need to record the footage of your cinematic masterpiece. You'll obviously want to do the majority of that in the Replay section where you're able to position your camera wherever you like, however I find it's also helpful to record the initial gameplay as well. That way, especially if you're capturing audio at the same time, you have a useful reference tool for the exact timing of events.
I use my NVIDIA graphics card's Shadowplay feature to capture all the gameplay, it's nice and easy to use but the file sizes can be pretty large at high quality so bear that in mind if you've got limited space on your hard drive.
If you're recording something with multiple actors, try filming each player in Replay mode separately first. Do this using the follow camera which is activated by pressing either C or RMB. These work well as safety shots, but also if you position the camera so the player character is facing towards the screen they can also work as easy cuts for extended bouts of dialogue.
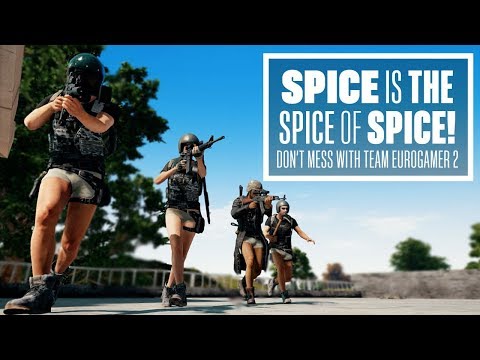
To achieve maximum cinema though, you'll want to get a little more creative with your camera work; especially during high octane action scenes. I spent about 30 minutes recording the exploding vehicle scene in Spice is the Spice of Spice, approaching it from many different angles and viewpoints, including those of the enemy players. By gathering a large mix of close-ups and wide shots I then had plenty of footage to play around with in the edit so I could create a sequences of shots that I felt flowed well.
Don't be afraid to go back in and re-record something if you feel like you can get a better shot. This happens to me many times during the editing phase and although it's a pain to go back and recapture scenes, you'll be happier with the end result in the long run.
F, J and CRTL+U
There are quite a few controls for PUBG's replay mode but if you're serious about making movies you'll need to become best friends with F, J and CRTL+U. They're without a doubt the most useful commands to know and getting used to switching between these three will speed up your production time no end.
First up, F enables Free Camera, an invaluable tool for finding the most cinematic of shots. With Free Camera you can place the camera wherever you want for static shots, or use it to free-follow players and vehicles. Just be warned that it's really hard to match the Free Camera speed with the speed of players who are running or travelling in vehicles. Holding down CRTL or SHIFT will slow down or speed up the camera but it's never really that accurate and it accelerates and decelerates awkwardly. I tend to use the Free Camera for swooping shots that pass over moving objects as they end up looking tidier than if I was trying to manually match the speed of a moving object.
The next command is super useful as it brings up the Replay's timeline. Press J and you can then you can click anywhere on this timeline to be taken to that point in the replay. This is something you'll want to be doing a lot if you're recording scenes from multiple angles. Be warned though (and this trips up a lot of people) if you have the timeline selected it will reduce your ability to move the Free Camera around. Having it active will disable the cameras rotation completely plus any accidental clicks on the screen will potentially snap the camera to another player on the battlegrounds. If this happens, press B to return to your player character and press J to deselect the timeline restoring full control of the camera.
Finally CTRL+U is the command combination you'll need to press in order to remove all the HUD elements from the screen. No HUD is generally the best way to capture the Replay if you are going for a purely cinematic video. Expect to spend a lot of your time bouncing between this and the other two commands in order to set up and then record your perfect shots.
As an aside, if you remove the HUD before you close the timeline, the timeline will remain active even though you won't be able to see it, restricting the Free Camera movement.

Allow time for the assets to load
The way the Replay system works isn't like a true video recording that shows events exactly as they happened. Instead the system reinterprets the saved game data each time you load a replay. That means every time you skip forwards or backwards along the timeline the game will need to reload its assets, especially those of each individual player.
This can lead to moments where character models will not appear for short periods, leaving only their weaponry floating in their approximate position. To combat this when recording multiple takes, make sure you skip back an extra 10 seconds or so from the point in which you want to record. Although this adds some extra wait time to the production, it should give the game ample time to stream in all the assets, saving you a bunch of faffing around in the long run.
Throwables reset themselves
Flicking through the timeline can also affect any throwable that you might be trying to incorporate into your cinematic. This is because each time you move to a new point in the timeline the throwable will reset itself, no matter what stage they were at during the original recording.
A good example of this happening was when I was recording the scene where Team Eurogamer jumps from the roof of a building into a plume of smoke. If I started the timeline too close to the point when we jumped off the roof, the throwable didn't have enough time to fully activate. This meant we jumped limply into a thin wisp of smoke instead.
By triggering the timeline as immediately after the smoke bomb was thrown meant I was able to achieve maximum smoke for the shot. While this did mean capturing the scene took a lot longer than it should have done, the waiting paid off because the overall effect was much more cinematic.
Camera height
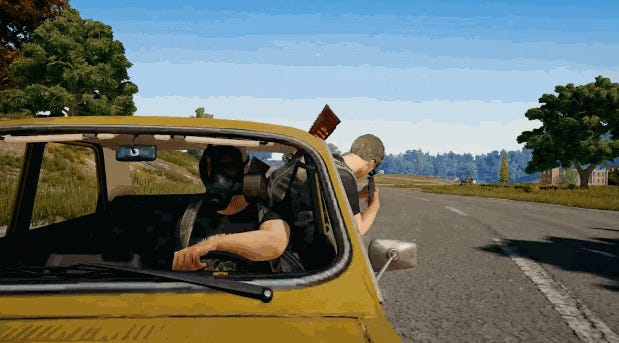
When players are travelling in vehicles, achieving close-up shots of each players face or interior and exterior shots of the vehicle can be rather tricky. This is due to the awkward way the camera can position itself.
When the character you are following gets in a car, the position of the camera remains relative to where their head was before they got into the vehicle. That means the Follow Camera will often be too high, orbiting a spot above the vehicle instead of the players head.
To remedy this, all you need to do is skip back on the timeline to a point in the replay where the players are already in said vehicle. This will cause the camera to recenter itself on the followed player. Now you can use the mouse wheel to zoom in and out on them to capture some cinematic interior shots, or some cool through-the-windows exterior shots. I also used this method to film close-ups of each player separately so I could cut to them as they spoke.
It's such a simple solution to a really annoying problem and it yields some great results for movies with multiple performers. In fact I'd say this is probably one of the most useful and important tips in this list. It was a literal game changer when I realised this was possible.
Field of view/depth of field
To change the field of view and create wider or tighter shots without repositioning your camera, try using the scroll wheel on your mouse. This causes the in game camera to act almost like the aperture of a camera lens, which can be increased or decreased in size to alternate between a shallow and deep depth of field.
With camera lenses, adjusting the depth of field will change the zone of focus, which basically speaking means some things will be in focus while others won't. A wide depth of field would cause more things to be in focus while a shallow depth of field would usually isolate one object or person.
Unfortunately the action in PUBG is sharp no matter what the distance of the objects, or how shallow or deep the field of view is. However it is possible to fake this using a masking tool in your editing software like I did for an opening shot in Spice where I blurred the interior of car to create a focal point on the players stood in front.
This isn't the easiest thing to do with a moving shot, but if you use a static camera and position it so there's something in the foreground, say a tree branch or structure, then it should be relatively simple to add a blur effect to it and fake the depth of field.
Quick zoom
Another great use for the mouse wheel is to create a quick zoom, something I did for the final car chase in Spice which provided one of my favourite shots of the movie.
Unfortunately the movement of the mouse wheel happens in increments meaning slow zooms end up looking rather juddery. Thankfully this doesn't affect fast zooms which can be achieved by rolling the mouse wheel forwards really quickly. This will create shots that snap from one object to another, adding a sense of speed and drama to the action and giving the impression that it's being filmed using a handheld camera. It can take a lot of tries to get this looking just right, but the overall effect is worth it.
Slow Motion
It's really easy to get super-cinematic slow-mo shots in PUBG's Replay mode. Just bring up the timeline, change the playback speed to 0.25 and enjoy the instant cool.
Close-ups
Team Eurogamer are not very good at staying alive, hence the heavy use of our corpses in each PUBG movie. Sometimes a static closeup on a dead body can be rather comedic, especially if there's something happening in the background.
Recording a static dead body on it's own can be a pretty boring and more often than not the end result will give the impression that you've lazily spliced a screenshot into your movie.
For a nice easy fix for this predicament, as you're capturing, very slowly move the camera to emulate the sort of shake you'd get if it was being held by a real life camera operator. This will transform a lifeless, flat shot into something that's less jarring to look at.
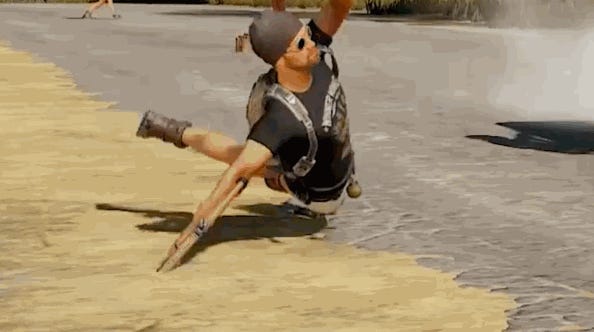
Beware, dead bodies!
Every time a player dies in PUBG their body goes into rag-doll mode so it can do a lovely, realistic crumple to the ground. This means every time you restart a Replay to re-watch someone's death, the game will re-calculate the mathematics behind the rag-doll giving you wildly different results each time.
Because of this it can take multiple tries to capture a shot where a body lands perfectly in frame, especially if said corpse is travelling at high speed.
Worst of all, this means you can never recreate the same death twice, so if you forget to record a perfect landing you'll never be able to recreate it.
If you use these tips to make any movies of your own, please do share links to them in the comments below so the video team can admire them!