Sekiro True Corrupted Monk fight - how to beat and kill the Fountainhead Corrupted Monk
How to beat the True Corrupted Monk in Fountainhead Palace in Sekiro: Shadows Die Twice.
True Corrupted Monk is the next main fight in Sekiro, found in the game's Fountainhead Palace area, following on from Great Shinobi Owl in our walkthrough of the game's bosses and mini-bosses.
You'll find the True Corrupted Monk on the bridge up ahead of the first Sculptor's Idol in the Fountainhead Palace area, immediately after you arrive via giant rope (you'll know what we meanw when you see it...).
Below, we'll cover how to beat Sekiro's True Corrupted Monk, including any particularly strong methods or weaknesses they might have and any handy things to bear in mind.
For more guides and pages like this, meanwhile, cycle back to our main Sekiro walkthrough and boss guide hub.
On this page:
Sekiro True Corrupted Monk - how to get two free Deathblows on the True Corrupted Monk
The True Corrupted Monk - which at first is similar to the earlier Corrupted Monk, but in flesh-and-blood form - is the first boss you'll face in the Fountainhead Palace area, and is entirely missable if you went for the 'bad' ending and fought Emma and Isshin Ashina instead.
There's more on all that in our Sekiro ending steps guide, so let's dive into the actual beating of the thing here.

The True Corrupted Monk has three Deathblow Marks, but there's a relatively easy way to get it down to just the one - at which point you can defeat it surprisingly quickly.
Both of them involve Deathblows from above, but they're done in slightly different ways. Here's how to do the first one - and before you start be sure to have the Shinobi Firecracker Prosthetic and a full stack of 10 Fistful of Ash readily equipped to use in phase three.
How to get the True Corrupted Monk down to two Deathblow Marks
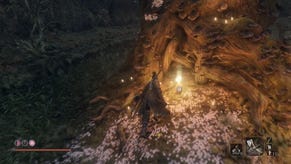
1. Run - but don't sprint - from the Sculptor's Idol through the gate and to the right, and straight away grapple up to the first tree branch.

2. Walk to the end of that branch towards the next branch along, and grapple to the further of the two available grapple points, quickly.

3. Then from there, walk along the smaller little branch towards the middle of the bridge, where you'll see the True Corrupted Monk's landed below.

4. Wait for about one second, then jump towards the True Corrupted Monk and there'll be a very narrow window where the Deathblow marker appears, and you can quickly hit R1/RB to get the first kill.

This took us a good half-dozen tries, but it's definitely possible and not too time-consuming if you fail - if you do fail it, you can get a couple of free hits in and then either practice fighting the Monk, let yourself die to it in order to immediately retry to stealth method, or actually get the first Deathblow down with standard combat, and then still use the following method for the second mark - yes, the second one can still be got with a Deathblow from above, even if you get the first one in combat.
With the first mark down, the True Corrupted Monk will go into a very tricky second phase, where it appears in multiple ghost-like forms that hit multiple places at once. It's extremely tough, but you can skip all that with the below steps.
How to get the True Corrupted Monk down to one Deathblow Marks
1. After you get the first Deathblow, however you get it, immediately grapple up to the tree branch on the back-left part of the bridge, as you look at it from the way you arrived.

2. The True Corrupted Monk will disappear after the first Deathblow and reappear in the middle of the bridge. You should be behind it and to its right side now on the tree. Once it's reappeared there, jump down towards it.

3. The Deathblow sign will appear - again very briefly - and you can land it for the second easy kill of three.


Now, for the final phase - which should be familiar after beating the first Corrupted Monk in the Mibu Village area.
Looking for more Sekiro pages like this? First up, the first main Sekiro patch notes for update 1.03 are live. Otherwise, our Sekiro boss guide, boss list and walkthrough hub has everything in one place, including pages on Lady Butterfly, Genichiro Ashina Way of Tomoe, Folding Screen Monkeys, Corrupted Monk, Guardian Ape, Great Shinobi Owl, Emma and Isshin Ashina, True Corrupted Monk, and Divine Dragon. We also have in-depth pages like Sekiro tips and tricks to get you started, Sekiro Skills, skill tree and Esoteric Text locations explained, our deep dive on the Sekiro combat system, Posture, and Perilous Attacks, or details on all Sekiro Prosthetic Tool locations, how to cure Dragonrot and Rot Essence in Sekiro, Gourd Seed locations, a Divine Confetti farm route method, all Treasure Carp Scale locations, all, Prayer Beads locations and all Snap Seed locations, too. And when you're ready - the how to beat Isshin Sword Saint and an Isshin Sword Saint cheese, plus the many Sekiro endings.
How to beat the True Corrupted Monk in Sekiro: Shadows Die Twice
You should have the True Corrupted Monk down to one Deathblow marker now, at which point it can be defeated exactly as you defeated the first Corrupted Monk you faced.
If you forgot, you'll need to equip the Shinobi Firecracker and a full stack of Fistful of Ash, then it's like this:
1. Use the Shinobi Firecracker Prosthetic at a good opening, and land exactly two hits.

2. Immediately follow up those two hits with another Firecracker. Count in your head to help: 1, 2, Firecracker - and keep going until you run out of Spirit Emblems.
3. Switch to using Fistful of Ash (have it ready equipped in that slot and you won't have to do any awkward toggling, just go straight to pressing Up on the D-Pad). Use it exactly like you did the Firecracker: 1, 2, Ash; 1, 2, Ash, and so on.

Keep going, and the True Corrupted Monk will go down easily - in fact you can do the entire thing without it landing a single hit, if you get it right. Congrats!
That's all you'll hopefully need for tackling this encounter. Next up in our guide is Divine Dragon, or you can cycle back to our main Sekiro walkthrough and boss guide hub for much more explainers and advice.


