Destiny 2 Warlord's Ruin dungeon walkthrough
Have fun storming the castle!

Warlord's Ruin is the-new Dungeon in Destiny 2 for the Season of the Wish.
This Scorn and Taken filled castle sits nestled in the mountains high above the EDZ. Like all Destiny 2 dungeons, this is tuned to be challenging PVE content. You’ll want high level characters with a solid build, and a trustworthy team to get you through the end. If you succeed you can collect some excellent gear, including a chance to earn the Buried Bloodline exotic Sidearm.
To set you on the path to success we’ve put together this guide that covers every encounter, including Rathil, First Broken Knight of Fikrul, the Locus of Wailing Grief, and finally Hefnd’s Vengeance.
In this guide:
Organizing your team for Warlord's Ruin
Similar to setting up for a raid like Root of Nightmares, communication will be key to your success. Make sure you and your team can coordinate clearly. Voice chat is really helpful.
There will be a lot of Scorn to clear, and sections with swarms of Taken. Osteo Striga and Riskrunner are both viable for this. Linear fusion rifles like Taipan-4FR are still a strong option for boss damage, while Solar Rocket or Grenade Launchers are also strong options. Either a Warlock who can drop healing rifts or a Titan than can drop barricades can help everyone stay alive. Regardless of how you set it up, you will want to make sure you can cover all of those bases.
The recommended power level for Warlord's Ruin is 1790, though enemies are as high as 1810. Being properly leveled is very important to make completion reasonable, so be sure to upgrade to your finest weapons and armours before you start.
How to start Warlord's Ruin in Destiny 2 and begin your climb
In order to access Warlord's Ruin you will first need to visit Ikora in the Tower. She will give you a quest called "Shadow of the Mountain." Once you have this you can open the Director, navigate to the EDZ, and launch Warlord's Ruin.
You’ll begin at the base of a mountain. Then you’ll need to ascend to the entrance of the keep. Start by jumping onto this tall rock.
Jump high onto this cliff, and to the platform behind it.

Now proceed straight. There are a few more jumps and bends, but soon you will arrive at the fortress doors, with the first boss waiting just beyond.
Rathil, First Broken Knight of Fikrul strategy
Before you will be Rathil, First Broken Knight of Fikrul. He's the first boss. The battle starts as soon as you approach or shoot him. This a mostly straightforward boss fight that will introduce the key mechanics of this Dungeon.

When the fight starts Rathil will be invincible. He’ll summon swarms of Scorn enemies. Do your best to stay alive while trimming their numbers, and eventually three important things will happen.
First, a message that reads "Imminent Wish" will appear with a 30 second countdown timer. Second, everyone in your fireteam will be teleported into locked cages suspended in the air. Finally, Scorn Lanterns will appear on the battlefield.

Your job is to escape the cages and activate the Lanterns before Imminent Wish reaches zero. If you are successful you will receive a buff called Naeem’s Wish Empowerment, which renders the boss vulnerable for DPS until it expires. Capturing more Lanterns will give you a longer damage phase, capturing zero lanterns will result in no damage phase at all.
The cages will be locked and rising. Any cage that reaches the top will kill its occupant. To escape you will need to shoot three Taken Eyes that appear in the air near it. Once all three are eliminated the door will swing open. You can shoot the Eyes near the other cages to free your other fireteam members, which can be helpful if anyone is having trouble locating their Eyes.
Once you are back on the ground, locate a Scorn Lantern and stand within the circle that surrounds it. After several seconds the small blight at the center will turn blue, indicating you have successfully activated the Lantern. Once Imminent Wish reaches 0, a message that reads "Rathil’s hex backfires!" will be displayed, and Naeem’s Wish Empowerment will begin.
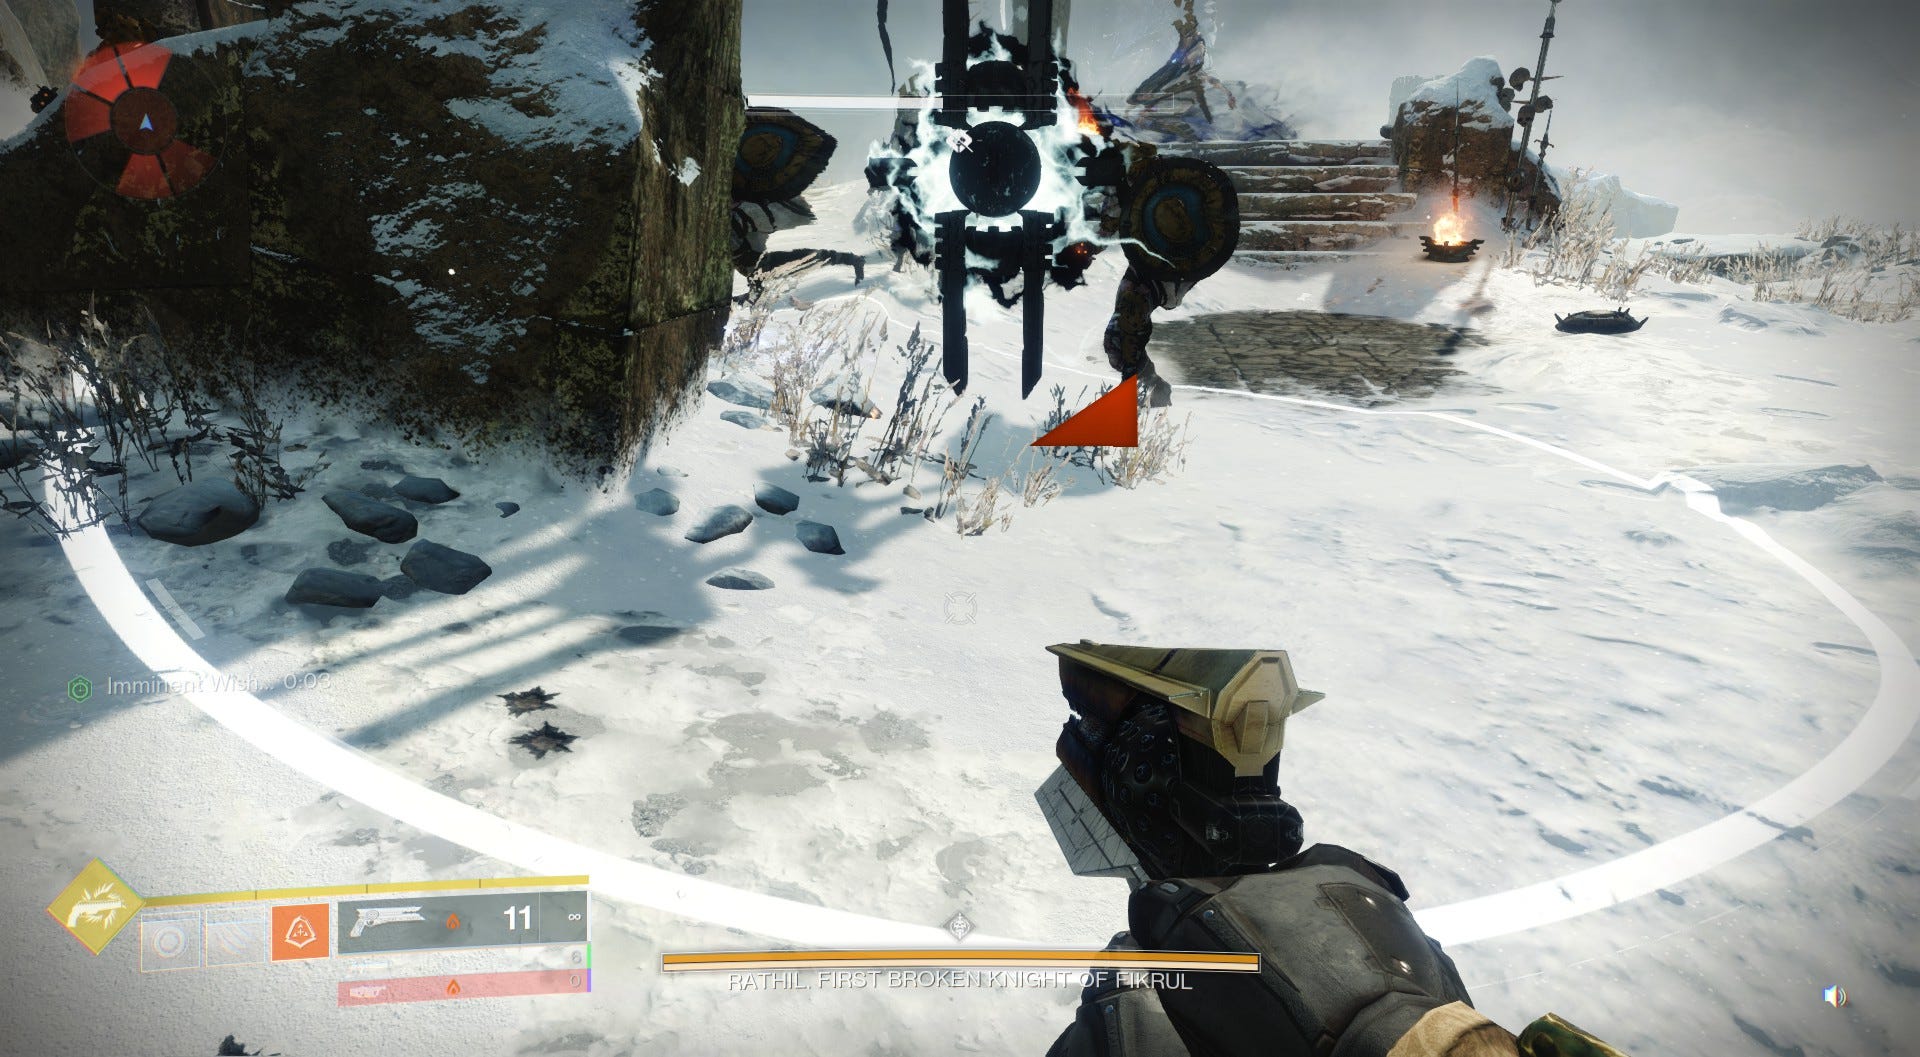
As soon as you see the words "Naeem’s Wish Empowerment" you should begin unloading as much damage as you can into Rathil until the timer expires. Repeat this cycle as needed until Rathil falls, and you will be sent to the next part of this Dungeon: an actual dungeon!