Dark Souls 2 - Last Giant, weakness, guide, location
The first boss fight in Dark Souls 2 makes use of half a dozen different attacks. Here's how to avoid each one and kill the deadly Lost Giant.

While The Last Giant isn't the toughest fight you'll face in the game, any Dark Souls veteran will tell you that an abundance of caution is key to winning even the gentlest of boss battles. The tactics here may be comparatively simple, but it only takes a few whacks from the boss to end the fight. Use the space that's all around you, and read ahead to get a handle on each one of the creature's special moves.
How to kill The Last Giant
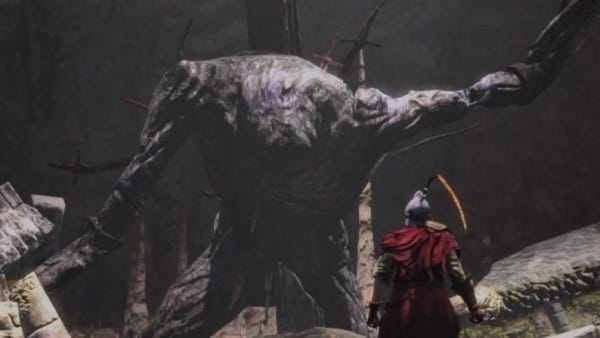
There are six of these core moves to watch out for during combat. From a certain distance, the creature will come crashing forwards and inflict a huge amount of damage if you're standing anywhere nearby. Approach the Last Giant from the front, and its massive hand will sweep right along the ground - and through you if you're standing in the way. Perhaps you think it's sensible to approach from the rear instead? Alas not - the creature will leap backwards if you try that trick.

Those are just the first three of the Giant's attacks. If you're in front of the Last Giant, and standing too close for comfort, he'll smash his fist down in an attempt to crush you flat. If you're in close range beneath or behind the behemoth, it'll try to stamp on you with its nearest foot, or use a series of massive stomps one after another. So far, so Dark Souls.
Here's how to tackle the monster. When the fight begins, run towards The Last Giant as quickly as you can, so that you prevent it from falling forwards. Ideally, you want to force it into using that big sweeping hand gesture, but it won't be able to complete the move until you've run straight through its legs.
As soon as you're behind the beast, give its ankles a damn good whacking. How many hits you can get in depends largely on the weapon your wielding, and your attacking speed. Use your best judgement here, but you want to finish dealing damage and get on the move again before The Last Giant starts planning its next attack type.
"When the fight begins, run towards The Last Giant as quickly as you can, so that you prevent it from falling forwards."
When you dodge out of the way, the Giant will likely commence its stomping attack. As soon as it finishes, run back into range to force it to sweep horizontally, then dart between its legs again and repeat the same tactic as before. Keep this back-and-forth up until the creature's health is at approximately 50 percent. Resist the temptation of impatience here! It's much better to deliver small chunks of damage safely, then end up restarting the fight because you just couldn't resist going for one more hit.
For reasons that will soon become worryingly obvious, the next phase of the fight sees the Last Giant ripping its own arm off - all the better to hit you at range with. What this means for the fight is that you need to move in a little quicker than before so you've got enough time to deal with the sweeping attack. The tactics largely remain the same, you just don't want to get too far away and into whalloping range of that arm.
Keep baiting the creature back and forth, and before you know it you'll be looking at a big old pile of ugly, dead monster. You'll get a generous quantity of souls for defeating this first boss too, but don't be in too much of a hurry to get back to the bonfire and level up.
Heading back to Majula
Make your way back to the bonfire, but first go up the stairs that are by the entrance. Use the Soldier Key you looted from the Giant to open the door at the end of this hallway. Once you're through, smash up the wooden cart and take the Hand Axe and the Radiant Lifegem inside. You'll also get hold of a Repair Powder and a Small Leather Shield from the coffer in the centre of the room. Now go through to the next room and open up the coffer here to get a Small White Sign Soapstone and an Estus Flask Shard.
"The Lockstone can be used to open up the strange mechanism shaped like a face by the booby-trapped room."
Jump down onto the branch beneath you, and grab the item nearby to get a Divine Blessing. Now jump down again and get into the room below you. Use the hole in the wall to get back outside, then head over to the left and climb down the ladder. Keep walking down the path and have a chat with the man at the end of it to get a White Sign Soapstone.
There's a merchant back at the bonfire. Say hello and pick up Lenigrast's Key (1,000) and Pharros' Lockstone (4,000). That key is used to unlock the hut you encountered at the start of the game, while the Lockstone can be used to open up the strange mechanism shaped like a face by the booby-trapped room.
Make your way back down the ladder again, then go over to the staircase and head right. Use The Soldier Key to open up the door in front of you. If you head up the stairs to your left, you'll see a door that requires you to have the symbol of the king. You don't have that quite yet, but make a note of the location for later on. For now, just open up the coffer at the end of the hallway to get a trio of torches and a Ring of Restoration.
Go back to the bonfire and squeeze through the opening on the wall. Take a left, then go down the ladder and into that booby-trapped crossbow room. Go down the ladder behind the crossbows again, and take a look at the face mechanism to make use of the Lockstone. You'll see an image of the face appear to your left shortly afterwards.
Give that face a good whack and you'll gain access to a new room. Grab the Chloranthy Ring and the Titanite Slab from the coffers inside, then give yourself a well-earned pat on the back. You've done everything you can in this opening section of the game - for the time being, at least.
If you're struggling to kill the Flexile Sentry, we've got some essential tactics to help you finish the fight. Alternatively, head back to the first page of our Dark Souls 2 walkthrough for more guides.