Rise of the Tomb Raider - Geothermal Valley, fire arrows, Molotov, rescue
How to complete the Geothermal Valley section of Rise of the Tomb Raider, and add fire arrows and Molotovs to your arsenal of weaponry.
Follow the path down some steps, then go up several flights before whizzing down the zipline for another reunion with Jacob. You're now free to wander around the area undisturbed, so be sure to visit the campsite, gather resources, and have a good nose around. As you've acquired some new items by now, it may also be worth fast-travelling back to other areas while things are quiet.
Prepare for Battle
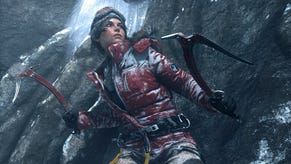
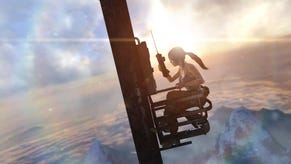
Follow the objective markers, cross the gap to the tower with a rope arrow from the post to the block at the lower right, and ascend the tower by climbing and scrambling round in an anti-clockwise direction. When you reach the half-way point you'll acquire the fire arrow crafting skill.
Continue your ascent, and when you reach the hanging wooden platform use a fire arrow to ignite the beacon above you. After a short cut-scene you'll be back at the top of the tower. Fill up your oil from the nearby canister, then use a rope arrow to make a zipline back to ground level. Loot the chest near the landing zone, then head for the marker - you'll pass a monolith, but it's unlikely your Greek will be up to the challenge yet.
As you approach Jacob trouble kicks off, and during the cut-scene you'll be handed a shotgun. Make use of the brief bullet time to kill the guards in front of you, then make your way through the burning sheds, taking out a handful of enemies on the way. They're followed by a mini boss battle with a flame-thrower wielding soldier. Stay out of the way of his fire and try and get behind him. The fuel tanks on his back are a weak spot and a few well placed shotgun blasts will give him a taste of his own medicine.
To the Tower
Scavenge the nearby area for ammo and other supplies, grab the map from the hut on stilts and the scroll from the medics hut, then follow the marker. Jump into the water and scramble up the wall to the right of the collapsed bridge to the courtyard. Nearby you'll find a campfire, a monolith, a satchel, and some resource crates, so scout around and then upgrade and craft as needed. When you're ready to proceed, jump across to the building on the far side and make your way inside.
Into the Acropolis
Head through the open door and follow the path. Take a left at the end and head back outside, cross the fallen tree, jump down to the right and scramble up the rocks to find yourself in a narrow ravine. At the end take a flying leap, grab the rock on the other side with your axe, then climb up and right over the obstacle to get to the safety of the stone staircase.
Ascend and use a rope arrow to cross the gap at the end, swim through the arch, and admire the vista on the other side before heading down the path to your right and entering the camp. Scout around for ammo, resources, a relic, and a couple of journals, then use the campfire if you need it.
Ahead you'll encounter a group of enemies. A firefight is largely unavoidable here, but by sneaking round to the right and grabbing a bottle to fashion a Molotov, you can get the drop on two or three of the enemies before the fight starts. Clear the area, restock on ammo, and continue on your way until you catch up with some soldiers heading into the tunnel.
Wait for them to have a brief debate about the value of art, then - when the impatient guard wanders off - sneak in and stealth-kill the one standing with his back to you. When he's down, sneak to the right and take the other guard by surprise, then carry on down the tunnel.
To the left are a handful of guards, and to the right is a dead end with some loot. Quickly stealth-kill the guard closest to you, then head into the alcove and gather the odds and ends before returning to the guarded room. Near the recently deceased corpse is a bottle, so grab it and take cover behind the low wall to the right. Fashion a cocktail, and take out the two guards kneeling down - if you move quickly you should be able to tackle the remaining guard before he gets a fix on your position. Collect any ammo you may need, then head through the archway.
Reach the Tower
After the floor gives way you'll be behind some sandbags. Wait for the two guards to stop moving, then make a Molotov from the nearby bottle and toss it into the corner between them. With luck that should eliminate them without any fuss. Once they're down, collect cloth and mushrooms from the right-hand alcove, then climb through the gap in the wall the guards were examining. The next room contains three enemies, but if you're quick with headshots you may be able to clear the room without incident.
To the left of the locked door is a crumbling wall that will succumb to the ministrations of your axe. Head through the hole, drop down into the water to read the plaque, then scramble up the other side. Peer through the grating on the wall, then drop down into the next room to unlock the grenade arrow upgrade. Pick up a few more grenades, and loot the artefact. Clamber back to the grating and take out the door with a well placed grenade.
Head up the steps to find a new campsite and a monolith. Read it, use the camp if you need, then head up the next set of steps. Make your way along the wooden platform and jump to the stone bridge, grab the artefact from the box behind the burning barrel, then head for the marker.
From here on in there's a heavy combat focus with very little time to rest, so if you need to take a break in the real world, now's the time to do it! Use a grenade arrow to demolish the barricade and crawl under the door. You'll immediately come under fire, so take evasive action and deal with the oncoming enemies. When the area is secure, make sure you collect the enhancement tool from the metal chest in the easternmost corner, then use another grenade arrow to clear your exit.
At the top of the steps is another battle-zone. Clear the enemies from the main courtyard by luring them to the top of the steps, then use a fire arrow to blow up the barrel on the walkway on the opposite side of the arena. Gather ammo, then push ahead and clear out the next area.
Rescue Mission
Once the fight is over, pick up the journal and Coin Cache from the back of the area, then make use of the camp if required - collecting the enhancement tool should have unlocked some new weapon upgrades. The fighting's not over yet though, and when you reach the top of the steps more enemies will attack. A shield-bearer will bring up the rear, so grab the handy bottle to burn him, try and get behind him to bypass his shield, or simply dodge past him and crawl under the gate.
In the next area you'll meet three enemies with their backs to you. Drop as many as you can before you're spotted, then prepare for another lengthy battle. Several waves of regular-strength bad guys will drop in before being replaced with the inevitable spec-ops reinforcements. If possible, save the exploding barrel for the end of the fight to assist with the shield bearer.
- Our walkthrough continues with a step-by-step guide to finishing Rise of the Tomb Raider: Back to the Forest.
- For the rest of our Rise of the Tomb Raider guide, head back to the index page of this article.


.png?width=291&height=164&fit=crop&quality=80&format=jpg&auto=webp)


