Hearthstone: Naxxramas - Frostwyrm Lair, Paladin challenge, Sapphiron, Kel'Thuzad
Our guide to beating both the Normal and Heroic bosses of the final Naxxramas wing, and successfully completing that devilish Paladin challenge.

The final wing of the Naxxramas wing was released earlier today, and while the Frostwyrm Lair contains just two bosses and a single class challenge, there's enough frustration in these fights to keep you busy for quite some time. Here's some advice for the decks and strategies you might want to use to take some of the pain out of these final encounters.
Sapphiron
Hero Ability
Normal - Destroy all enemy minions that aren't Frozen (0 Mana).
Heroic - Destroy all enemy minions that aren't Frozen (0 Mana).
Sapphiron strategy - Normal
At the start of this fight, you'll be given a frozen gnome who's vital to your survival strategy. Sapphiron uses a Hero Ability each turn that kills all unfrozen enemy minions - but a single minion placed either side of that gnome will also be protected by his chilly aura. For that reason, you want to stick to having just two minions out on the board at any one time, and keep wearing the enemy down bit by bit.
We created a simple Mage deck out of completely free cards to finish up this penultimate fight. As the game develops, you'll want to start trading your weaker minions off against Sapphiron's, so that you can start bringing out your big hitters and keep the pressure piled on.
Sapphiron - Heroic
We switched over to a Hunter deck for the Heroic fight against Sapphiron, as it allowed us to keep piling Hero Ability damage into the enemy's face while still exerting control over development of the board.
Play around your Eaglehorn Bow's durability carefully, and always take into consideration the impact of Sapphiron's next auto-application of the Hero Ability. Mad Scientists will die instantly and put a Secret into play, for example, allowing you to use your full durability bow, safe in the knowledge that it will shortly be refreshed. Nerubian Eggs are also guaranteed to give the enemy a 4/4-sized problem. If you don't have Leeroy Jenkins, consider swapping him out for another charge card like Reckless Rocketeer or Arcane Golem.
Reward
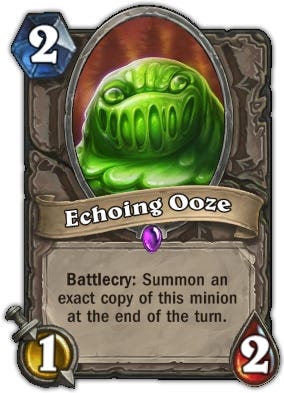
The benefits of the Echoing Ooze are pretty obvious, but try to play it in a turn where you can also buff it and receive two bigger minions for the price of one.
Kel'Thuzad
Hero Ability (Phase One)
Normal - Deal 2 damage to the enemy hero and Freeze it (0 Mana).
Heroic - Deal 3 damage to the enemy hero and Freeze it (0 Mana).
Hero Ability (Phase Two)
Normal - Take control of a random enemy minion until end of turn (8 Mana).
Heroic - Take control of a random enemy minion (8 Mana).
Kel'Thuzad strategy - Normal
There's a very cheap Priest deck post over at Hearthpwn which you can use to make pretty light work of Kel'Thuzad. You can use your own Hero Ability to mitigate the damage inflicted by Kel'Thuzad's, while developing a board that exploits the old Divine Spirit / Inner Fire trick to create monsters out of your Lightwells or Deathlords.
Just be aware that he fights in two phases. You'll trigger the second phase when you clear out his armour, at which point he'll summon a pair of taunt minions. Avoid triggering the final phase until you have the means to dispatch these guards, then just keep piling on the pressure and trading minions efficiently until he drops.
Kel'Thuzad - Heroic
You can take down Kel'Thuzad on Heroic difficulty using the same deck and strategy you used for the Normal version. It is, however, even more important to get that Mulligan correct and have a very strong opening hand. His Hero Ability does even more damage this time around, so having a Lightwell out on the board very early on in the game is more or less essential.
You should also avoid clearing his armour (or reaching turn 11) and triggering his pair of taunt minions unless you have the means to either dispatch them, or have them run themselves into a devastating taunt of your own. There's a bit of a race on as well, because when he reaches his second phase he'll be able to steal your minions for eight Mana. Keep minions coming onto the board so you never commit too much to a single minion, only for it to be snatched from under your nose.
As with so many of the Heroic Naxxramas fights, you'll be relying on a mixture of skill and good fortune to finish this particularly nasty fight.
Reward
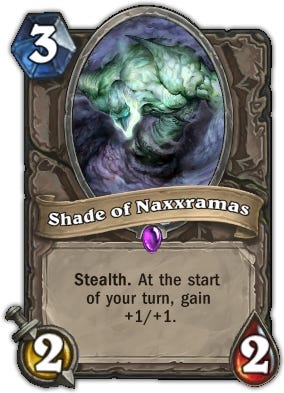
You'll need to hold your nerve when playing the Shade of Naxxramas, and calculate the right moment to pull the trigger and take it out of stealth. Watch out for those clearance spells that don't need to be targeted to a specific minion though, eh?
Class challenge
The final class to get a special deck to play with is the Paladin. Sadly, this is a fight that leans very heavily indeed on good fortune for both the cards you Mulligan, and those you draw as the fight plays it. This final challenge is, quite frankly, a royal pain in the neck to complete, but if you persevere and keep your frustration in check, you will finish it eventually.
You've got four of those Echoing Oozes in your hands, so it won't come as a surprise to learn that your challenge is to utilise your buff cards as efficiently as possible to make the most out of them. You should also pray for a Blood Knight and at least one Argent Squire in your opening hand, so you can create a big threat on the board at the start of turn four.
Frostwyrm Lair reward
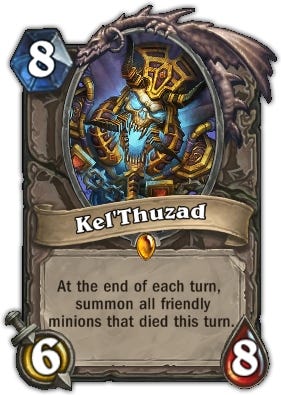
Your reward for successfully completing the Normal difficulty fights and the Paladin challenge is Kel'Thuzad himself. His high health and resurrection passive ability should give big board clearers something to think about, although note that his eight Mana cost might not necessarily keep you safe from a Mage's Flamestrike.
You can find all of our Naxxramas wing guides via the first page of this article.
To stay on top of all the latest Hearthstone developments, take a look through our dedicated Hearthstone site MetaBomb.