Elite Dangerous - how to travel within and between star systems
Our Elite Dangerous guide explains how to reach new star systems, travel within each system, and dock safely at Stations and Outposts.

There are many fiddly elements to Elite Dangerous, and while travelling is just one of them it's fair to say there's very little you can get done in the game without mastering this fundamental activity. You'll also need to master docking and undocking from Stations and Outposts too, so we recommend working your way through this section until you're completely comfortable with getting around the universe.
Getting used to the basic controls in Elite Dangerous
There are lots of fine details to consider when it comes to the flight controls of Elite Dangerous. For the purposes of this guide, however, we just want to get you up and flying quickly and confidently, so we'll stick with the default basic keybinds that you can tweak later on. We're also sticking to a mouse and keyboard here, although you might want to think about investing in a throttle and joystick further on down the road. Take a look further down the page for an idea of some of the controller options that are out there.

Here are the most important control elements that you need to be aware of.
- W - Increases your ship's speed
- S - Reduces your ship's speed
- Q - Thrust left
- E - Thrust right
- A - Yaw / rotate left
- D - Yaw / rotate right
- R - Thrusters Up
- F - Thrusters Down
- L - Raise / lower landing gear
- J - Initiate Frameshift Drive / Supercruise
- U - Deploy hardpoints (weapons, scanners etc.)
- Tab - Engine Boost (useful for getting out of Mass Lock range)
The mouse is used to orientate your ship along the X and Y axis. You'll find this very wobbly at first, but finesse comes quickly with practise.
Beyond using the above keys to navigate the area of space immediately around you, there are two critical elements to travel in this universe - Hyperspace and Supercruise. The former is used to travel the enormous distances between different star systems, while the latter is used to cross large distances within the systems themselves.
Using Hyperspace jumps to reach new star systems
If you want to travel to a completely new system, you'll need to complete something called a Hyperspace jump. Hit 1 to open up your left-hand Target panel, then select the star and target it using the list that appears under Navigation. Next, use the compass to the left of your radar to aim your ship at the star. When there's a full white dot directly in the middle of the compass, the star is right ahead of you. Now just hit J and wait for your Frameshift Drive to charge up. You'll automatically jump to the new system when the countdown finishes.
Using Supercruise to reach your destination
When you arrive in the new system, you'll be travelling straight towards a rather hot, rather deadly sun. Your first task is to angle your ship away from this collision course, and level it off so it's not in immediate danger. Next, open up that Target panel in your cockpit again and select the Station, Outpost, or celestial object that you want to reach. Lock onto it, then rotate your ship until you're facing the target. From time to time, the sun will block your path - if that's the case, just travel around it a bit.
Reaching your next in-system location involves a sort of mini-game. The trick is to balance your travelling speed with the distance remaining just enough that you minimise travel time, but not overshoot the target and find yourself having to backtrack. In order to safely drop out of Supercruise mode at your destination (using the J button again), you must be travelling slower than 1,000km/s at a time when your target is less than 1,000km from you.
The easiest way to do this is to look at the column of lights that indicate your throttle level, and always ensure that the top of the column sits within the blue zone on the throttle indicator. Maintain this level and you should manage to drop out at your destination bang on the money.
There's an alternative, slightly faster method which involves pelting towards your target at maximum speed, then dropping down to 75% throttle speed at the very instant the time-remaining indicator hits seven seconds. This involves changing your throttle changes to percentage increments, and tweaking a few keybinds. Try it once you've mastered the basic manoeuvre and want to shave a little bit more off your journey times.
Docking safely in Elite Dangerous
There are two different types of places to dock at in Elite Dangerous: Outposts and Stations. The former are very primitive structures that you simply need to land on top of, while Stations are a bit trickier. Here's how to pitch down correctly at both.
Docking at Outposts
When you're within 7.5km of the Outpost in question, simply lock onto it and then request docking permission by pressing 1, then navigating to Contacts. If you hit 1 again to close the cockpit panel immediately after requesting permission, you'll be able to see the orange glow of your landing pad flash up, making it nice and easy to locate. If you can't see it, it's hidden on the other side of the station, so angle your way around.
You must land on the Outpost landing pad in a very specific way. Pop your landing gear down with L, then approach the pad so that the highlighted number is both in front of you, and the furthest away from you it can be. If you don't ensure you land in this orientation, the station won't accept you and you'll have to spin your ship around 180 degrees (use A and D by default to turn your hovering ship around if necessary).
When you get very close to the landing position, a visual indicator will appear on your radar, displaying your ship, along with a targeting reticule beneath it. The aim here is to get the line protruding from the bottom of your ship into the centre circle. When you do so, the landing grid will turn blue. At this point, simply use your thrusters (F) to inch down to ground level slowly but surely. If you're struggling to be accepted by the Station, try lifting the nose of your ship up a little, and make sure you haven't fractionally overshot the landing area while thrusting downwards.
Docking at Stations
One of the fiddliest aspects of docking at a Station is actually finding the entrance in the first place. The good news is that these imposing structures all follow one important rule: the side with the letterbox opening that you need to enter through always rotates anti-clockwise. What this means is that you just need to picture the plane the station is rotating around when you drop out of Supercruise, then work your way over to the end turning in the correct direction. Keep an eye out for advertising hoardings too - they're always found by the entrance.
Just like docking at Outposts, you must gain permission before docking at the Station. Once you have permission and a pad number, work your way through the letter box opening of the Station very slowly until you're confident at performing this manoeuvre. Keep an eye out for other pilots too - protocol dictates that you should always enter and exit a Station by hugging the side indicated with a green strip of lights. As soon as you're inside, look for your pad number and glide slowly towards it before landing just as you do at Outposts. Remember your landing gear!
Undocking safely
Undocking is a good deal easier than docking. Select Surface from the basic menu to be sent back to the main level of the Station you're in, or Launch if you want to be sent up and then automatically released into the air. Once you're free of your moorings, align your ship with the letterbox entrance/exit and speed on through. Again, stick to the side of the exit with the green lights, retract your landing gear using L by default, and get far enough away from the Station that the Mass Locked indicator to the far right of your dashboard has gone out. When it does so, you're free to initiate a Hyperspace jump to a new system, or use Supercruise to get around the one you're currently in.
Elite Dangerous Flight Control HOTAS options
Thrustmaster T. Flight HOTAS Stick X
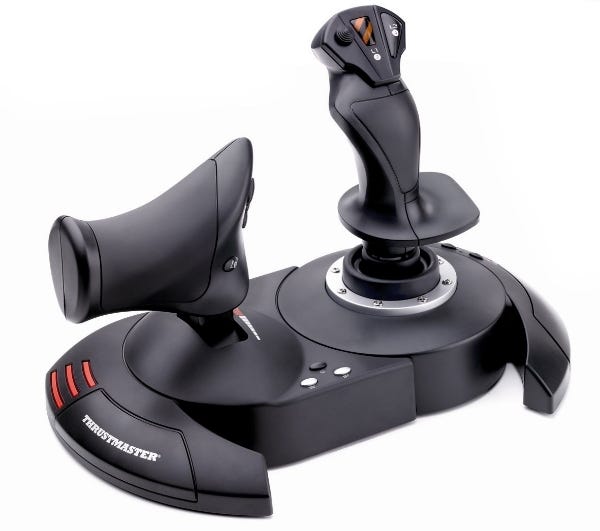
- Thrustmaster T. Flight HOTAS Stick X from Amazon UK or Amazon US.
If you've not got a lot of money to throw away on yet more gaming bric-a-brac, you could do an awful lot worse than grab this entry-level Thrustmaster unit. It's by no means the most advanced HOTAS you can buy, but you do get a proper taste of the flight control experience nevertheless. Button positioning is good, the keys are all programmable, and there's even the option to tweak the resistance to suit your preferences. Just under fifty of your Earth pounds if you're interested.
Saitek Pro Flight X-55 Rhino HOTAS System
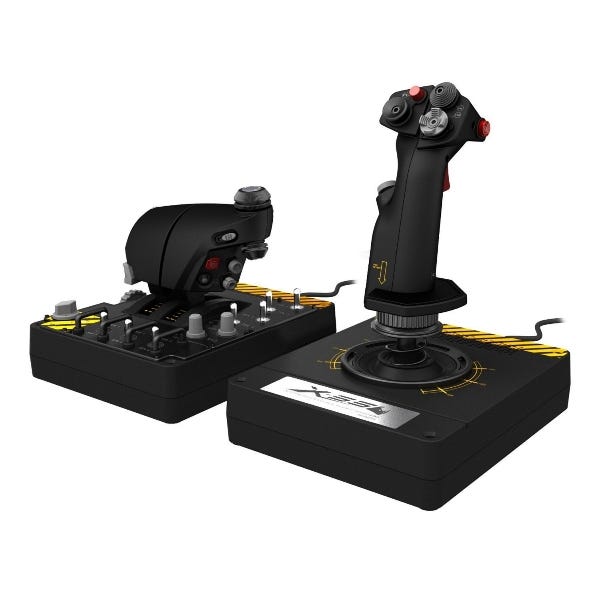
Representing considerably more expensive serious business is the Saitek Pro Flight X-55 Rhino unit. This might be considered the very best all-rounder if you're willing to spend more money on your flight controls - the build is solid and it looks the business. The system'll set you back about £300, however, and those with smaller hands might find it tricky to reach the upper buttons. Try to get some hands-on experience with all of these units before handing over your money.
Thrustmaster HOTAS Warthog
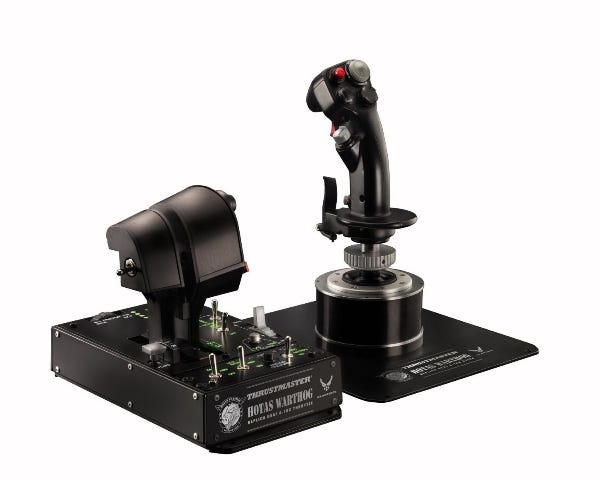
Another pricey option - from the second main manufacturer of HOTAS devices this time - is the Thrustmaster Warthog. If authenticity's your thing, you'll be reassured to know that these controls are modelled directly from those of the A-10 Warthog bomber. If you're really feeling adventurous, you can even grab a set of pedals to further authenticate the cockpit experience. Expect to pay around £300 for the base unit, and another £100 to have your feet do some of the hard work.
Read on for advice on how to use Elite's map systems and route-planning tools.
Head back to the first page of this article for the rest of our Elite Dangerous guide.