Super Mario Galaxy Star Guide
Part 1: A short time ago in a Galaxy waiting for you at home...

So, Super Mario Galaxy is here. You've bought it, of course. What do you mean, you haven't? Can't find a Wii in any shops? What sort of excuse is that? Why do you think God invented burglary? Get out there, get a Wii, get Super Mario Galaxy and get back here.
Got it? Good. Now, fear not - Eurogamer isn't turning into a cheats and tips site but, as with Bioshock, we'd be damn fools to ignore the fact that a lot of you are going to be playing the same game, and a lot of you might be looking to your benevolent Euromasters for guidance not just on what games to buy, but also how to get the most out of them.
Which brings us to this, Part One of our guide to all those elusive Power Stars and Grand Stars in Mario's gravity-warping space adventure. This won't be a step-by-step walkthrough - we'd like to think if you're smart enough to be reading this, you'll be smart enough to know how to jump over obstacles. Instead, this will be your overview of where the stars are, both obvious and hidden, and the best ways to get them. The Prankster Comet stars won't be covered, since they're earned by replaying certain levels when those cheeky comets are nearby, but if you're determined to find all 120 stars in the game you're advised to jump back into those levels when you see a comet nearby. Being comets, they'll soon move on and you'll have missed your chance. They can be realigned by bribing the right Luma, but it's much cheaper and quicker to simply tackle these challenges as they appear.
And with that, let's rescue that Princess. Again.
Gateway Galaxy
Grand Star #1
To earn your first Grand Star, and unlock the first proper galaxy, you need to head inside the final planet in this introductory stage using the obligatory pipe. Avoid the exposed electrical wires in the rotating struts and walk over the blue buttons to turn them yellow. Simple, eh? Once they're all done, the star is yours and you can enter the first observatory. Now let's get to work finding those power stars...
The Terrace
Good Egg Galaxy
Star #1
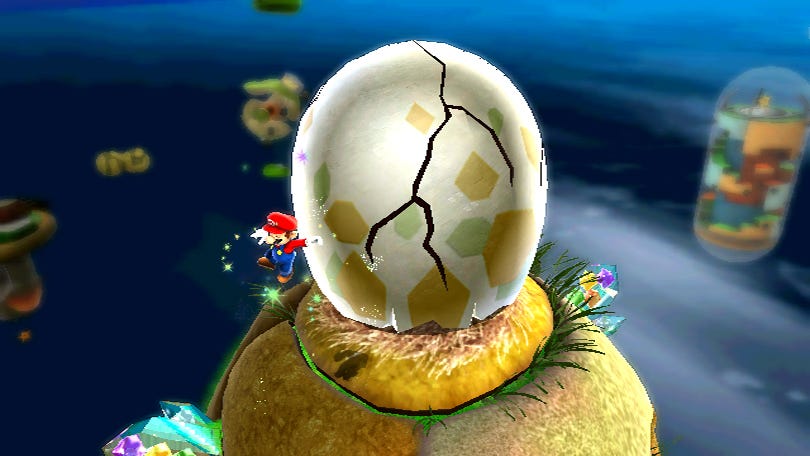
Dino Piranha
A nice easy one to start with. Dino Piranha has your first power star, and he's easily beaten by spinning into his tail, which sends it whipsnapping back towards him. The first time you do it, his shell will crack and he'll hatch. The second time - ooh - it makes him mad. Hit him with his own tail one last time and he'll keel over, leaving you with a star. And we're off!
Star #2
A Snack of Cosmic Proportions
Make your way to the planet shaped like a weird glass capsule. Find the crystal blocking the entrance, smash it and drop inside. Pay attention to the arrows in here - they show which way the gravity goes. Be careful not to get pushed into a different gravity zone by the moving sections. Once you reach the launch star, head off to the star-shaped planet and collect the five star pieces. You'll need to check both sides. Once the power star appears, attach yourself to one of the blue pull stars opposite to swing you across the gap in the middle and pick it up.
Star #3
King Kaliente's Battle Fleet
You'll learn two important skills here - deflecting projectiles back at your enemies, and dodging Bullet Bills. It's the first one that proves most useful for this boss though. King Kaliente is a big old octopus who, for reasons best known to himself, alternates between firing coconuts and fireballs at you. Simply bounce his coconuts back at him, while dodging the trios of fireballs. If you've mastered the timing, you can ricochet the same coconut into him three times for a swift victory. Another star for you.
Honeyhive Galaxy
Star #1
Bee Mario Takes Flight
Follow the bees' advice and make for the palace. Use the Bee Mario power-up (surely the best thing ever) to fly to the high platform that leads to her honey-making majesty. When you reach the Queen Bee, just fly over and crawl around her body collecting the star pieces that are itching her. Don't be shy. Really get in there. Landing in the water will make you lose the Bee Mario power, but its easily regained. Once you've found all five star pieces, and solved the Queen Bee's itchy problem, you'll get the star from Toad.

Star #2
Trouble on the Tower
Mandibugs can only be defeated by stomping them (jump, then crouch in mid-air) so get in some practice as you make your way around the tower. There's a health mushroom at the bottom, which will increase your hits from three to six, so grab that if you feel the need and then take down the twin Mandibug boss at the top. It's not hard - stomp once to kill the smaller one, then again to kill his big friend.
Star #3
Big Bad Bugaboom
More stomping required for this one. Spin up the flowers with a Wiimote wiggle to gain the necessary height, then glide into position and stomp as he passes underneath you. Do this three times and the star is yours. If you're struggling, there's an extra life on the branch sticking out from the edge of the arena, while climbing on the honeycombs on the tree will earn you some health reviving coins.
Loopdeeloop Galaxy
Star #1
Surfing 101
This one is simple, but fun. Talk to the giant penguin and tell him you're a surfer. Now just complete the ray surfing course and climb the podium to get the star.
Flipswitch Galaxy
Star #1
Painting The Planet Yellow
The theory here is the same as your first Grand Star. Turn all the panels yellow by walking on them, but be aware that if you retrace your steps you'll turn them blue again. From the start, head over the edge, and use the moving platforms to avoid going back on yourself. Just watch out for the sharp edges! Jump over the pulses from the turret, and once the final panels on the other side are turned everything will freeze. The turret transforms into a trampoline so you can reach the star.