Uncharted 4 - Chapter 19: Avery’s Descent
How to survive the dark and deadly tunnels under New Devon, including treasure locations and a puzzle solution.

In this chapter, Nate and Elena make their way through some decidedly dangerous tunnels full of booby-traps and other unwelcome surprises. Here's a full walkthrough, with details of treasure locations and a puzzle solution.
Head down the dark tunnels and examine the footprints. When you reach the second chamber, the batteries in your flashlight will start to give out - bang the controller on your hand as demonstrated by the on-screen icon and turn left. It'll give out again a bit further on, so bash it again and then carefully follow the footprints across the wooden floor panels - one false step and it's explosion time.

Once safely across, head left and examine the footprints again, then try and clear the path. Your flashlight is completely dead now, and Sam's lighter is no help, but thankfully Elena saves the day, first with a match and then with a flaming torch. Take one from her, then boost her up through the hole in the ceiling and follow her through. Crawl down the narrow passage and take the left fork both times, then drop down into the hole.
Light the cone of bones then take the left passage into another chamber. Light the cone and keep moving - when Nathan says "is that a mummy?" pull back on the left stick and hit [CIRCLE] to dodge the explosion. There will be a lot more of these traps as you head further in, so be ready to dodge whenever you see a smouldering mummy. (Elena has a habit of getting in the way, so it can sometimes be frustrating.)
After climbing over the short wall and avoiding some more exploding mummies, follow Elena's shortcut to the left and climb over the wall to your right. Light another cone, then take the exit to the right. Drop into the water and pass some more mummies, then slide down the slope. The first two mummies will ignite, so roll forwards, and as soon as they explode roll back to evade the second pair. Examine the mummy on the right the head through the passage to the right of it.
- Treasure: Ancient Stone Vessel - Head through the doorway to the left of the mummy and it's on the floor next to the bottom step.
When you drop down to the floor below you'll rejoin the trail of footprints, so head left further into the darkness. When you drop down into the small pool of water, dodge the grenade that gets thrown at you and then deal with a small ambush. As you head further down the passage you'll encounter more resistance, so don't drop your guard yet. When you drop down the hole after the second large chamber, you'll face off against a minigun, and once that's dealt with you're safe again. (Well, ish, anyway.)
Drop down the hole and grab a flare, then turn around and head up the steps behind the dangling tree roots. Open the door at the back and you'll pick up a key and a note - read the note then flip it, and pay close attention to the diagram on the back. (You may recognise the symbols from the "follow the footprints or explode" section, which might give you a clue what this is for.)
Head right and down into another creepy room, and towards the path directly behind the statue - a chain reaction of exploding mummies will start, so dodge without delay. Keep following the path, and when you drop down again immediately clamber over the bricks ahead and bear left into a low tunnel to avoid multiple mummy blasts. Drop down again, examine the "mermaids" and then exit to the right.
- Treasure: Mughal Decorative Cudgel - After examining the mermaids, take the left exit and the treasure is located on some barrels to the right.
Chapter 19 puzzle solution
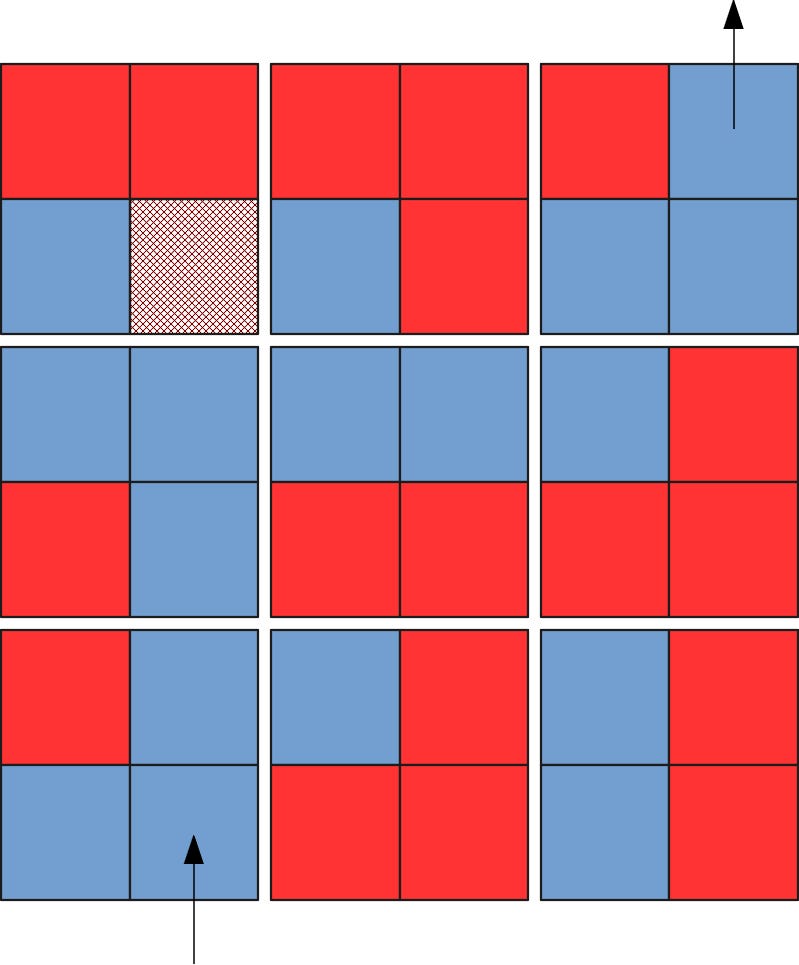
Head onwards until you come to a familiar-looking area, but this one you'll need to solve yourself (or look at the answer we've provided, of course). Refer to the note in your journal, and use the diagrams to work out which squares are safe or unsafe by mentally rotating the drawings to match the orientations of the blocks on the floor.
Once you're safely past and through the archway, turn left and head down the steps to a room filled with dangling skeletons. Open the door at the end and - IT'S A TRAP!
Mummies at the rear of the room will start to explode and set off a chain reaction that's heading towards you, so quickly start to swing the net and keep building momentum until you can grab the sword, then hack your way out. The chain reaction doesn't stop, and there's now a short scripted running escape - keep moving, jump over the obstacles, and don't pause for breath until you've fallen to safety.
Walkthrough navigation:
- The next part of our walkthrough explains how to complete Uncharted 4 - Chapter 20: No Escape.
- Return to the index page of this article for the rest of our Uncharted 4 walkthrough.
Other guides:
- Struggling to track down a Treasure? Have a look at our Uncharted 4 Treasures and collectibles guide.
- For details on how to unlock all of the game's Trophies, take a look at our Uncharted 4 Trophy guide.