The Division 2 Skills and Perks - the best Skills and best Perks in The Division 2 and what Skills to unlock explained
Which Skills and Perks to unlock first and The Division 2 Skills and Perks system explained.


Skills and Perks in The Division 2 are two different types of skill tree that you'll beging working your way through right from the off.
The best Skills and best Perks is a matter of taste, but there are some in each category that you're absolutely going to want to unlock as soon as possible, granting benefits from the ability to revive yourself when killed in solo play to earning significantly more XP for playing through the game. We'll explain those in plenty of detail below.
On this page:
The Division 2 best Skills and Skill tree explained - what Skills to unlock first
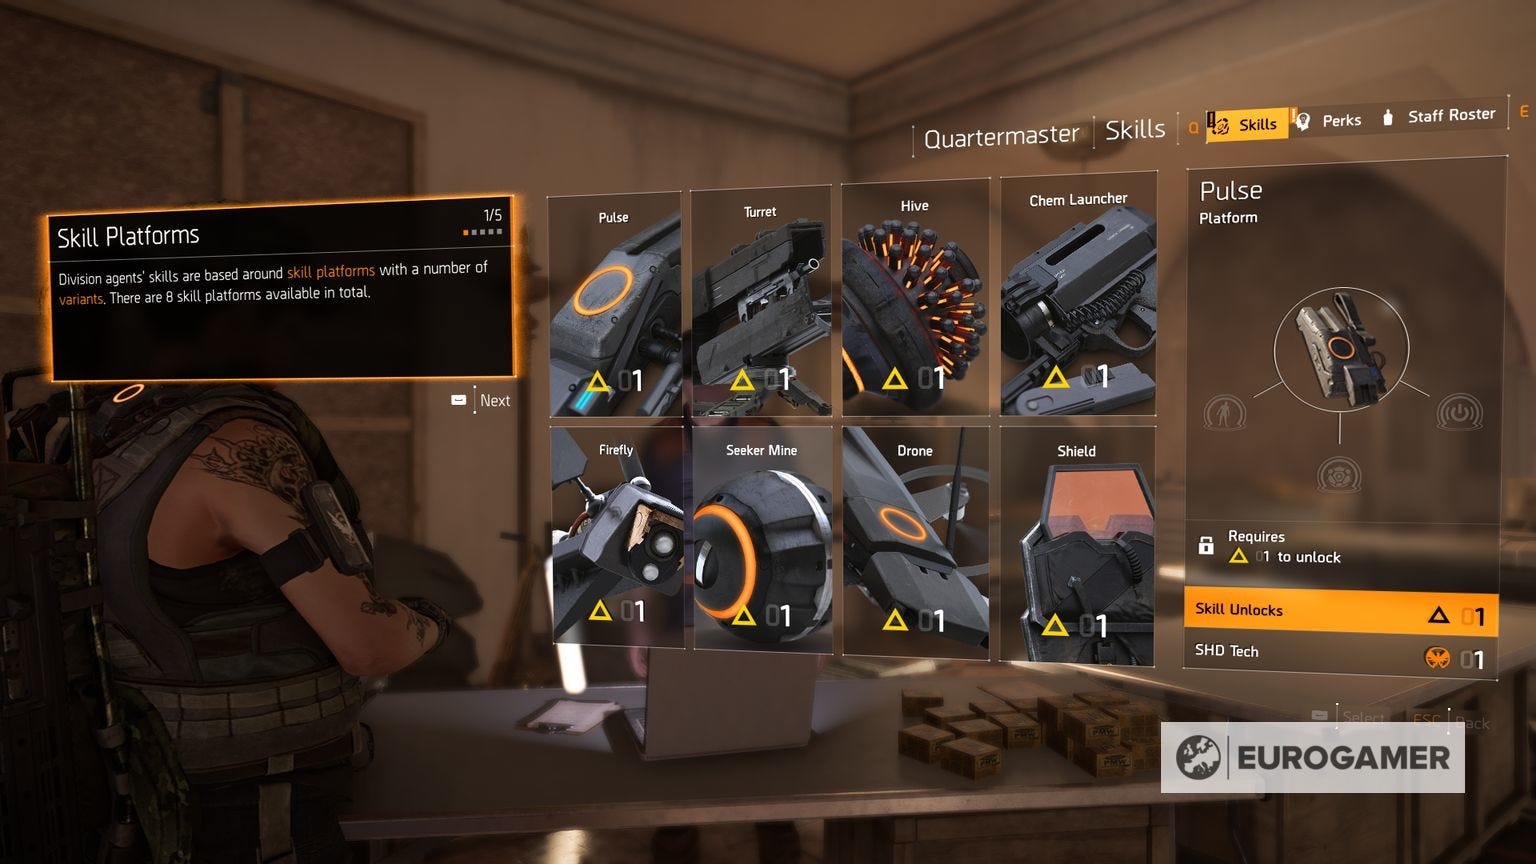
Skills in The Division 2 refer to your technological abilities. They're things like drones, or riot shields, or automatic turrets that you can deploy in battle with a set cooldown timer on them, rather than passive bonuses that help you out in the background.
Each Skill has several versions of it that you can unlock - usually three or four - and that's where you'll want to think extra carefully.

The Division 2 Skill tree and Skill unlocks explained
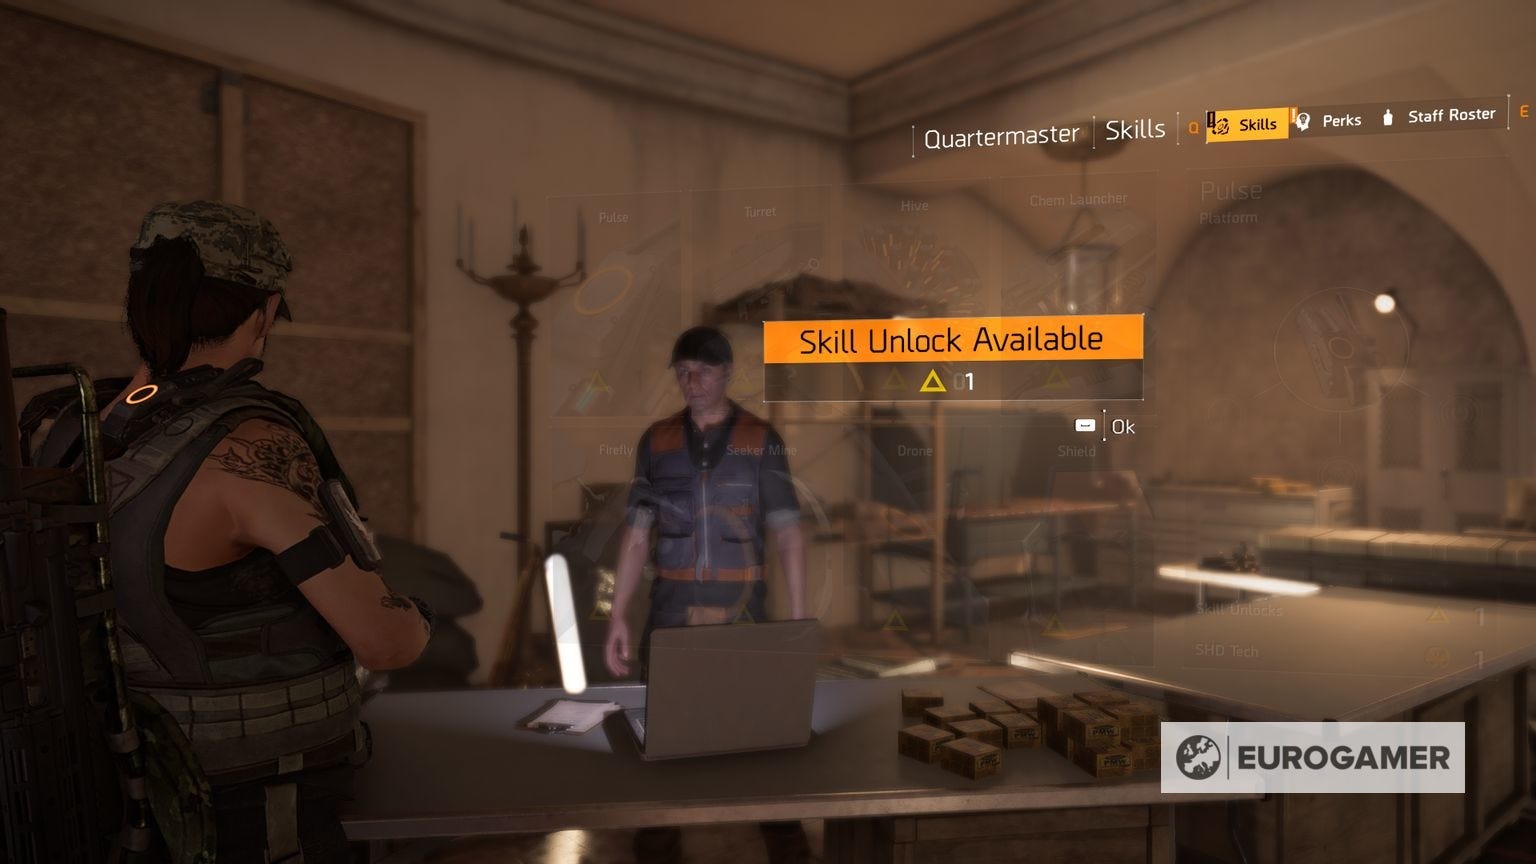
Each time you get a Skill unlock - indicated by the little yellow triangles next to missions or in your inventory screen - you can an entirely new Skill. Doing so grants you one free unlock of one of its sub-categories. So the first time you unlock the Drone, you can choose one free 'variant' of it, like the Striker Drone.
After that first free one in a Skill category, you need to buy further unlocks with SHD Tech - signified by the little orange eagle, earned not only from SHD Missions (see our Division 2 guide and mission list hub for more on those), but also from areas out in the world, again shown by little circular orange eagles on the map.
Here's a rundown of the full Skill tree - in other words, all the skills and their variants.
Pulse:
- Scanner - Pulses the surrounding area for hostiles and visually highlights them on the angent's HUD.
- Remote - Deployed at a set location and continually pulses the nearby area, visually highlighting hostiles on the HUD.
- Jammer - Pulses outwards, overloading and disabling hostile electronics.
Turret:
- Assault - Automatically or manually tracks and attacks hostile targets.
- Incinerator - Manualy controlled, fires flames in a forward-facing cone.
- Sniper - Fires high-caliber rounds at manually-selected targets.
Hive:
- Restorer - Sends out micro repair drones that expend themselves to repair allies' armour.
- Stinger - Sends out micro drones that attack and distract nearby enemies.
- Reviver - Deploys small drones that revive nearby downed allies.
- Booster - Delivers a stimulant to nearby allies that increase their combat efficiency.
Chem Launcher:
- Reinforcer - disperses a cloud of gas that repairs and reinforces allies' armour.
- Firestarter - creates a cloud of explosive gas that can be ignited through explosives, weapon fire etc.
- Riot Foam - fires sticky foam that immobilizes targets.
- Oxidizer - releases a cloud of corrosive gas taht damages enemies armour, skill proxies and causes damage over time.
Firefly:
- Blinder - blinds enemies that it passes over, reducing combat effectiveness.
- Burster - attaches explosives to enemies that detonate if two are in close proximity.
- Demolisher - damages or destroys enemy weak points, skill proxies and environmental explosives.
Seeker Mine:
- Explosive - tracks down hostiles and explodes on reaching close proximity.
- Airburst - rolls towards target launching an explosive burst into the air on close proximity.
- Cluster - splits into smaller seekers and tracks down enemies, exploding on close proximity.
Drone:
- Striker - tracks targets and attempts to maintain line of sight while continuously firing.
- Defender - attempts to deflect incoming bullets near the agent.
- Bombardier - deploys a payload of miniature explosives between two points set by the agent.
- Fixer - replenishes nearby allies' armour automatically or on a manually selected target.
Shield:
- Bulwark - provies near full-body coverage but only sidearms can be used while equipped.
- Crusader - does not protect legs but allows use of all weapons excluding rifles, marksman rifles and LMGs.
- Deflector - ricochets incoming bullets to a nearby highlighted target, smaller and usable with sidearms only.
The Division 2 best Skills
After playing around with a few of the skills so far, there's a handful of clearly stronger options, both for single player and squad play. Here are our choices:
- Reinforcer Chem Launcher - This is a much faster 'heal' than the Repair Drone, is near-instant, and holds three charges with low cooldowns. It also keeps the Drone free for more offensive usage and works just as well on yourself in solo as it does on allies in squads.
- Striker Drone - Probably our favourite individual skill, a flexible one that can be used to distract enemies, force camping ones out of cover, chase away ones that rush you or focus down chunky bosses.
- Assault Turret - Can be used as a defensive compliment to the Striker Drone or in its place, great for protecting your flanks.
- Reviver Hive - Fantastic for solo use, this will automatically revive you if you have an available charge that's not on cooldown.
There are other great options too, of course, although they become noticably more situational rather than just about always effective like the above. The riot shield comes to mind as a great option for drawing enemy fire and distracting them from your allies in squad play, especially. The general consesus amongst the community is that the Pulse skills, on the other hand, should all be avoided at all costs, as the short range on them all just doesn't make it worth the precious slot in your build.
One other thing to note: your Skill's cooldown timer begins from when that skill ends, which means when your Drone or Turret is destroyed, for instance. You can dismantle them when you're done using them - and therefore get the cooldown timer ticking down much sooner - by holding down the button you press to deploy them!
Look for more advice pages like this? Visit our The Division 2 guide hub, tips, mission list walkthrough for all of our helpers in one place, such as The Division 2 weapon damage stats, best weapons and Weapon Talents list, Division 2 error codes like Mike-01, Alpha-02 and Delta-03, The Division 2's best Skills and best Perks explained, or our outlining of The Division 2 Hyena Key locations, plus Outcasts Key, True Sons Key and Faction Keys.

The Division 2 best Perks and Perk list explained - what Perks to unlock first
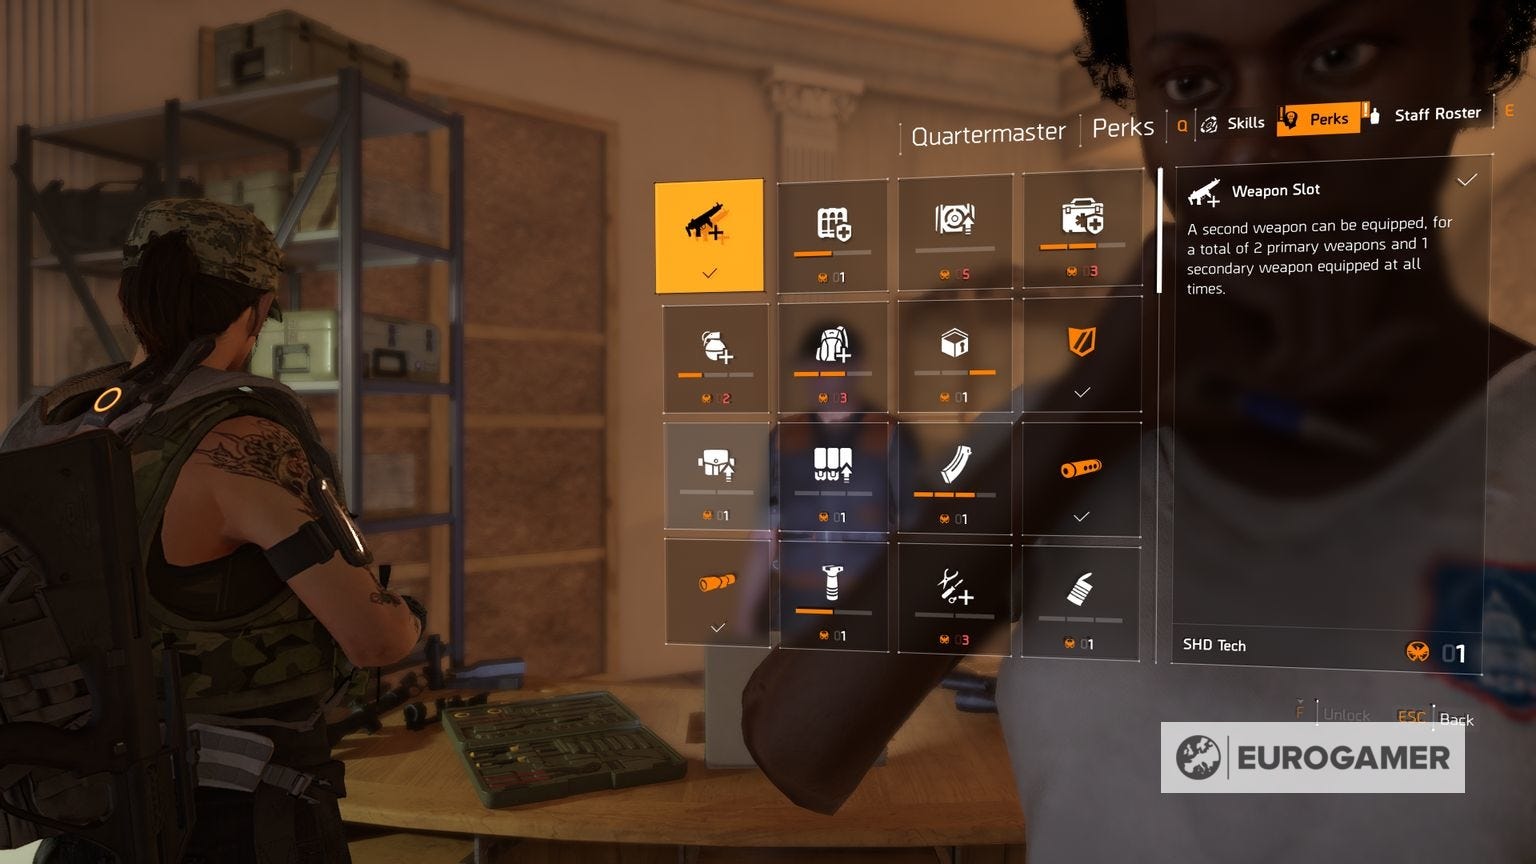
Perks are a similar kind of concept to Skills, only they're more passive benefits and are generally much faster to unlock, simply requiring SHD Tech and, in most cases, not much more than one or two SHD Tech at a time, either.
Here's a quick runthrough of all the Perks available, before we pick out some of the best to unlock first just a little further below.
The Division 2 Perk list and Perk unlocks explained
Perks are unlocked by spending SHD Tech, earned from SHD missions, levelling up, or finding SHD Caches out in the open world. They're easily found on the map - look for the orange eagle icons - and you can earn them in bulk from missions, so it's nice and easy to unlock plenty of Perks fast. Do note that, like Skills, you'll need to fast travel back to the White House and visit the Quartermaster to actually do the unlocking.
| Perk | Description | Requirements |
|---|---|---|
| Weapon Slot | A second weapon slot can be equipped - compulsory. | - |
| Restock 1: Armour Kits | Restocking when entering a safe space refills all Armour Kits. | - |
| Restock 2: Grenades | Restocking when entering a safe space refills all Grenades. | Restock 1: Armour Kits |
| Field Proficiency Cache | 50% chance for a bonus item to drop when opening a Field Proficiency Cache | Level 30 |
| Armour Kit 1 | Carry 1 more armour kit for a total of 4. | - |
| Armour Kit 2 | Carry 1 more armour kit for a total of 5. | Armour Kit 1 |
| Armour Kit 3 | Carry 1 more armour kit for a total of 6. | Armour Kit 2 |
| Grenades 1 | Carry 1 more grenade. | - |
| Grenades 2 | Carry 1 more grenade. | Grenades 1 |
| Grenades 3 | Carry 1 more grenade. | Grenades 2 |
| Inventory 1 | Inventory capacity increased by 10 slots. | - |
| Inventory 2 | Inventory capacity increased by 20 slots. | Inventory 1 |
| Inventory 3 | Inventory capacity increased by 30 slots. | Inventory 2, Level 30 |
| Stash 1 | Increase stash storage capacity by 20 slots. | - |
| Stash 2 | Increase stash storage capacity by 30 slots. | Stash 1 |
| Stash 3 | Increase stash storage capacity by 50 slots. | Stash 2 |
| Headshot Accolade | Headshit kills award an XP bonus. | - |
| Multi-kill Accolade | Killing multiple enemies at once awards an XP bonus. | Headshot Accolade |
| Weakpoints Accolade | Kills triggered by destroying weakpoints award an XP bonus. | Multi-kill Accolade |
| Tractical Kill Accolade | Kills triggered by destroying environment objects award an XP bonus. | Weakpoints Accolade |
| Survivor | Not dying for a long amount of time, solo or in a group, awards increasing XP bonuses. | Tractical Kill Accolade |
| Detection 1 | Donating enough resources to the control points activates better loot detection in a 20m radius for 10 mins. | - |
| Detection 2 | Donating enough resources to the control points activates better hostile detection in a 20m radius for 10 mins. | Detection 1 |
| Crafting Materials 1 | Material storage capacity increased to 100. | - |
| Crafting Materials 2 | Material storage capacity increased to 250. | Crafting Materials 1 |
| Crafting Materials 3 | Material storage capacity increased to 500. | Crafting Materials 2, Level 30 |
| Magazine 1 | Awards a tactical small pouch magazine, any belt-fed weapon. | - |
| Magazine 2 | Awards a 5.56 mag, any 5.56 ammo assault style weapons. | Magazine 1 |
| Magazine 3 | Awards a 7.62 mag, any 7.62 ammo assault style weapons. | Magazine 2 |
| Magazine 4 | Awards a field pistol mag, fits sidearms. | Magazine 3 |
| Muzzle 1 | Awards a loud vent break 5.56 muzzle for 5.56 ammo muzzles. | - |
| Muzzle 2 | Awards a 7.62 compensator for 7.72 muzzles. | Muzzle 1 |
| Muzzle 3 | Awards a 9mm suppressor for 9mm muzzles. | Muzzle 2 |
| Muzzle 4 | Awards an Osprey .45 suppressor for .45 muzzles. | Muzzle 3 |
| Optics 1 | Awards a red dot sight, fits short and long top rails. | - |
| Optics 2 | Awards a 4x Acog scope, fits long top rails only. | Optics 1 |
| Grip 1 | Awards a short grip uinderbarrel attachment, fits long rails | - |
| Grip 2 | Awards a compact laser pointer, fits non-rail couplings. | Grip 1 |
| Deconstruction 1 | Deconstruction can yield extra crafting materials. | - |
| Deconstruction 2 | Chance for a rare material to be awarded when deconstructing. | Deconstruction 1 |
| Resources 1 | Can carry 50 more food, water and components in resource inventory. | - |
| Resources 2 | Can carry 50 more food, water and components in resource inventory. | Resources 1 |
| Resources 3 | Can carry 50 more food, water and components in resource inventory. | Resources 2 |
| Hard Bounties | Get access to 1 Hard difficulty bounter per day. | Otis Sykes. |
| Challenge Bounties | Get acces to 1 Challenging difficulty bounter per day. | Hard Bounties, Level 30 |
| Loadouts 1 | Extra equipment loadout can be created, for a total of 4. | - |
| Loadouts 2 | Extra equipment loadout can be created, for a total of 5. | Loadouts 1 |
| Loadouts 3 | Extra equipment loadout can be created, for a total of 6. | Loadouts 2, Level 30 |
| Signature Weapon Ammo | Increases the amount of signature weapon ammo dropped. | Level 30 |
The Division 2 best Perks
There are plenty of Perks to choose from then, but again as with Skills, there are a few that instantly stand out as ones you should absolutely prioritise, especially at the start of your playthrough. Here's our selection of the best ones.
- All XP Accolade Perks - You should rush these XP-boosting Perks straight away, ideally, as they'll soon begin to add up over time and make your grind to Level 30 much faster. Less of a help if you're not that fussed about getting to The Division 2's endgame fast, of course, but if you want to get there at any point then, sooner or later, you'll be glad you took these early on!
- Inventory 1 and 2 - You'll be surprised how quickly your on-person Inventory can fill up and, despite a decent enough system for mass-dismantling items, you'll still want to do that as little as possible really. Safe yourself some boring menu time and unlock these carry capacity-boosting Division 2 Perks as soon as you can.
- Armoour Kit 1, 2 and 3 - At least 1 or 2 will be very helpful. Armour kits refil your entire set of armour and, especially when you're playing solo, having a big stock of these for each mission will make your life far easier (and far longer). Stacks well with the Survivor Accolade Perk!
- Grenades 1 - Carry an extra grenade or two and you then won't need any crowd-control Skills on you, freeing up slots for Drones, Turrets or Healing Skills like we mention above. Use grenades for clustered enemies instead of high-cooldown Skills, wherever possible!
- A Muzzle, a Magazine, a Grip and an Optics - Picking up one of each of these will be nice and cheap in terms of SHD Tech required, and also allows you to spec out any weapon you get with at least a couple of quality-of-life improving attachments. It the unlocked attachment available for all weapons, and you don't need to remove them from one to attach to another, so they're great long-term investments to make early on.