Resident Evil 7 - Processing Area, Incinerator Room handprint puzzle and Scorpion Key
A complete walkthrough and guide to each area in Capcom's survival horror adventure.

Resident Evil 7's Processing Area is where the game's difficulty jumps up a notch, pitting you against the Molded in some enclosed spaces, and one of the game's tougher puzzles in a bid to locate the final Dog's Head.
It is, however, a chance to get your hands on the Scorpion Key, so you can explore more of the Main House.
If you're after help for parts of the game, consult our complete Resident Evil 7 walkthrough and guide.
On this page:

Processing Area and how to solve the Incinerator Room puzzle
Head downstairs from the safe room into the Processing Area. Go ahead and follow the twisting corridor, and after two or three corners, a Molded will emerge.
As it's in your path you have to take it down; three Handgun rounds or so to the head will do it. You can take off its limbs one by one if you want to slow its advance, but it's only headshots that'll kill it. Remember to guard with the left bumper / L1, too - it'll signal its attacks well in advance, and you'll incur much less damage as a result.
When the creature is down, head into the door on the right into the Incinerator Room, where another creature awaits. Once it's dead, start exploring. Read the 'Incinerator Room Memo' above the sink to give you a clue to a puzzle - three a's and a handprint.
This means you need to open the incinerator doors in a specific order. Three a's means one of the names with three names - Tamara - then the door with the bloody handprint, so open the door furthest on the right, then the door without a name tag three from the left.
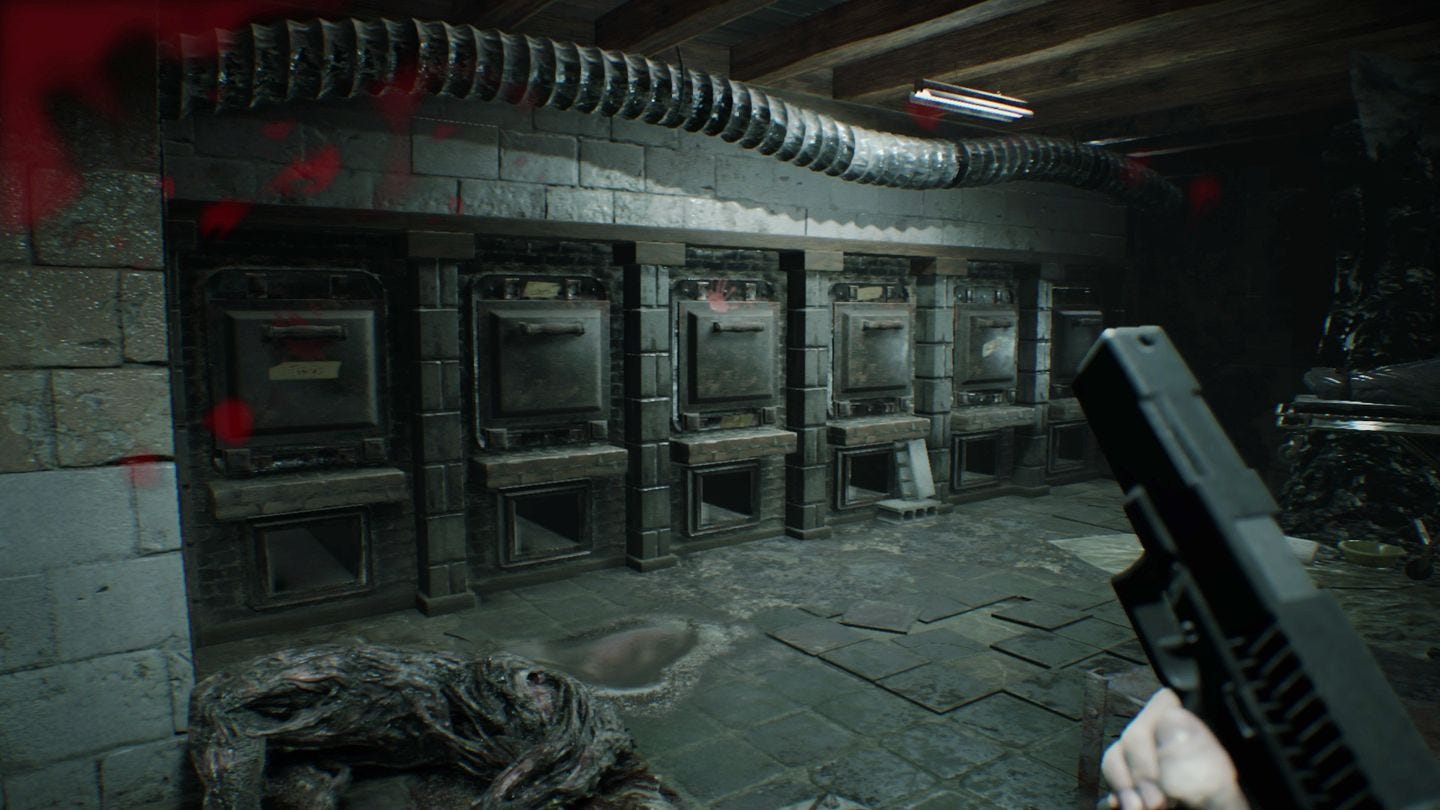
The far left door will then unlock. Reload and make sure you're at full health, then open it up. A more powerful variant of the creatures you've encountered so far will drop out, and will require a bit more of a beating.
Once it's down, you'll get the Dissection Room Key. Before we use it, however, we've got a few things to do first.
Exploring more of the Processing Area and finding the Scorpion Key
Leave the Incinerator room and head south. To the left is a door to the Workshop - which is locked, so don't worry about it for now - and another area left. This will take you to the Boiler Room and the Dissection Room, but the route is filled with enemies and is particularly tough, so for right now, we'd recommend getting the Shotgun and more supplies to make life easier.
Continue down the corridor and pull the corrugated divide at the end to reach an open room. First, turn left and get the Antiquated Coin resting inside the piece of broken wall. Next, smash the crates for consumables and the Processing Area Map so you know where you're going.
Continue exploring the wider room and you'll find the Scorpion Key from the table - unlocking a multitude of rooms elsewhere in the house - and on the rack in the corner, a Treasure Photo.

This shows a photo of a fireplace, specifically the one in the Drawing Room on the 1F (the area you arrived at after crawling between the walls following the Main Hall shadow puzzle). You'll find Steroids here, which increases your maximum health permanently, by removing a stone on the upper left.
There's also various consumables here too - a Herb in the cage, and while you're here, go to the south west door (there's Chem Fluid in the cabinet) and head down the steps; it leads to a locked Snake Door, but you can collect Psychostimulants, Shotgun Shells, and smash a Mr Everywhere statue in the corner.
Want more help? Our Resident Evil 7 walkthrough provides step-by-step instructions on how to survive the main story, as well as finding the Shotgun, Grenade Launcher and the game's many Lockpicks and Treasure Photos. Meanwhile, our Antique Coins locations, Mr Everywhere statue locations and File locations lists will help you find every available collectible on Normal and Easy difficulties.
You can press onto the Dissection Room now, but first we recommend taking a slight detour.
Head back up the Main House 1F - though watch out for the creature that drops from the ceiling near where you picked up the map in the Processing Area - which will take you back to where you first entered the area. Head to the 1F safe room, stock up on supplies, save, then head back to the Main Hall (you can now use the Scorpion Key to go directly there from this safe room). Next, it's time to get the Shotgun, one of the game's most useful weapons, and an effective means to take on the Molded.