Resident Evil 7 - Fixing the Ship elevator with the power cable, Captain’s Cabin Locker Key and Lounge painting puzzle
A complete walkthrough and guide to each area in Capcom's survival horror adventure.

Fixing the Ship elevator is the main objective once you have played through the Old Videotape, and has you come up against a Lounge painting puzzle and an optional Captain's Cabin Locker Key in order to unlock a powerful weapon that'll aid your exploration.
After you've played the Old Videotape, head west down the corridor and investigate the case on the floor, making sure to read the 'Tattered Secret Document' file. Pull open the elevator doors next to you, take the ladder up, then drop down the hole to reach Wrecked Ship 4F and the Bridge.
If you're after help for parts of the game, consult our complete Resident Evil 7 walkthrough and guide.
On this page:

Exploring the Bridge on Wrecked Ship 4F
Investigate the computer nearby and cycle through the cameras to learn Ethan is on S2. Investigate the lockers on north west of the bridge to get some Gunpowder, then head round to the south east door, which is the Captain's Cabin.
On the desk is the Ship Map and the Lug Wrench, both of which will come in handy. You'll need a key to open the locker holding the Machine Gun in the corner, and we'll get to that soon.
Head along the southern wall to the far corridor - grabbing the Herb from the locker on the left along the way - and turn the corner to the stairs. Note the Mr Everywhere head on the left behind the banister - you'll have to smash this later when you have a weapon - and help yourself to the Remote Bomb halfway down too.
On the south edge of the map is an elevator. Pry open the doors, use the Lug Wrench on the hatch, and drop down into the elevator. While you are here, read the 'Mechanic's Memo' File on the wall and you'll notice two slots where items need to go.
We now have two objectives; find the Machine Gun by locating the Captain's Cabin Locker Key, and repairing the elevator with a fuse and power cable.

You have a choice of going up to 2F or down to 1F; the upper route looks safer, so let's do that first.
How to get the Captain's Cabin Locker Key
Climb out the elevator on Wrecked Ship 2F, which is the same as the one you explored in the Old Videotape, but with some tweaks and changes.
Head west and enter the Guest Room (you'll notice an enemy to the north, but it'll disappear as soon as you head in). Grab the Handgun Ammo on the left, feel free to re-read 'Orders' on the desk, and most importantly, a Corrosive.
This is also a safe room, which is important, as any enemies you see on this floor can be 'killed' by simply retreating back here. Head east down the corridor, and get the Knife on the floor opposite the lift. As you approach the corner, an enemy may spawn from the ground - retreat to the safe room if so.

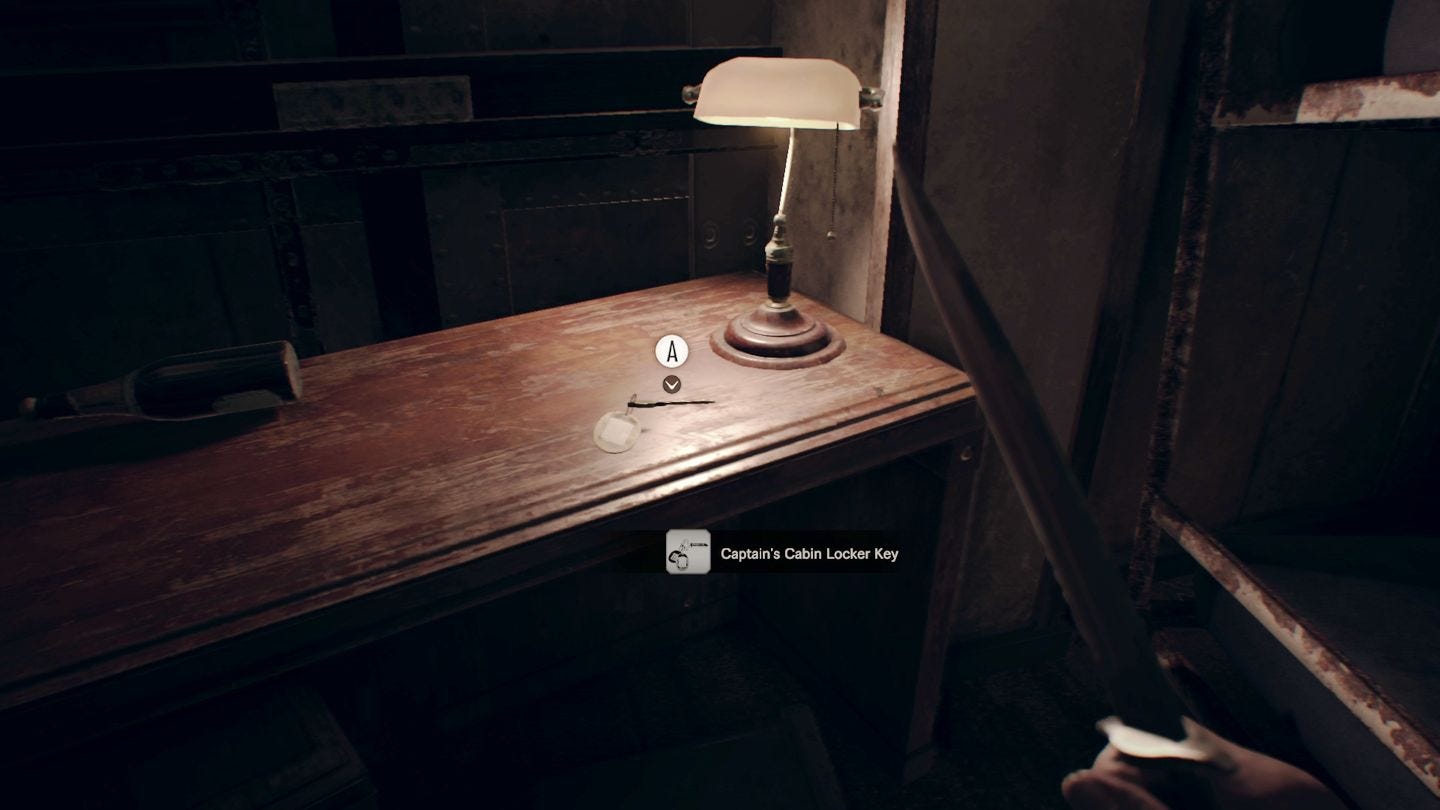
Open the southern locked door here with the Corrisive, and get the Captain's Cabin Locker Key from the desk, as well as Remote Bombs and other consumables.
Head back to the lift, up the ladder, and drop down into the Bridge. There will be enemies on this floor; though you have the knife, simply sprint past them to the Captain's Cabin in the corner, and close the door behind you so they don't follow. Open the locker with your key and get a Remote Bomb and the Machine Gun.
The only other thing on this floor is the Mr Everywhere head on west stairwell behind the banister, so either sprint past the enemies, shoot that and get into the lift, or kill them as you go - your choice.
How to solve the Lounge painting puzzle
Drop into the lift shaft, then down again into the lift proper, and visit Wrecked Ship 2F again now you have firepower.
Go clockwise round the corridor and into the Dining Room. Kill the enemy that spawns in the corner, then crouch and enter the room to the south for some Machine Gun ammo, then into the Break Room west for some Gunpower in the wardrobe.
Go south into the door (which was inaccessible in the Old Videotape) to enter the Lounge. There's a puzzle here involving paintings on the wall, where you have to match the revolvable paintings on the left side with those opposite:
- Rotate the left painting so the pink area is upper left
- Rotate the middle painting so the green side runs horizontal at the top
- Rotate the right painting so the road is along the bottom
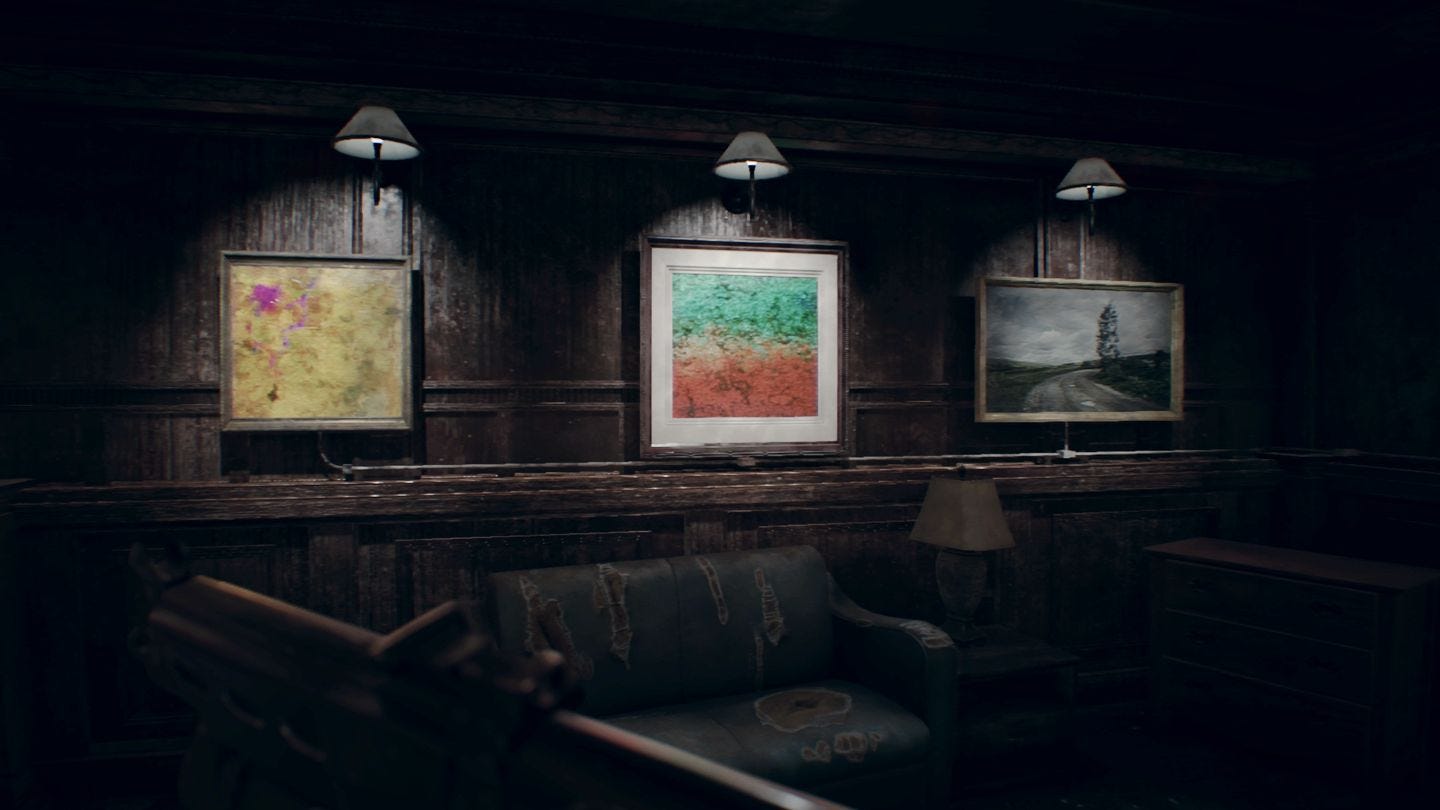
This will unlock the box on the wall, giving you three Corrosives.
Before you leave Wrecked Ship 2F, head to the north east room and climb the ladder to the Shaft room in Wrecked Ship 3F, where you'll find Remote Bombs, a Lockpick and opposite the ladder, a Mr Everywhere head.
How to find the elevator Power Cable
Now it's time to explore Wrecked Ship 3F. Head into the elevator and climb up a level, then jump out. Go east into the Control Room. Now you have a weapon you can kill the crawling enemy here, and clear the room of its consumables, including a Herb, Chem Fluid and Machine Gun Ammo. Inside the locked case on the south desk meanwhile is an Antique Coin.
Use the Corrosive on the door to continue. The door immediately on the left doesn't want to open, so head round the corridor and into the Shower Room. Nothing of note here, so continue next door to Sick Bay.
When you reach the end of a room, a Fat Molded will spawn in from the room behind you and enter. Your best tactic is to lay an Explosive Bomb as you enter, detonate it knock him down, and run past him into the Shower Room so you have more room to manoeuvre. One or two more blasts like this should take him down.
Once he's done, check the right corner of Sick Bay for some Chem Fluids, and in the corner, investigate the machine to get the Power Cable. Be sure to also get the Explosive Bomb at the dead end on the other side of Sick Bay.
How to get the Fuse from Wrecked Ship F1
Now it's time to head to Wrecked Ship F1. Instead of going via the elevator from F3, take the stairwell (going through the room where you watched the Old Videotape) and go two floors down.
You'll come out in the north west corner, back in the corridor where you first started to properly explore the ship, this time armed and dangerous. The Fuse you need is the one you placed in this north west door to get to the stairwell, so take it with you.
How to get a Backpack upgrade and other consumables
Some notes about this floor; though there are some useful items and Files for completionists, now you have the Fuse it's all optional. As with upstairs, this corner Maintenance Room acts as a safe room, so any enemies that you see outside can be 'killed' by simply stepping inside - though of course, they may respawn.
Go anti-clockwise round the corridor now, heading to the Maintenance Room in the south west corner, where there's a save point and in the drawer the MPH Handgun (though if you've got the Machine Gun, is a little defunct).
Head along the bottom of this corridor into room south of the Bunk Room. Read the 'Giovanni's Will' file on the desk and head into the door, where you'll find 'Jim's Letter' file on the corner bed.
The other rooms contain consumables and a permanent upgrade. Open the Recreation Room in the north east corner with a Corrosive, where there is a Backpack to expand your inventory, another Corrosive, some Machine Gun Ammo, a Herb and two more Remote Bombs.
There's also two rooms either side of the stairs (which you cannot traverse though). The Laundry Room contains some Chem Fluid and Machine Gun Ammo (as well as an enemy) if you don't get them previously while grabbing the Fuse, while the Stockroom has a Herb and some Gunpowder in a crate.
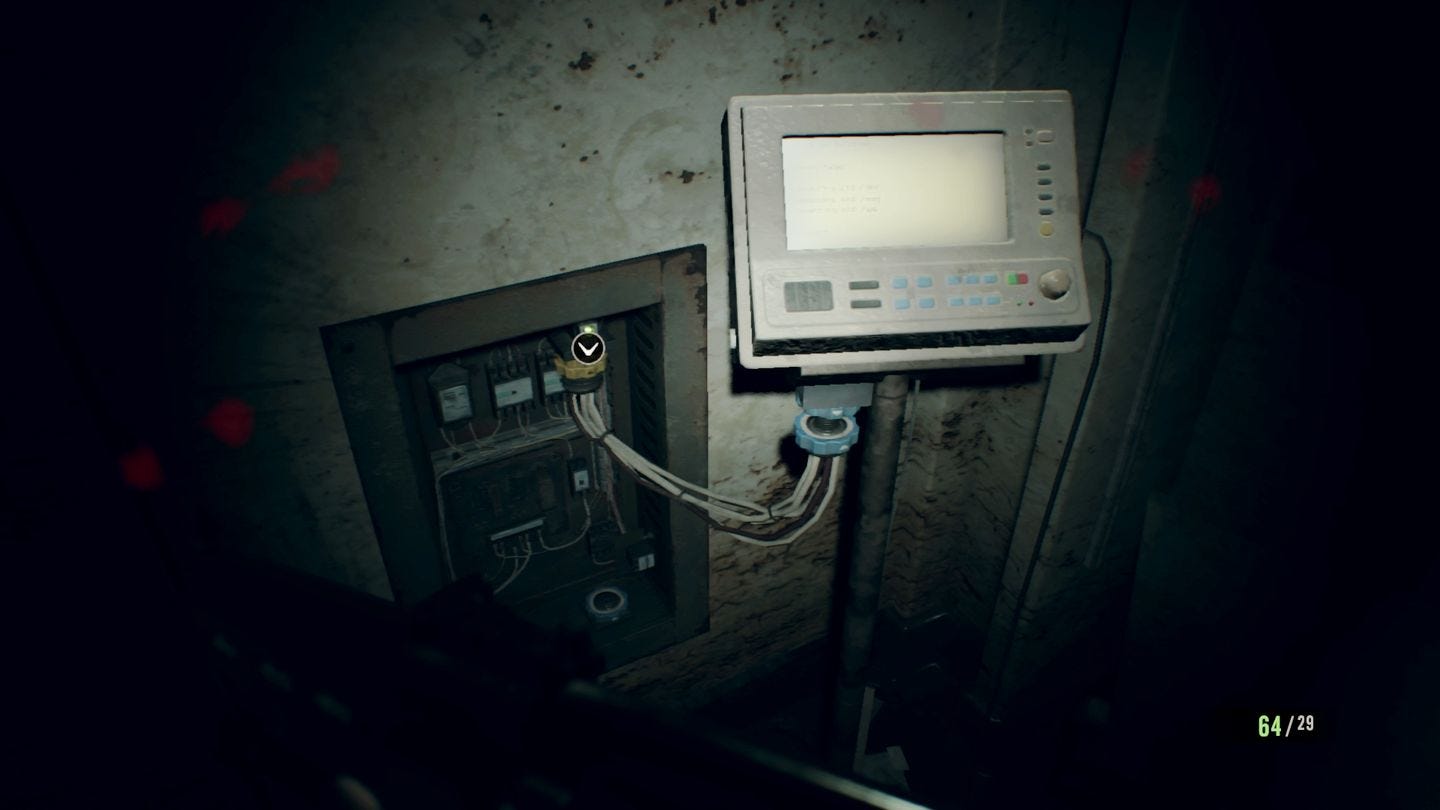
Fix the elevator
How you have the Power Cable from Wrecked Ship F3 and the Fuse from the wall outside the door on Wrecked Ship F1, go to the elevator on the south and insert both into the wall.
The elevator will now be fully operational. Make sure you have explored all the other floors and got any missing Antique Coins, Mr Everywhere statues and Files (including the Mechanic's Memo on this elevator wall) then head down to floor S2.
Exploring Wrecked Ship S2
Head out the elevator and grab the Machine Gun Ammo from the left. This corridor will have a few enemies along the way; one will crawl along the ceiling and drop down behind you, one will be before the long section before the No. 1 Engine Room, and another will emerge outside the No. 1 Engine Room. If you've explored the above rooms, you should have more than enough firepower to take them down. If not, there's plenty of Ammo to get along the way, including a couple of Remote Bombs in the room on the right before the No. 1 Engine Room.
Go through the No. 1 Engine Room, and as you climb the stairs, one creature will spawn on the first corner, while a Fat Man awaits you at the top. Backtrack and lay Explosive Bombs along the way and detonate them as he walks over them. Three should do the trick. Once the way is clear, smash the crate on the final corner for more Ammo, and go through the door.
The following corridor takes you right to the No. 2 Engine Room, but first, open the locked cupboard on the wall for an Antique Coin, then go to the Cargo Bay at the end and use the Corrosive on the device inside to get two Remote Bombs. There'll then be a cutscene when you enter the No. 2 Engine Room.
Want more help? Our Resident Evil 7 walkthrough provides step-by-step instructions on how to survive the main story, as well as finding the Shotgun, Grenade Launcher and the game's many Lockpicks and Treasure Photos. Meanwhile, our Antique Coins locations, Mr Everywhere statue locations and File locations lists will help you find every available collectible on Normal and Easy difficulties.
Mia Fight
When you resume control of Ethan, you have to fight off a possessed Mia. Run south and get the Crowbar from the floor, and use that to block her attacks and swipe away at her whenever you can, until she's down.

Once the fight is over, head east through the door, through the wired fence in the corner, and out of the ship to the Swamp and the Salt Mine, which are essentially the game's final two areas.