PS3 Linux
How it works and what it's good for.

Installing and Running PS3 Linux
One man's "not that difficult" is another man's technical nightmare, so it's worth going through exactly what I had to do to get Linux up and running on the PS3. One major difficulty I did face was the lack of any kind of guide online which is written in passable English or which goes beyond the point at the end of the install where you get a blinking cursor on screen and not a lot else, so hopefully this can fill that gap to some extent as well.
It's worth pointing out early on that unlike the Linux kit for the PlayStation 2, Linux on the PS3 is completely free - aside, obviously, from the need to have such things as a broadband connection, a few blank DVDs, a USB stick, and, er, a PlayStation 3. I guess the last item on that list might be a stumbling block for a lot of people right now.
The full list of things you'll need, then: a PlayStation 3, a blank DVD, a blank CD, a USB key, and a USB keyboard and mouse.
Then you'll need to download some things. First, grab a copy of the latest version of Fedora Core 5 Linux - you want the PowerPC version of the operating system, which is free to download from the Fedora Project. You want "bordeaux-DVD-ppc.torrent" on that page - it's about 3.4Gb so be prepared for a heavy night's downloading! Burn that to a DVD, and while you're doing that, grab the PS3 Linux Add-On Packages CD, which is another free download - available by FTP from the Linux.org site. Burn that to a CD.
You're almost done downloading. The last file you need is called "otheros.self" and can be found on Sony's website - it's only a few megabytes. Grab that and put it onto your USB stick - you want to create a folder called "PS3" in the root of the USB drive, then a sub-folder of that called "otheros", and place the "otheros.self" file in there.
One last thing before you start - pop the PS3 Linux Add-On CD that you burned earlier into your PC, and go into the "kboot" folder. There'll be a file in there called "otheros.bld" - copy that off the CD and drop it into the same folder on the USB drive, where you put "otheros.self" just a moment ago.
Right, you're ready to go. Now for the frightening bit.
Boot up your PS3. First, you want to make sure you've backed up as much as possible from your hard drive - be warned that when I installed Linux on our prototype PS3, it wiped the user profiles and save games during the format process, so you could be in for a nasty shock on that front if you're not prepared for it. Once you're satisfied that you've copied everything of value, go to the Format utility (it's under Settings, in the System menu) and go through the menus to create a partition for another operating system on the drive. It will quickly format the drive, and when it finishes, a section will be set aside for Linux.
Now plug your USB key into the PS3 - and select "Install Other OS" on the system menu. It will find the "otheros.self" file, and ask you if you want to proceed - give it permission, and it'll put a loader on your system that will let you start the install process. The final thing you need to do in the PS3 menus is here - go to the Default OS setting, and switch it from "PS3" to "Other OS".
Say goodbye to the PS3 dashboard - you won't be seeing it again for a while. Reboot.
When the system comes back up, it'll just give you a command prompt. Pop your install DVD in the drive (the Fedora Core DVD - not the Add-On CD), and at the command prompt, type:
install-fc sda
You'll be asked if you want a full or minimum install - unless you really know what you're doing, select a full install, as this will give you all the various applications you'll need to actually get some use out of your Linux system. Next, you'll get a few questions, ranging from the inane to the very technical - just type "y" and hit enter in response to all of them. They're basically just checking that it's okay to wipe the Linux partition and install over the top. The one question you do need to be concerned about is the root password - make sure you set this to something you can remember, or your entire install will be useless!
At this point, I hope you own another game console, or a handheld, or a really good book, because the install process from here until the next time human interaction is required will take about two hours. There's not a lot of point watching it - it's not even particularly hypnotic. Just leave it be for a couple of hours, and when you come back the system will be asking for the Add-On Packages CD you burned earlier. Pop it into the drive, and you're on the home stretch.
A few minutes more, and the install process will - finally - finish. Helpfully, you'll be dumped right back to a command prompt. To shut down the machine at this point, you'd type halt, but obviously you'll want to play with your new toy! Instead, type reboot and the machine will do exactly that.
After the lengthy boot process - which is terribly verbose and spits text around the place like there's no tomorrow, none of which you actually have to bother yourself with - you'll be at a login prompt. Log in as root with the password you set yourself.
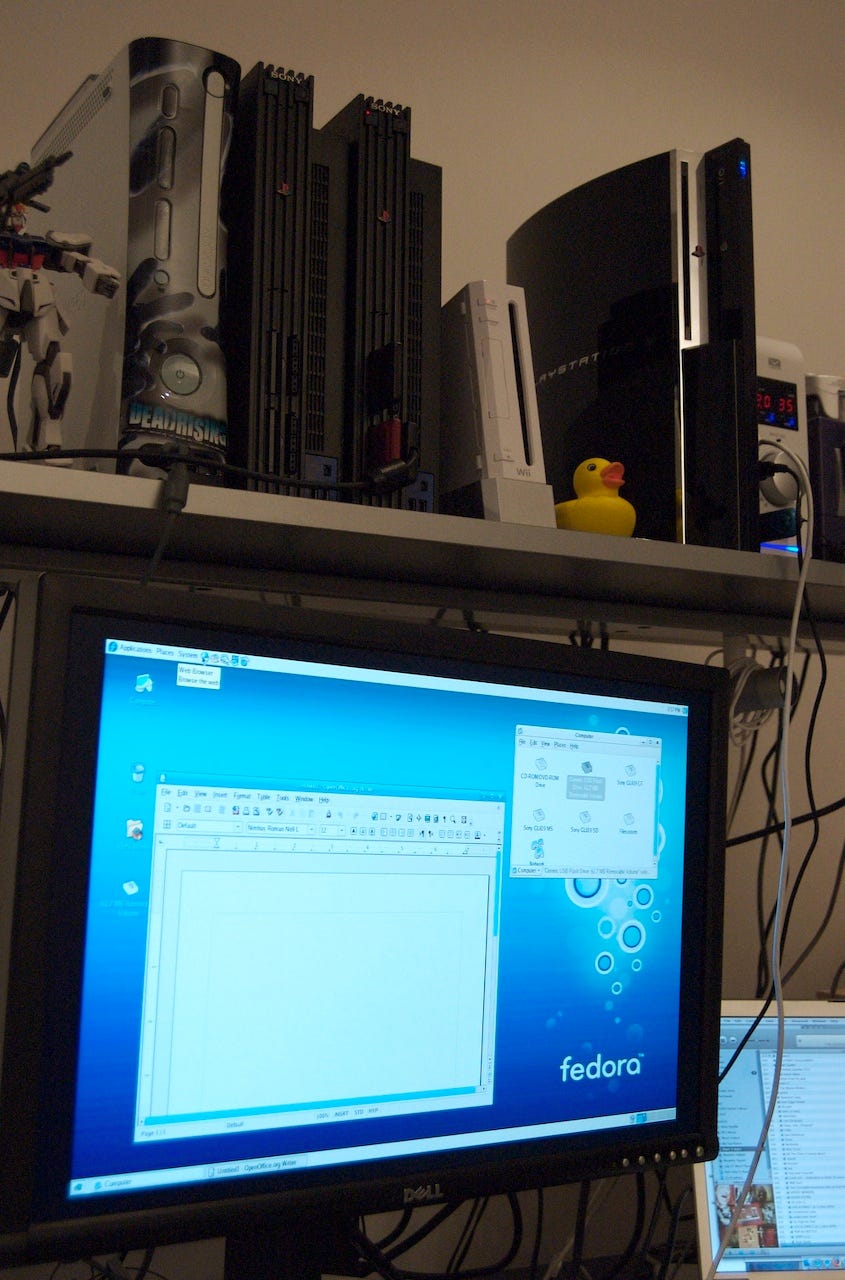
Command prompt. Bit like DOS, this? However, before you head off into the pleasures of the windowed environment, there are a few things to fix. For a start, you'll want to get out of that nasty 480i resolution...
The crucial command here is one called "ps3videomode". Basically, this is a custom command that sets the mode on the PS3. If you're hooked up using a component cable, the commands are as follows:
ps3videomode -v [number]
Replace [number] with 2 for 480p, 3 for 720p, 4 for 1080i and 5 for 1080p. Alternatively, if you're using RGB rather than YUV component video, use 34 for 480p, 35 for 720p, 36 for 1080i and 37 for 1080p. Those are all for 60Hz displays - there is a different set of numbers for 50Hz displays. A full set of the numbers is available in the documentation on Sony's site.
If you're using a HDMI cable, you have the option of using VESA resolutions, like those used by PCs. For WXGA, use 11; for SXGA, use 12; and for WUXGA, the highest resolution supported by the console, use 13. However, a quick word of warning - my own experimentation with the console suggests that when running Linux, the PS3 insists on outputting HDCP signals, which basically means that the signal is copy-protected and will only work on monitors that support HDCP. The more recent Dell 2407 monitor supports HDCP on the DVI port, for example, so you can plug in a HDMI to DVI cable and it'll work - the older Dell 2405 doesn't, and nor do the majority of computer monitors. There may be a way around this, but I have yet to find it if so.
Next, you'll probably also want a way to return to the PS3's normal operating system. To do so, type the following at the command prompt:
boot-game-os
This command shuts down Linux and boots into the PS3 OS, which will be the default boot OS from now on. To get back into Linux, go to the system menu and set the default OS back to "Other OS", like you did at the start of the install process.
Last, but by no means least, once you've set a video resolution you're happy with - it's time to get into the nice graphical operating system. To do this, at the console, type:
startx
From here, you can explore to your heart's content. This is a very typical Linux install, and there's loads of information out there to get you started on using Linux - all of which is beyond the scope of this article. Enjoy!