Lightning Returns: FF13 – Wildlands quest, getting a chocobo, Reaver fight, Caius fight, Cactair fight
We've got essential guides to beating the Reaver, Caius Ballad and Cactair in our complete walkthrough for the Wildlands region of the game.

The third chapter of Lightning's adventure is packed with a few very tricky boss battles which require some very specific strategies. You can expect some extensive platforming sections in this area of the game too, but on the bright side, at least you get to do it on the back of your very own Chocobo! Read on for our walkthrough of the Wildlands content in Lightning Returns.
Wildlands main quest walkthrough
As soon as you step foot in this new area of the game, you'll be gifted a brand new quest to get stuck into. Titled The Angel of Valhalla, you won't get far through it before you're treated to a new cut-scene. And when we say you won't get far, we mean the moment you leave the station. Anyway, your reward is a new avenue to pursue and a new marker on your map - one that takes you to a character called Dr. Gysahl.
Once you've found the doctor and had a chat with him, he'll ask you to find his assistant named Seven. That shouldn't present you with too much of a problem, as you'll find him standing just away from the doctor, chopping away at firewood. Head over to him, have a word or two, and he'll send you off to the City of Ruins with a handy marker on your map. Just make sure you grab the item sphere before leaving - it's located in the grass at Canopus Farms.
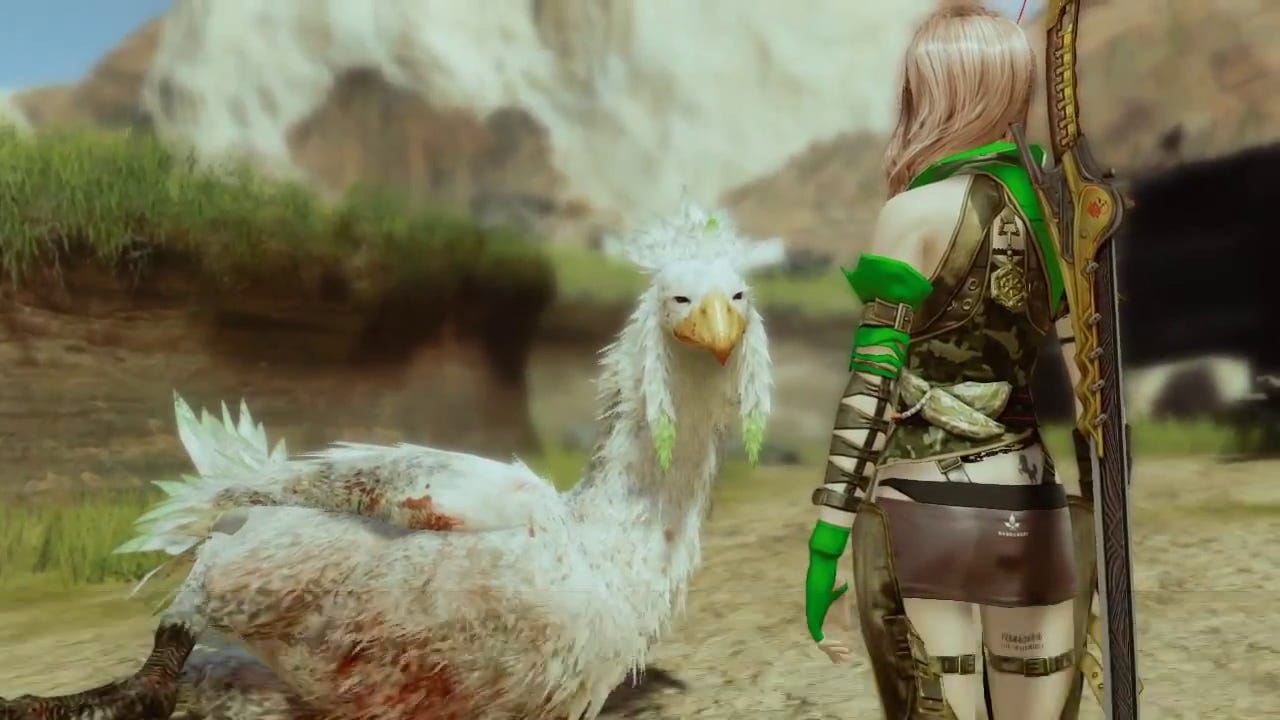
The first order of business when you arrive at the City of Ruins is to go head-to-head against a Chocobo Eater. If you're flinging magic around at it, make sure you stick to those from the Thunder or Aero class for maximum effect, although you'll still find yourself using a decent amount of physical damage to fully finish off the fight.
"The Chocobull can be obtained from the Hunter Chief just to the west of the farms, the Gysahl Greens are with Sarala nearby, while Fuzzy Sheep Milk can be obtained from the Innkeeper."
Once you've defeated the Chocobo Eater, it's time to head back to Canopus Farms - just use your new location marker to find your way back home if necessary. As you approach Dr Gysahl, a new cut-scene will begin and you'll also be granted access to the side quest Saving an Angel. Just like the quest with the fireworks, it's time to grab some items - the chocobo's hungry, after all, and it's after some very fussy foods.
There are three items you'll need to get your hands on to stuff this particular bird. The Chocobull can be obtained from the Hunter Chief just to the west of the farms, the Gysahl Greens are with Sarala nearby, while Fuzzy Sheep Milk can be obtained from the Innkeeper.
Once the chocobo's been fed and watered, you'll need to head south-west until you reach Jagd Woods. Here you'll receive a side quest from Hunter Hopeful, one that rewards you with a Mystical Meal.
Unlocking your chocobo
Take this foodstuff back to the farms and feed it to the bloated Chocobo. Voila! This happy little chick is now grateful enough that it'll let you ride around on its back. Once mounted, head to Jagd Village where you should pick up a quest called Chocobo Cheer from Nadia. This involves a little light flower-picking, so saddle up and head north-west to find your first flower. Once investigated, head to the north of the Woods to find the second of the flowers, while the third can be found just to the west of Aryas Village.
At this point you've got a couple of choices. Either you can continue straight on with the main quest, or you can give your chocobo a further boost by gathering the flowers all over again - although you'll have to wait until 24 game hours have passed. If you've been ploughing your way through the main quest, it's probably worth finishing off all of your side quests first, as things get noticeably trickier during the latter half of the Wildlands content.
If you're ready to carry on further into the meat of the game's story, your next stop on the world map should be Poltae. Once there, you need to speak to a gentleman called Professor Lathom, who you'll find standing by the Poltae Inn. He'll give you a new side quest called The Grail of Valhalla once you've finished your conversation with him.
Once you've reached the location marked on your map you'll need to deftly float your chocobo over the rocks ahead before making your way further up. Hop over to the roof opposite you, and then move onto the rocky platform, before jumping and gliding over to the next platform. When the - seemingly inevitable - cut-scene has finished, you'll want to travel to the south-eastern part of this area to have a rummage around for an item sphere. After that, go back and ascend the ladder, then cross the bridge for a further cut-scene.
Beginning the Goddess Glyphs quest
Once that's over with, you'll be able to get your hands on another item sphere that's located to the north. Now make your way up the nearby slope and walk through the hallways until you trigger a cut-scene. Keep heading onwards and upwards using the platforms, then follow the path that leads towards the north-west. Keep heading up until you're on the balcony, then drop down and take a look at the plaque to get hold of a new side quest: Goddess Glyphs.
Talk to Yeul again to get to the next balcony, then head in a south-eastern direction to get hold of another handy item sphere. Go through the door to the north-west and speak to Yeul when you've reached the centre of War's Cage. Now travel up the ramp and veer to the right to speak with Yeul. If you don't mind jumping around a little, you can also find another item sphere by heading outside and dropping down to the area below. Talk to Yeul once more to return back up top, then get over to the next balcony.
As you make your way forward through the next door, you'll be able to open up an item sphere - this one contains something called the Prophecy of Rebirth, which holds some useful info about one of the boss fights you've got coming up shortly. Keep heading forward into the next room, finishing off the Aster Protoflorian as you go, then climb up and over the rubble you see to talk to Yeul once more. Make your way up the balcony and keep travelling down the corridor to start a cut-scene.
Make your way across the room via the platforms, and interact with the item sphere just to your right to get hold of some extra loot. Now go back through the upper hallway until you're at the highest level of War's Cage. There's a plaque just to the north-west of the spot you're in - investigate it, then take the right-hand path to speak to the Yeul.
Continue making your way through the corridor, talk to the next Yeul, and then hop over the three platforms ahead of you as quickly as possible - they'll disappear after a short while, and you'll be sent plummeting to the ground if you're not careful or quick enough.
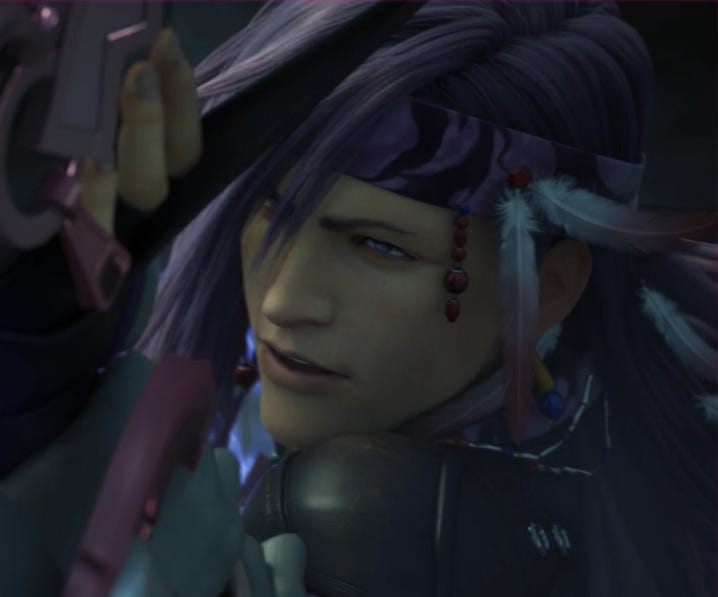
"You'll run into a mini-boss known as the Reaver whose main purpose is to act as a gear-check. "
Fighting the Reaver
You'll eventually run into a mini-boss known as the Reaver, whose main purpose is to act as a gear-check. If you find yourself able to take him down pretty easily, you're ready for the next stage of the game. If, on the other hand, he gives you a bit of a whooping, you might want to think about finishing up some side quests. Focus on those that give you the best gear rewards and stat boosts.
Assuming you've managed to kill the Reaver, make your way into the next room and speak to Yeul, before making your way up the balcony and on down the next corridor until you trigger a cut-scene. After talking to Yeul for the final time, keep moving forward as far as you can until the next cut-scene starts. Just make sure you've had a good look over your equipment and abilities, as you'll want to equip your very best kit for the boss fight that's coming up.
Fighting Caius Ballad
| Boss | Caius Ballad |
| Rewards | Max HP +120, Max ATB +10, Strength +56, Magic +126, Recovery Item Capacity +1 |
If you want to stand a decent chance of coming out of this fight alive, make sure you use as many of your physical damage mitigation abilities as you can - this guy hits hard. Anything that reduces elemental damage is a good call here too, and Defaith is a great tool to use. As with all of the significant fights in the game, being able to guard against the meatiest attacks is absolutely critical. The more Perfect Guards you can pull off, the easier you'll find everything else in this fight.
Caius fights you using a number of different stances. The first, Commando, allows him to deliver a fast and furious flurry of attacks. These go on for so long, in fact, that you should be ready to switch over to a new Schemata at a moment's notice, just so you can keep guarding this devastating assault. If nothing else, you absolutely, positively must block his Eye of Bahamut attack - unless, that is, you want to be dripping in every status ailment you can possibly imagine.
The second stance Caius will make use of is Ravager, and this time around the focus is very much on painful elemental spells that will strike Lightning multiple times while he charges up his main attack. When that attack comes, expect some very strong elemental damage spells that come at you thick and fast.
Note that Caius will eventually cast Absolution once his health starts running low, so by all means throw Brave Thief at him if you've got it available. If not, just hit him with everything you've got, while also throwing every last debuff you've got at him - these will really help turn the tide of battle in your favour.
Another useful tool when you're fighting Caius is Curse, an ability which helps you interrupt the worst of his damage using any of your spells which end with -ga: Aeroga, Thundaga, and so on. Apart from that, you want to concentrate on delivering elemental damage when he's in his Ravenger stance, and physical damage when he's in Commando mode. Just make sure you deliver these without respite if you're hoping to induce a Stagger. Once triggered, you know what to do - hit your Overclock ability as soon as possible, so you have plenty of time to get stuck into him.
Keep this up and he'll eventually crumble, although it might take you a few attempts to get this fight down perfectly. When he's dead, take a look at the item that's just in front of Lightning to get hold of the lovely weapon called Chaos's Revenge.
At this point, you've actually completed the Wildlands main quest, but you need to hang around in this region to kick-start the final part of the main quest. Make your way to the very north of Eremite Peaks and talk to Sazh. When you follow the chocobo outside, you'll be able to unlock a new item sphere which then triggers a cut-scene. Now go back outside and talk to Chocolina in order to get the Key To Her Heart quest. Once you've completed this, you'll receive the Fragment of Smiles.
You won't be able to take this quest any further until you've completed a couple of other side quests, namely Soul Seeds and Peace And Quiet, Kupo. Once you've got the Moogle Fragment you need, talk to a Soul Seed merchant and hand it over to get the Fragment of Radiance in exchange.
Assuming your game time is somewhere between 7pm and 3am, you'll be able to go back to the Slaughterhouse and talk to Slaughterhouse Zoe. Just be ready for a fight against a Zaltys Brimstone when you do so, although it can be beaten using the same tactics you've used for any of the other Zaltys fights you've had. The reward for beating this creature is the Fragment of Courage.
The fight with Cactair
"Although the enemy has a very low health pool, every hit you land against it will only inflict one point of damage."
Now you're ready to make your way to the fourth and final main region of Lightning Returns: the Dead Dunes. Here you'll be able to get your hands on another fragment - the Fragment of Kindness - by beating Cactair, the second and final boss in this section of our guide. First of all you'll have to make your way to the Dry Floodlands, then use the Pilgrim's Crux on the altar to dispel the sandstorm and start the fight.
| Boss | Cactair |
| Rewards | Fragment of Kindness |
There's one key aspect to this fight that you must know about if you're to both beat Cactair and save your sanity at the same time. Although the enemy has a very low health pool, every hit you land against it will only inflict one point of damage. Just one. So, you want to focus on attacks that both hit multiple times, and also use up very little of your ATB. Do you have anything in your arsenal that can inflict Slow against Cactair? Use it, as that will limit your opponent's attacking capabilities, while allowing you to keep chipping away.
A couple of other things to note about this fight. Staggering the enemy really doesn't confer any benefit, and any of your spells from the Ice class will actually heal him. Just keep chipping away and using your slowing debuffs and your opponent will fall to the ground before you know it.
Now go back to Sazh and collect your well-earned rewards.
Lost in Luxerion? We've got main quest walkthroughs to get you all the way through Lightning Returns