Inside Digital Foundry: Teach yourself pixel-counting
DF reveals its high-tech tools: Microsoft Paint and a calculator.

720p, 792p, 900p - video games often operate at significantly lower native resolutions than the 1080p output of the console may suggest. We've discussed at length our opinions on how much this actually matters to the gameplay experience (generally speaking, 900p isn't as much of a visual comedown as the raw maths suggest) but in this piece, we'll be going into depth on how we actually make the calculations - and how you can produce your own analyses.
Pixel-counting - as it's known - is a fairly simple procedure. Back in the day, we would require access to lossless captures from the consoles in making our analysis, requiring an expensive capture card. But in the current generation console era, Sony and Microsoft have made it very easy for everyone to gain access to premium quality screen captures - both PlayStation 4 and Xbox One allow users to produce PNG shots of in-game action that can be copied onto a USB stick then taken over to your computer for analysis.
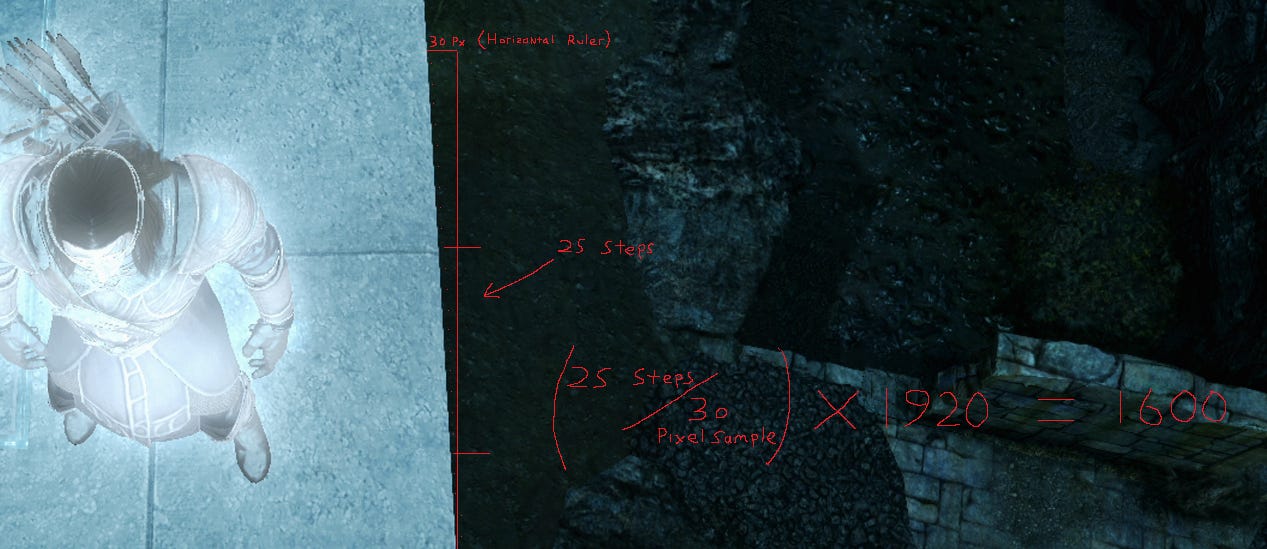
And that's where the actual pixel-counting procedure takes place. What's required to ascertain native resolutions are long, preferably sharp geometric edges, preferably high contrast in nature to highlight the 'stair-step' edges of the line. From there, across what is generally a 30 pixel sample, we count the amount of stair-steps generated by the console. Assuming we're talking about vertical resolution, 20 steps from a 30 sample gives us this calculation - (20/30) x 1080. End result: 720p. If you see 25 steps, that's (25/30) x 1080... 900p.

It may sound a little complex at first, but it's simply a matter of observation and basic maths. To illustrate how it's actually done, we've made a 'hands-on' video to demonstrate the technique. In there we cover the best way to grab screenshots for analysis, and then how we use Microsoft Paint as our tool of choice, for setting the pixel sample (the 'ruler') and then counting the edges. In addition to the video, there's also a download available here - it features a number of demo screenshots in original form, along with pixel-counting annotations provided by Tom Morgan. Compare and contrast with your own efforts and you'll soon get the picture.
So why choose a 30-pixel sample for our 'ruler' in the first place? Well, when we encounter a sub-native title, we generally expect developers to drop down to 900p or at a push, 720p. A 30-pixel sample is divisible by both 20 and 25, the results we expect to see for those upscaled resolutions. But of course, there can be wrinkles: the Xbox One versions of Far Cry 4, Dying Light and Call of Duty Advanced Warfare retain a 1080p vertical, but opt for a sub-native horizontal resolution. The pixel counting technique still works here as generally we take both measurements from both vertical and horizontal edges - you'll just get different results for each axis. Games like Call of Duty Black Ops 3, utilising dynamic resolution, can be trickier to track - a high-quality capture card is definitely required there to catch differences during in-the-moment gameplay.
Even factoring out dynamic resolution, there are outliers that require extending the 30-pixel sample 'ruler' to something higher. Take Titanfall and Watch Dogs on Xbox One for example - both operate at 792p (1408x792). Generally, the longer the pixel sample, the tighter the ratio between rendered pixels (game resolution) and the raw output of the console. And the tighter the ratio, the more accurate your analysis will be. Sometimes it can take a while to definitely pin down exact rendering resolution, but in the rare occasion when doubts remain, higher pixel samples from a longer 'ruler' reduce the potential for error to just a few pixels.
Ultimately, getting a good lock on resolution is all about having good, high contrast edges to analyse. The era of post-process anti-aliasing - which tends to blur those edges - means you need to be really careful with your sample shots, but it's actually a fair bit easier than the last-gen era, where native rendering resolution choices were a lot more arbitrary, and where the arrival of post-process AA in combination with the much lower resolution made analysis considerably more challenging owing to excessive blur. Back then, we made a fair few calls on resolution using choice shots where FXAA was 'broken', leaving some crucial edges untreated, giving us the means to get a decent lock.
With the exception of a few notable games, pixel-counting is a relatively simple task in the current-gen era. There are no arcane arts or high-tech tools involved - and the basic nature of the tools available means that practically everyone who owns a PS4 or Xbox One can give it a shot. Often, much of the work we do at Digital Foundry can be demystified quite easily - and what made this piece interesting to produce from our perspective was the fact that the tools used are well within the reach of the majority of our audience. If there's anything else you'd like us to tackle, feel free to let us know.
Ever wondered how Digital Foundry produces its performance videos? Check out this Inside Digital Foundry post to see the bespoke frame-rate analysis tools in action.