Pokémon Sword and Shield: Stowe-on-Side and how to beat Bea or Allister's Gym Mission
Our complete walkthrough for Pokémon Sword and Shield.

Stow-on-Side and Bea or Allister's Gym Mission follow on from Route 6 in your quest through Pokémon Sword and Shield's main story.
On each page of our walkthrough like this, we'll cover any and all of the obtainable Pokémon, item locations, trainers and their teams that you might come across here, as well as walking you through any key steps of the story, puzzles or challenges along the way.
Where applicable, note that our walkthrough pages will be down into separate sections referring to each of your visits to a given location, seeing as you often backtrack or revisit various places in your quest to become Galar League Champion. And of course if there are any, we'll clearly mark any spoilers, too!
For more explainers, meanwhile, or walkthrough pages on more locations in Sword and Shield, head back to our main Pokémon Sword and Shield walkthrough and guide hub.
On this page:
Pokémon Sword and Shield: Stow-on-Side - available Pokémon, items and trainers
Stow-on-Side is an interesting town, with a fair few things to do and explore that belies its small size.
First up, there's a man in the Pokémon Center who'll give you a couple of Fossils for free, and explains that you can find more by searching for them in the Wild Area or getting the Digging Duo there to look for more.
There's also a salesman and a collector at the market. The salesman will sell one item per day at a heavy discount, and the collector will buy one particular item per day at a much higher price than usual. They're useful, if you can find a good deal!
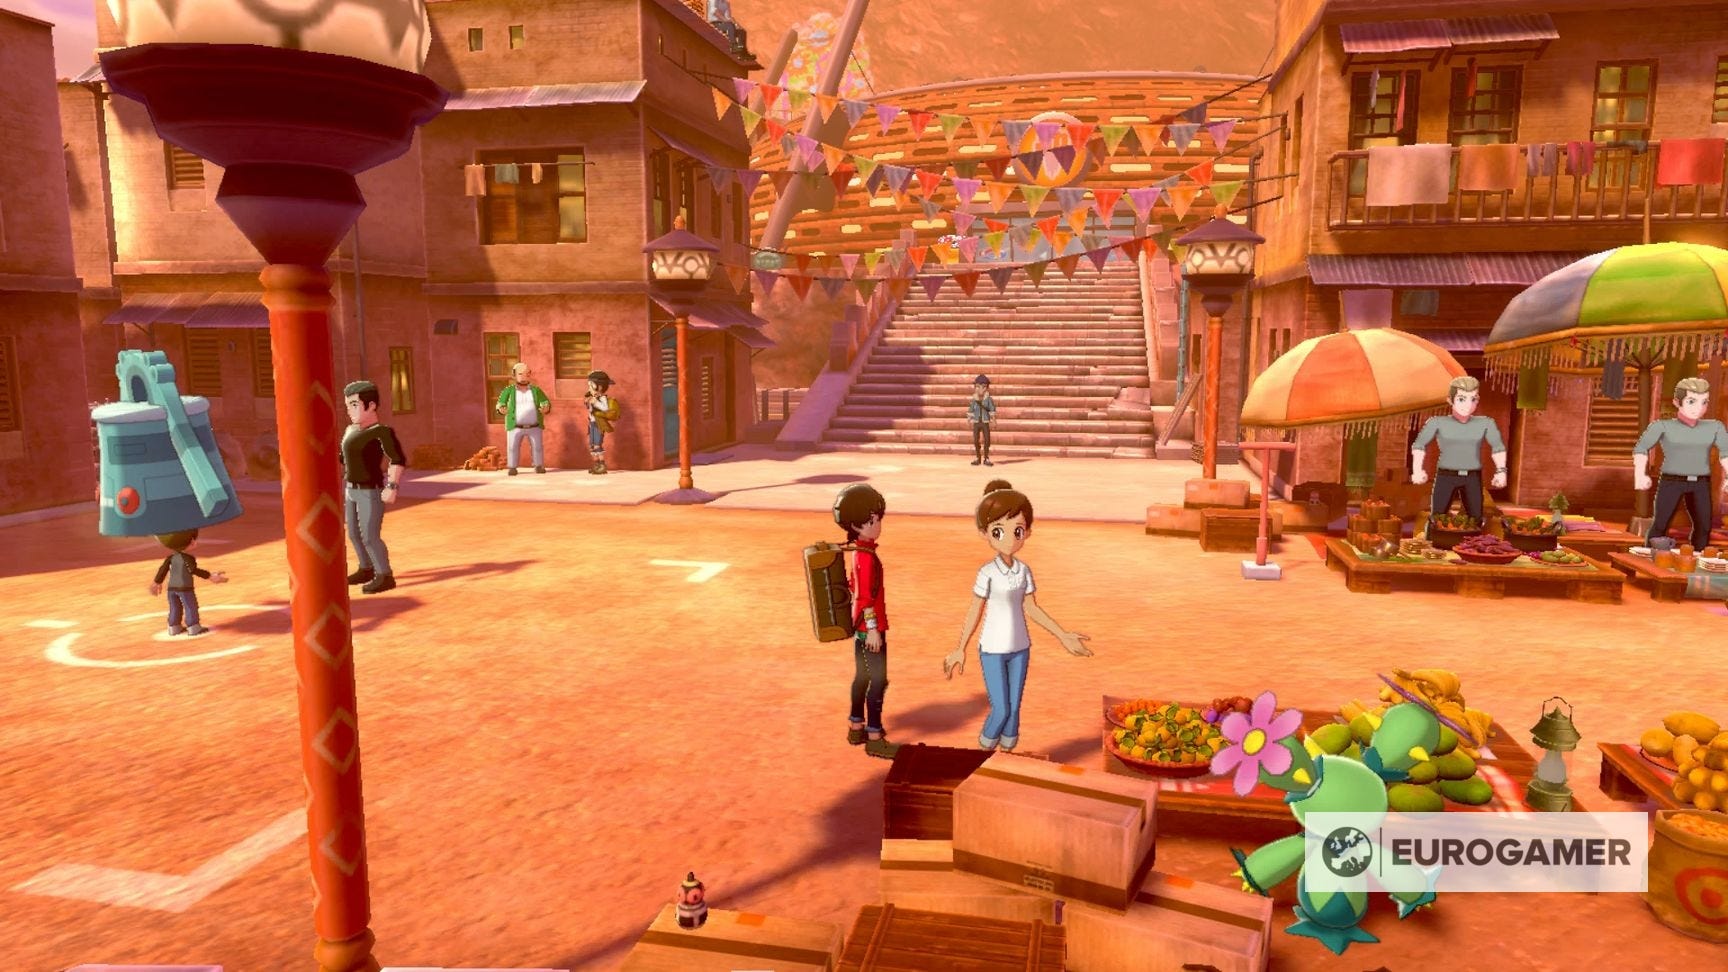
There are also a few interesting things to find in the town itself. If you head to the bottom left corner of Stow-on-Side there's a ladder, down to a small lower area with an item and a hidden item, and also a route round to the left behind the buildings with a couple more items to be found up on the rooftops - and a trade to be had with a man sat on the roof too.
He wants a Maractus, which can be found back on Route 6, and in Pokémon Sword he'll offer you a Hatenna, or in Shield an Impidimp. It's worth noting this is a great trade whichever version in, as the Pokémon he's offering corresponds to the main weakness of your upcoming Gym Leader (Psychic, for the Fighting-type leader Bea, or Dark for the Ghost-type leader Allister!).
There's also a route from the main staircase in town to the right, up another hard-to-see ladder, behind the buildings to another rooftop with another item.
At that main staircase you'll find Hop waiting for battle. He's changed his team around a bit but should still go down easy enough. Opal will also appear again, and give you the Gym Leader's League Card - Bea's in Sword or Allister's in Shield.
After that, head up to the left of the Gym to go visit the ruins, and notice the cracks in the wall...
You can also poke your head into the entrance of the Glimwood Tangle, to the east, and catch some useful Ghost, Fairy and and Psychic-types if you need one for the upcoming battle and didn't fancy that trade earlier on. After that, it's time to tackle that Gym!
Available Pokémon
| Pokémon | Notes |
|---|---|
| Hetenna | Trade with man on roof, accessed via bottom left corner (Sword) |
| Impidimp | Trade with man on roof, accessed via bottom left corner (Shield) |
Available Items
| Item | Location |
|---|---|
| Fossilized Birds x2 | Man in grey shirt in Pokémon Center (Sword) |
| Fossilized Drakes x2 | Man in grey shirt in Pokémon Center (Shield) |
| Sp Attack x2 | Hidden: Far left corner of town by two sandbags |
| Bea's League Card | From Opal, after beating Hop (Sword) |
| Allister's League Card | From Opal, after beating Hop (Shield) |
| TM06 Fly | From the man in the house next to where you battled Hop, possibly only if you've used a Flying Taxi before. |
| Cracked Pot | Take the ladder on the right of the big staircase onto a rooftop. |
| Dusk Stone | Behind the Pokémon Center, accessed by going behind the town sign to the right |
| Max Revive | Hidden to the left, on the first platform as you head up the stairs to the mural |
| Heavy Ball | The Ball Guy! |
| Rare Bone x3 | Hidden: down the ladder in the bottom left, by three sandbags |
| Quick Claw | From daily salesman |
| Rocky Helmet | Down ladder in the bottom left, by a ledge. |
| Metal Coat | Hidden: on rooftop accessed by bottom left, next to man who wants to trade |
| TM74 Venoshock | On rooftop accessed by bottom left, far left side. |
| Beast Ball | From bargain seller after becoming Champion |
Trainers and Battles
| Trainer | Pokémon | Level |
|---|---|---|
| Hop | Cramorant Silicobra Toxel Drizzlie/Thwackey/Raboot | Lv.28 Lv.30 Lv.29 Lv.33 |
| Bede | Duosion Hattrem Galar Ponyta | Lv.32 Lv.35 Lv.33 |
That battle with Bede, if you noticed it there, will come after the Gym is defeated - so worry about that in a bit!
With it finally in the wild, here's how to start the Crown Tundra DLC and our full Pokémon Crown Tundra walkthrough. Plus, here's how to catch Calyrex, Glastrier and Spectrier, the Regieleki and Regidrago puzzle solution and Regirock, Regice, Registeel locations, details on how to catch Legendary Birds Articuno, Zapdos and Moltres in the Crown Tundra, the Ultra Beasts and Necrozma adventure, Dynamax Adventures, including the legendries you can catch on these adventures, and the new Crown Tundra Pokédex and returning Pokémon explained. For Isle of Armor players, here's how to find the Slowpoke, where to find Max Mushroom locations, and how to get Kubfu, become best friends and evolve it, plus all Diglett locations too! For the base game, here's info on the ability to transfer Pokémon to Pokémon Home, the Wild Area, lists of all TM locations and TRs, all Galarian forms and finally our main Pokémon Sword and Shield walkthrough for the whole game.
Pokémon Sword and Shield: how to beat Bea or Allister's Ghost or Fighting-type Gym Mission
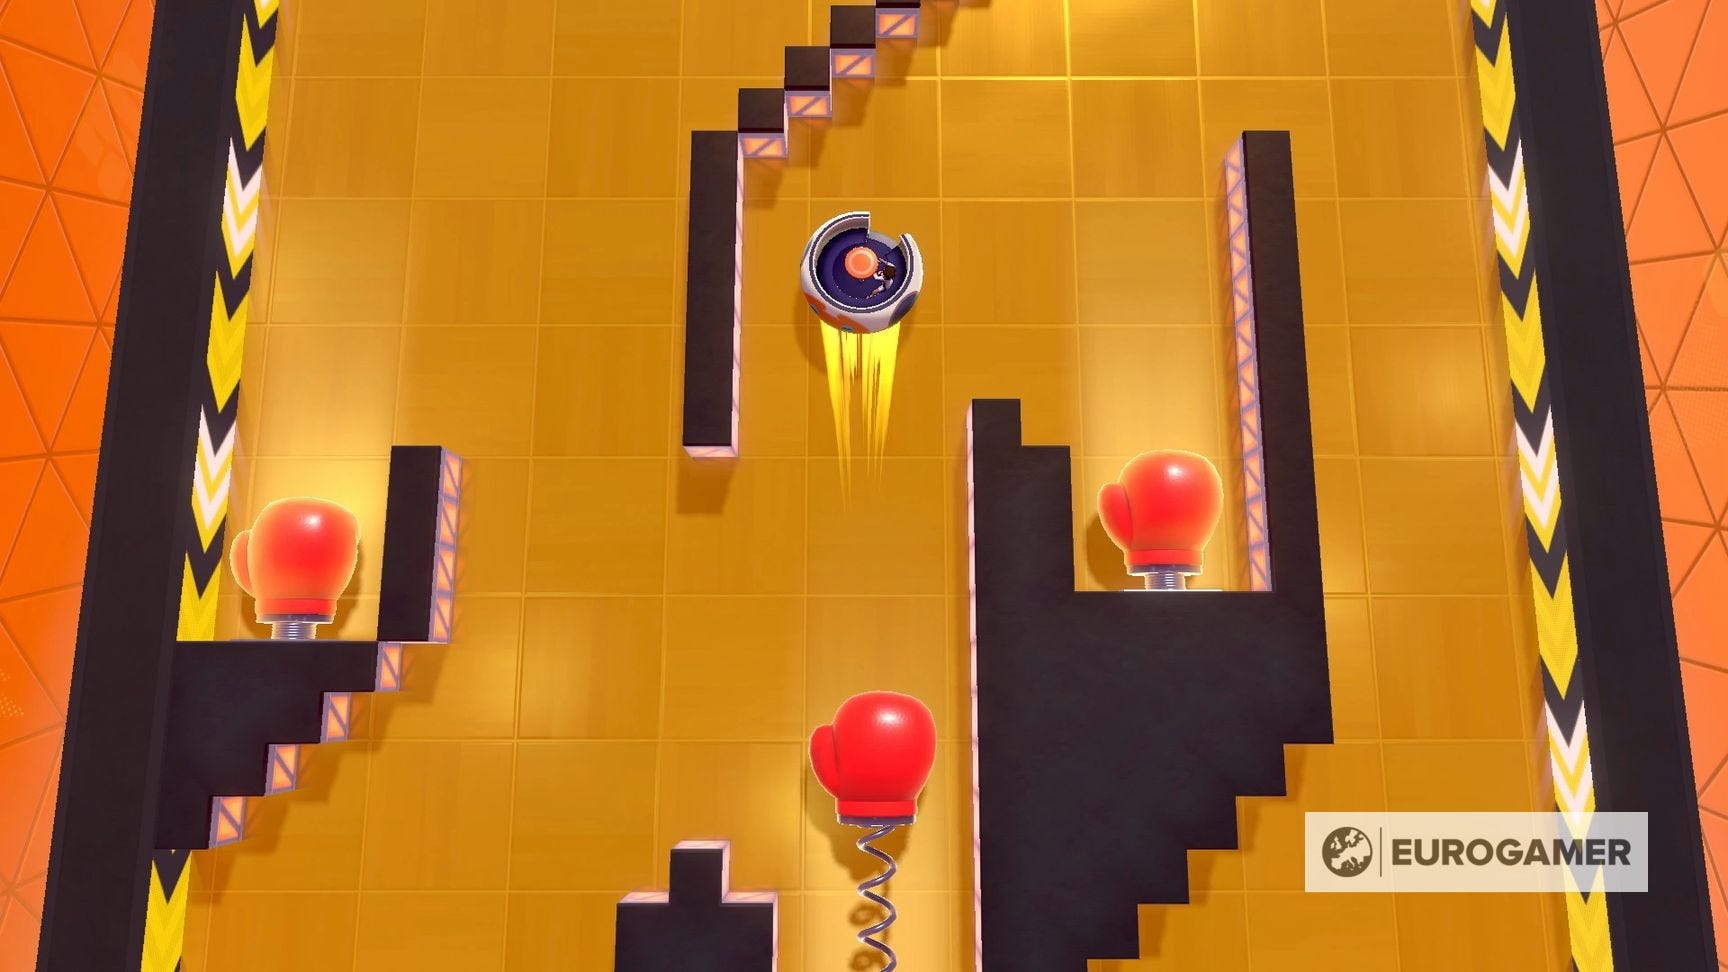
This Gym Mission is sort of like reverse pinball: you sit in a ring and have to bounce your way down through three obstacle courses to reach the final battle with Bea or Allister on the other side.
You might have noticed we keep saying Bea or Allister - that's because this Gym's Leader is one of several Pokémon Sword and Shield version exclusives. In Sword, the Gym will be Fighting-type themed, making it brown in colour, the trainers will have Fighting Pokémon, and you'll battle Bea at the end. In Shield, it's Ghost-type, with the interior purple in colour, the trainers having Ghost-type Pokémon and you battling Allister at the end.
The challenge itself, however, is exactly the same - there's just a different theme layed over the top of it.
How to complete the Stow-on-Side Gym Mission
To move, rotate the stick right (clockwise) to go right; or left (anticlockwise) to go left. Navigating the obstacles is relatively easy, just remember that the spring-loaded fists are actually a help as much as a hindrance, and you should be fine!
When you get to the third obstacle course, which is the only tricky one, go to the far left if you get stuck, and that spring arm will knock you right up to the top, letting you get over to the far right much easier.
Between each of the three there's a trainer and a warp pad to take you back to the entrance, if for any reason you need to leave.
Trainers and Battles (Sword)
| Trainer | Pokémon | Level |
|---|---|---|
| Gym Trainer Ian | Stufful Bewear | Lv.31 Lv.32 |
| Gym Trainer Claire | Farfetch'd | Lv.32 |
| Gym Trainer Simon | Hitmonlee Hitmonchan | Lv.33 Lv.33 |
Trainers and Battles (Shield)
| Trainer | Pokémon | Level |
|---|---|---|
| Gym Trainer Clive | Pumpkaboo Phantump Pumpkaboo | Lv.31 Lv.31 .Lv.31 |
| Gym Trainer Roy | Haunter Drifblim | Lv.33 Lv.33 |
| Gym Trainer Lynne | Corsola | Lv.32 |
How to beat Gym Leader Bea or Allister
Fairy is actually more useful against Bea than Psychic. Psychic-type attacks will be super effective against three of her four Pokémon, but Pangoro could be a problem if that's all you have to deal with it, is it's totally immune! Fairy-type is super effective against all four Pokémon and doubly effective against Pangoro too, so consider picking up an Impidimp from the entrance to the Glimwood Tangle and evolving it, if you haven't got any useful Fairy-types in your team!
Bea Gigantamaxes her Machamp, which can deal out some hefty damage if you're not careful, so save your Dynamaxing for then.

As for Allister, the options are a bit less obvious. Ghost is super effective against three of his Pokémon, but not Gengar - and he Gigantamaxes his Gengar too. Your own Ghost-types will also be weak to his Ghost-type attacks, so it's not a brilliant option for the actual typing of your team. Dark is a better shout - it's super effective against three of his again, including Gengar, so you just have Mimikyu to deal with (use Steel or Ghost!).
| Trainer | Pokémon | Level |
|---|---|---|
| Gym Leader Bea (Sword) | Hitmontop Pangoro Sirfetch'd Machamp (Gigantamax) | Lv.34 Lv.34 Lv.35 Lv.36 |
| Gym Leader Allister (Shield) | Yamask Cursola Mimikyu Gengar (Gigantamax) | Lv.34 Lv.35 Lv.34 Lv.36 |
Available Items
| Item | Location |
|---|---|
| Fighting Badge | Defeat Bea |
| TM42 Revenge | Defeat Bea |
| Fighting Uniform | Defeat Bea |
| 2x Revives | From Sonia after defeating Bede |
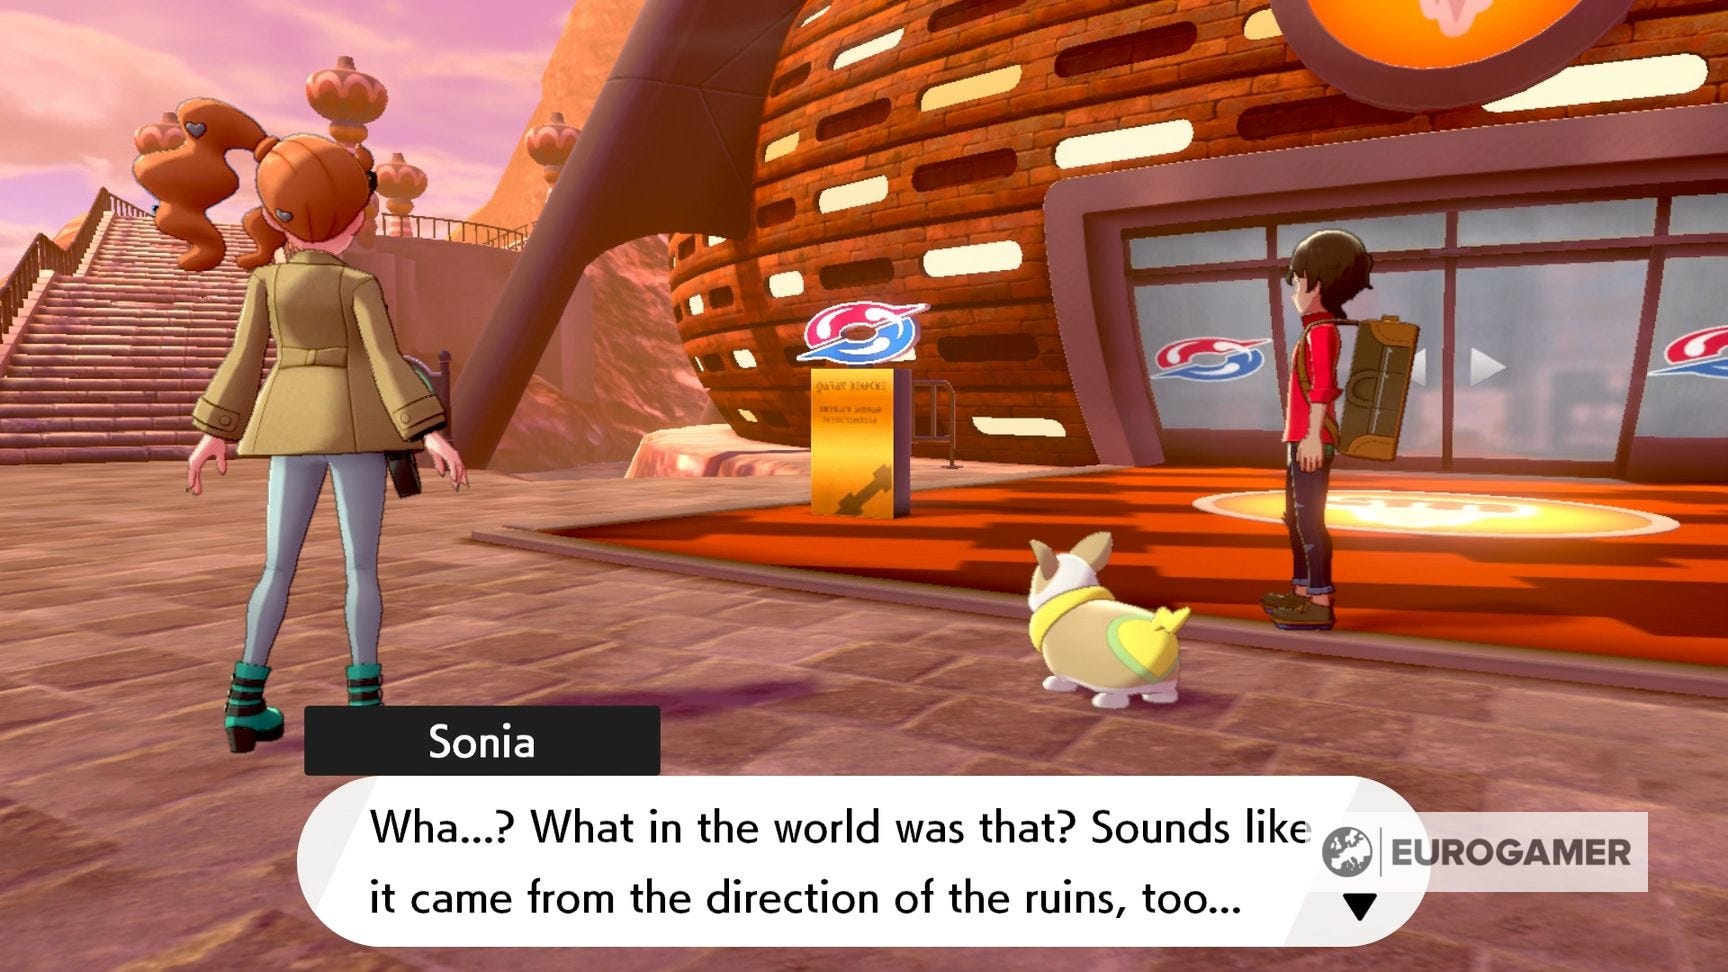
After the battle, you'll get all the usual items - but something's happened up at the ruins! Head up the staircase outside the Gym to go see what the ruckus is all about, and you'll find Bede has smashed the entire wall to pieces!
Luckily, the actual ruins are behind that mural wall anyway. Battle Bede (his Pokémon are listed in the section above) and pick up some more lore about that statue, and then after Chairman Rose gives Bede a real dressing down, booting him out of the competition entirely, it's on to your next stop on the Gym Challenge.
That's everything here for now, so continue on to Glimwood Tangle for the next steps in your quest, or cycle back to our main Pokémon Sword and Shield walkthrough and guide hub for all the other pages we have like this.