Dark Souls 3 - Farron Keep and the Abyss Watchers
How to kill the Abyss Watchers, along with a comprehensive walkthrough for making it through the Farron Keep section of Dark Souls 3.
Travel to Crucifixion Woods and then head down the slope into the water.
Bear right towards an outcropping of land, avoiding the giant crabs if possible. Once ashore, collect the Fallen Knight armour set from the corpse and head towards the stone steps.
Two enemies are nearby - one on the steps themselves and one just through the arch - so approach carefully to avoid having to fight both at once. They're both quick on their feet, so keep your distance and attack when they've leapt towards you and have become momentarily vulnerable.
Once they're dead, head through the arch and down the ladder to find the Farron Keep bonfire.
The area is highly toxic, so don't stand in the mud for too long. Around the area you'll see three tall chimneys belching flames, and a number of small fires burning on islands. Follow the trail of fires through the swamp, then up a stone path to the first chimney.
It's guarded by two enemies, one unarmed and one with shield and spear, so clear them out and then head to the chimney to extinguish the first flame. Pass through the arch, and watch for the bad guy off to your right.
Follow the path to the left from the arch, then go back down to the swamp to rejoin the trail of fires.
The first island has a larger variant of the unarmed enemy you met earlier. If he grabs you he can one-shot you if you're unlucky, so stay clear of his jump attacks, and head up the next ramp. Fight off the solitary enemy and extinguish the fire.
Cross the bridge and face off against three enemies. The larger one has a long range poison cloud attack that's tricky to avoid when you're on the bridge, so try and draw them back if possible, and give yourself room to manoeuvre.
Light the Keep Ruins bonfire
Light the Keep Ruins bonfire and head onwards. At the bottom of the slope, head right and into the tower. It's filled with slugs, and it can be hard to tell which ones are dead or alive when they're en masse, so don't stop slashing until you're sure.
There's an Undead Bone Shard here that can be used to upgrade the Firelink bonfire, so it may be worth doubling back and dealing with that now before you've gone too far.
From the other side of the tower there's a ladder just off to the right of the first island. First, head round the left side of the tower to collect the Wolf Blood Swordgrass from the corpse, then onto the small island to collect an item, then head back and ascend the ladder.
Light the Old Wolf of Farron bonfire
Run around the back of the tower to find a gem bug, then head inside the tower to light the Old Wolf of Farron bonfire. Next, head back down and follow the trail of fires again.
The mud gets deeper here so you'll probably need to wait on each island for the poison effects to wear off before proceeding.
You'll eventually run across a rather large rotten-looking enemy, and avoiding his attacks whilst staying out of the poisoned swamp isn't an easy job. The safest place is on the island without a fire that's just to the right of his patrol zone. He has some slow moving projectile attacks and some substantial physical blows, so speed is of the essence here.
Making the last dash to the steps without getting poisoned is a hit-and-miss affair, so if you have any purple flowers left, now's a good time to use them.
You'll be attacked by a second rotten enemy, but getting onto dry land is your first priority - not only to avoid severe poisoning, but also to give yourself a safe area to fight in. Once he's dead, extinguish the final fire.
Head back to the large doors that have just opened and go through. Take the path to the left and defeat the creature resting on the ledge, then drop down and destroy the rest - they change form quickly, so the more you can kill before they're alert the better.
Light the Farron Keep Perimeter bonfire
Head up the slope but keep to the right as much as possible. There are some enemies in the distance fighting amongst themselves, so ignore them and head through the stone arch to find the Farron Keep Perimeter bonfire.
Carry on down the passageway. At the bottom of the stairs is an enemy with a shield and spear, and just up the other side are two more having a nap.
The pile of crystals just ahead is actually alive, so get a quick jab in before it wakes up, then try and stay to the rear from now on. This enemy has a lunge attack, and an area-of-effect move that summons crystals from the ground in front of him.
Open the door at the end to create a shortcut back to Road of Sacrifices, then double-back to the bonfire and stop just inside the arch.
Wait a minute or so while the distant enemies kill each other off, then head to where they were and take out any stragglers - they're tough enemies, but should be fairly close to death already.
If you have a lot of patience you can farm souls here. It's not very efficient but carries zero risk. Simply circle between the archway and the bonfire, and you'll pick up the souls from the infighting up ahead.
Before opening the doors, make sure to explore this small area thoroughly, then head through and watch the cinematic.
How to kill the Abyss Watchers
This is a two-stage fight, and works a little differently to what you've experienced so far. Unlike the previous boss fights, the first phase here lasts until all enemies are dead, rather than merely reduced to a lower percentage of health.
Phase one kicks off against a single enemy, but as you fight him others will join in. They can also hurt each other though, so if you can simply stay out of reach for a while, they may even out the odds a bit themselves.
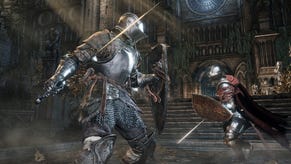
They move quickly and can be hard to track. They also have whirling attacks, a thrust move, and a long dash that kicks up a trail of dust, making it hard to see what's going on. We recommend not using lock-on camera here, as it makes it easy to be blind-sided by an unseen opponent.
Once the enemies are down there'll be another cinematic, and then one of the enemies will rise, with his sword blazing. He has the same attacks as the previous round, but this time they also deliver fire damage.
Be particularly careful of the dash attack now. Dodge sideways and keep dodging afterwards, as the initial attack will be followed up with a trail of fire. Focus on evasion first, and then attack gingerly whenever the opportunity presents itself.
Once the Watcher is down, light the bonfire and return to Firelink to regroup before moving on.
- Our walkthrough continues with a step-by-step guide to completing Dark Souls 3's Catacombs of Carthus and High Lord Wolnir sections.
- You can find the rest of our Dark Souls 3 guide from the first page of this article.


