Prison Architect guide: How to get started on PS4, Xbox and PC
How to prepare your very first prison, start making money and more.

Editor's note: With Prison Architect releasing on PS4, Xbox One and Xbox 360 this week, we're re-promoting our beginner's guide to the game - first published alongside the PC release last October - with amendments to reflect control schemes on consoles. If you've yet to play the game, then be sure to read our Prison Architect review.
After years of crowd-funded development and countless updates, Introversion has finally set free the release version of Prison Architect on PC and consoles. Will you be a compassionate caretaker shouldering a necessary responsibility for society? Or will you become a deranged monster with a penchant for sending petty criminals to the chair?

While the game's opening mission does go some way towards introducing would-be wardens to the nitty-gritty details of establishing and maintaining their very own prison, quite a lot of critical detail is left out. When you first enter the sandbox, and find yourself staring at nothing more than a barren scratch of land while a timer ticks down towards your first arrivals, the whole experience can leave you feeling paralysed.
With that in mind, we've put together a simple guide that will help you get the most fundamental aspects of your first facility in place, so that you're ready to at least contain and care for your first batch of prisoners. This should give you all the confidence you need to dig deeper into the game, expand the scope of your prison, and explore all of the many features that await more advanced architects.
A quick note before we begin, however. We've left all of the starting conditions at their default settings, except for Fog of War which normally comes into play when your first prisoners arrive, but has been disabled. Having eyes on all sections of your prison at all times certainly takes a chunk of challenge out of the game, but it also makes life much easier while you're getting to grips with the basics.
How to make money, use the planning tool and secure your prison
Before doing anything else, pause the clock - by hitting the button at the top-right hand corner of the screen on PC, or by holding down Triangle / Y and then left on the D-pad on console - to buy you the breathing space you need to prepare for your first prisoners. If you'd like, you can even turn new arrivals on or off using the Prisoners section of the Reports system (accessed by clicking the clipboard in the bottom right-hand corner, or by pressing Up on the D-pad on console), but for this guide we'll assume the first inmates are coming in 24 hours.
Instead of diving straight in and laying foundations, it's recommended that new architects make use of the Planning tool, allowing you to lay down a wall, designate an object's position, or set a pathway. You can also highlight and delete any sections of the sketch that you want to discard, too. You're not a slave to the initial plans you set out here by any means, but taking a bit of time to sketch things out will definitely help.
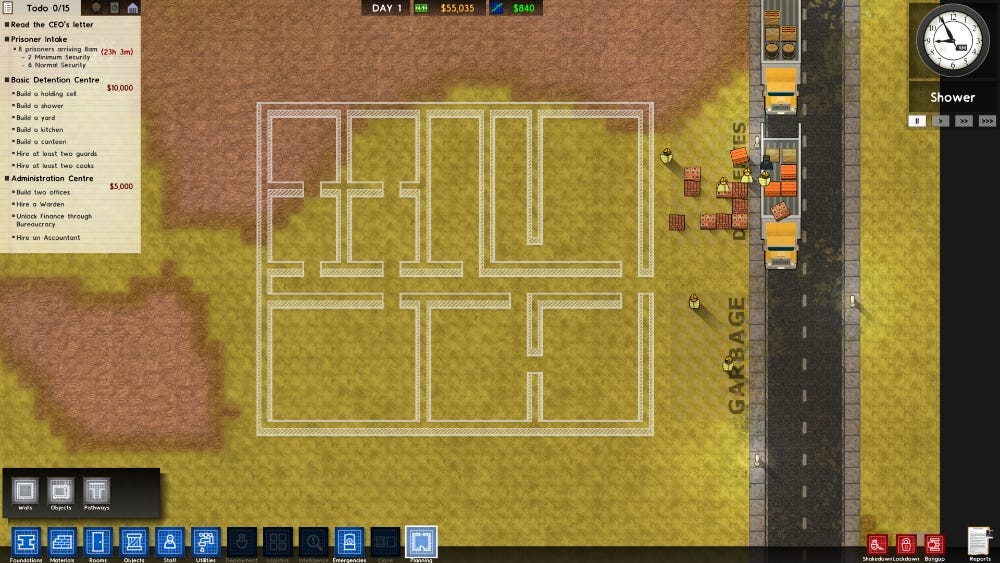
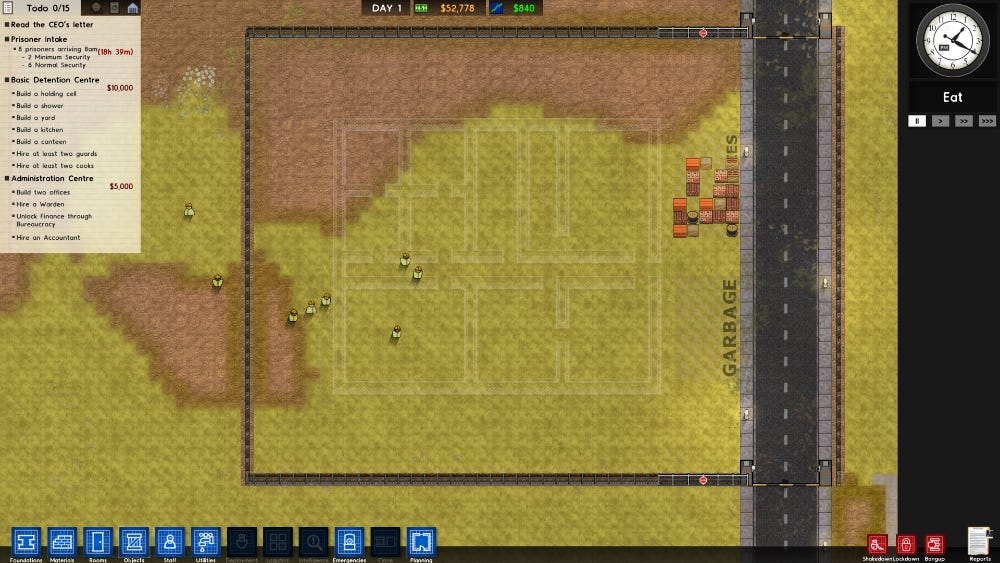
Ignoring issues like optimal pathways and bigger security issues, you're free to lay things out as you please, but you'll see two zones marked Deliveries and Garbage by the road. These indicate where supplies will arrive and where rubbish will be collected from, and it makes sense to build your Kitchens and Canteens nearby. You can move these designated zones if you want, but for simplicity's sake, leave them where they are for your first prison.
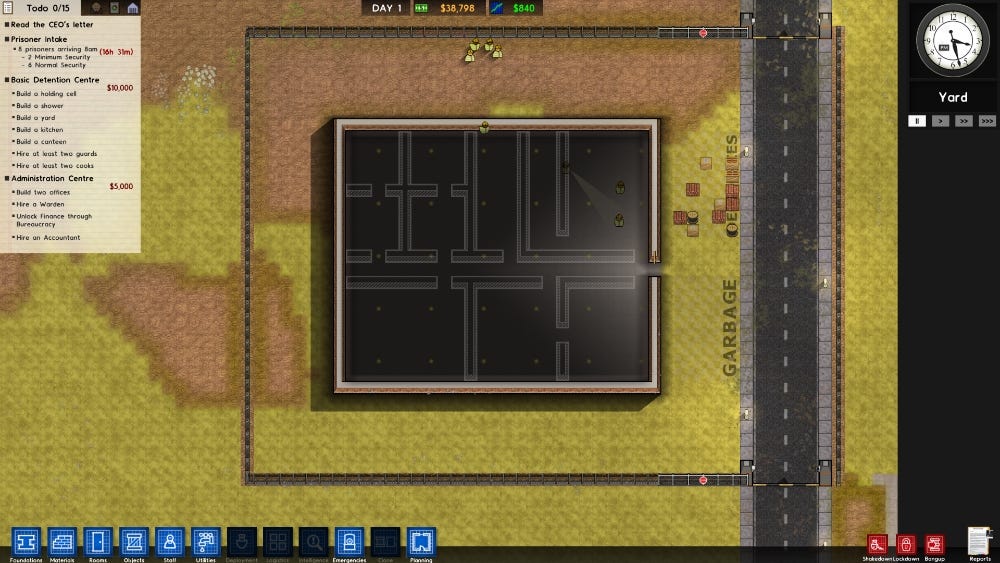
Security is, of course, vital for any prison, so lay down a nice big rectangular fencing area to completely seal your facility off from the outside world. Standard fencing is cheap and tough for prisoners to bust through and so is perfect to start with. A common method for securing the area involves extending the fencing into the road area - as we've done in our example - adding security gates to the top and bottom, and then running fencing along the other side of the gates.
Before we start building our prison proper, it's important to mention the Grants system which can be accessed via the Reports section. Here, you'll be able to take on specific tasks in exchange for some very welcome cash. Take the first two Grants which task you with building the very basics of a prison, and setting up all of your basic administrative requirements. This is easy money, and you need all the funds you can get in the early days.
How to lay foundations, build your first rooms and hire the Warden
Next, we need to hire a Warden, as doing so unlocks lots of building options as well as general prison policies. We won't go into the details of these more advanced areas in this basic guide, but when you're ready to dig deeper you should spend some time familiarising yourself with all of the different tabs under the Reports section of the UI, as well as the Bureaucracy options at the top left of the screen.
The Warden needs an office before he'll turn up for work, and so it's time to build our first room. Before designating the zone as an office, you'll first of all need to use the Foundations tool to mark out the area, including where you'd like the walls to be. You should also check the minimum size requirement of whatever room you want to build. Once you've laid the foundations, go to the Rooms section of the UI, click on Office, then draw the zone you want. Rooms must be enclosed, but make sure you leave space to pop a door in!
As well as solid foundations, most rooms have other requirements too, and you'll usually have to supply items from the Objects menu before the room will become active. If you see a red warning triangle appear on the room you're making, hover over it with your mouse to see what's required, then select Objects. If you've zoomed in closely enough, all of the room's associated items will have a bright white border around them. Alternatively, use the search function to find exactly what you want.
Place them one by one in the Office until all of the requirements have been met. Once everything's where it should be, select Staff, followed by Warden to make the hire. Now go to the Bureaucracy screen and start researching the Finance option so you can eventually hire an Accountant.
There are a few more rooms we need to complete for the specific Grant we're working on. You need to make a Holding Cell for our fresh arrivals to rest in, provide them with some basic hygiene facilities, then put in place a Kitchen and a Canteen so that they can eat. We also need to supply them with a Yard, where we'll also provide some entertainment items like gym equipment and telephones so they can contact home. It's often worth providing more than the bare minimum to keep your inmates happy, so don't be afraid to provide comfort where you can - you should have plenty of money for this first experiment.
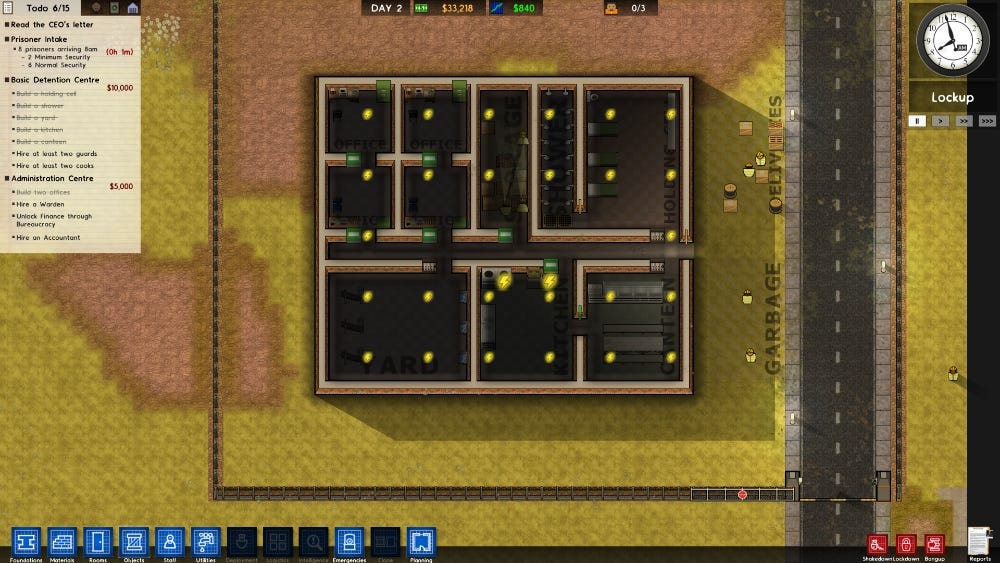
Each of these rooms needs an entrance, and it's important that you choose your doors carefully. Jail doors are more secure but require a prison guard to open. If you slap these down everywhere, it's going to take forever to get anything done. Instead you need to use a mix of secure doors and staff doors to balance security with efficiency. Note that the latter can be opened by guards or staff, but prisoners can also pass through if they've been opened for them.
One final thing to consider, even in this most primitive of starting prisons, is the type of flooring you use. Different ground materials affect the movement speed of both prisoners and prison staff alike, and slapping down a bit of concrete on commonly used paths can really speed up movement around the facility.
How to get electricity and water supplies
Even though you've now laid down all of the rooms you need, your prison isn't going to survive long without proper provision of the most fundamental utilities: electricity and water. They're both quite easy to implement, but there are a few important considerations to keep in mind.
First, to get the electricity flowing, you should select a Power Station from the Utilities menu, then place it somewhere fairly central along an exterior wall. Next, put a Water Pump into position nearby, but make sure you leave at least one tile's worth of space all around the Power Station. This allows you to add adjacent Capacitors as you start exhausting the basic power supply. These items cost a fair few bob, but each one doubles the amount of juice you have to play with.
To spread power around your prison, simply lay down some Electrical Cable (found in Utilities), from the Power Station to the individual rooms. Note that some high-voltage items like cookers need to be connected directly to the mains or they won't work - you'll see a blinking yellow lightning icon if they need to be connected this way. Just add a stretch of power cabling directly into the item in question to fix the problem.
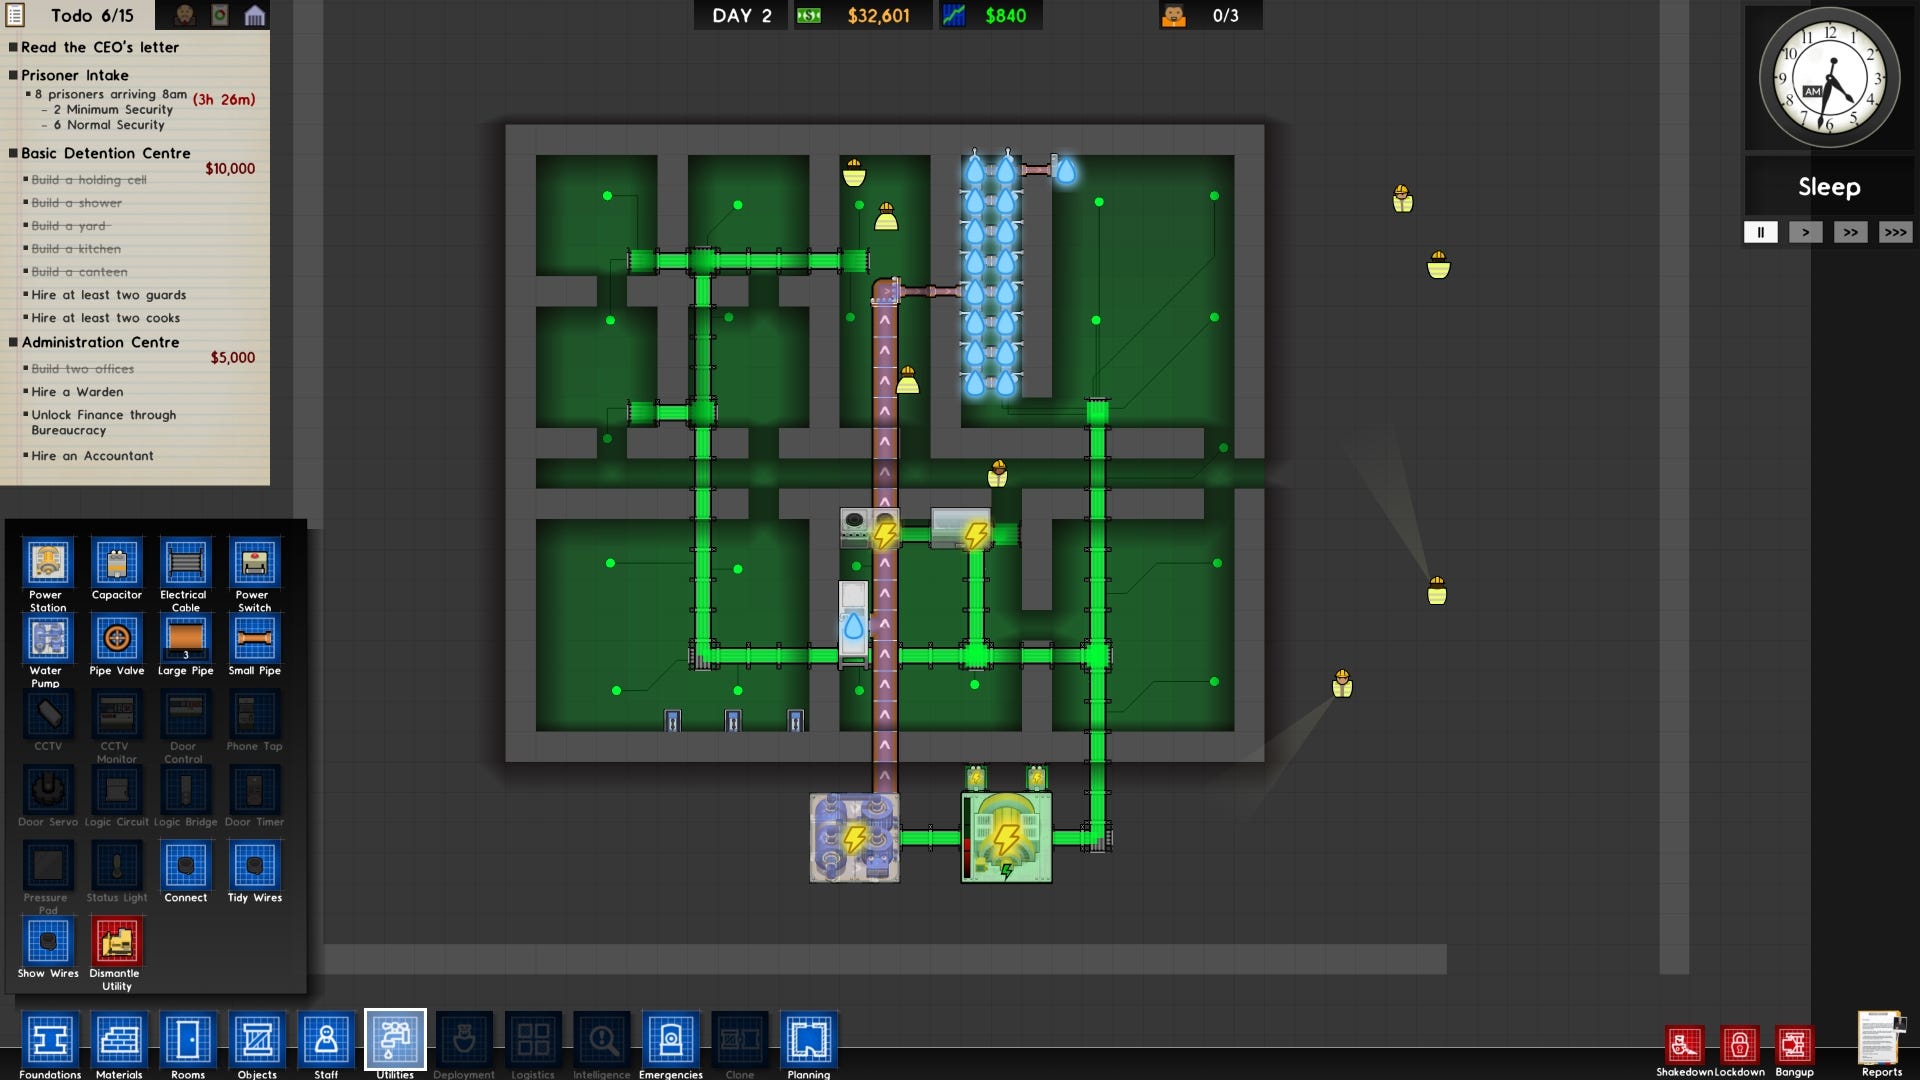
When it comes to your water supply, use Large Pipes to move water to different zones in your prison, but make sure you use Small Pipes to connect directly to those areas occupied by Prisoners. They will use the larger pipes to escape if they think they can get away with it, so make sure all toilets, showers and so on are connected to the supply using these narrower tubes!
One final tip. Make sure that you place a Drain tile in any gaps that lead from your shower areas to other zones, otherwise you're going to end up with a very soggy prison indeed, and nobody wants that.
How to hire staff to expand your operations and and unlock new features
Before you can start accepting prisoners, you need to make sure that the core facilities of your prison are staffed appropriately. You need two guards and two cooks as a minimum, so make these hires in the Staff section.
To complete your Grants you'll need an Accountant too, and we've allowed for this and other extra staff members in the cluster of offices sketched out in our prison plan. Once you've moved beyond the basics of this guide, you'll find the Accountant is required for many of the financial options in the game.
Note that some staff take longer for the Warden to process and bring onto the site than others, so you should plan your staffing needs well in advance of them turning into a vital addition to your prison!
How to set a Regime, then receive and search your prisoners
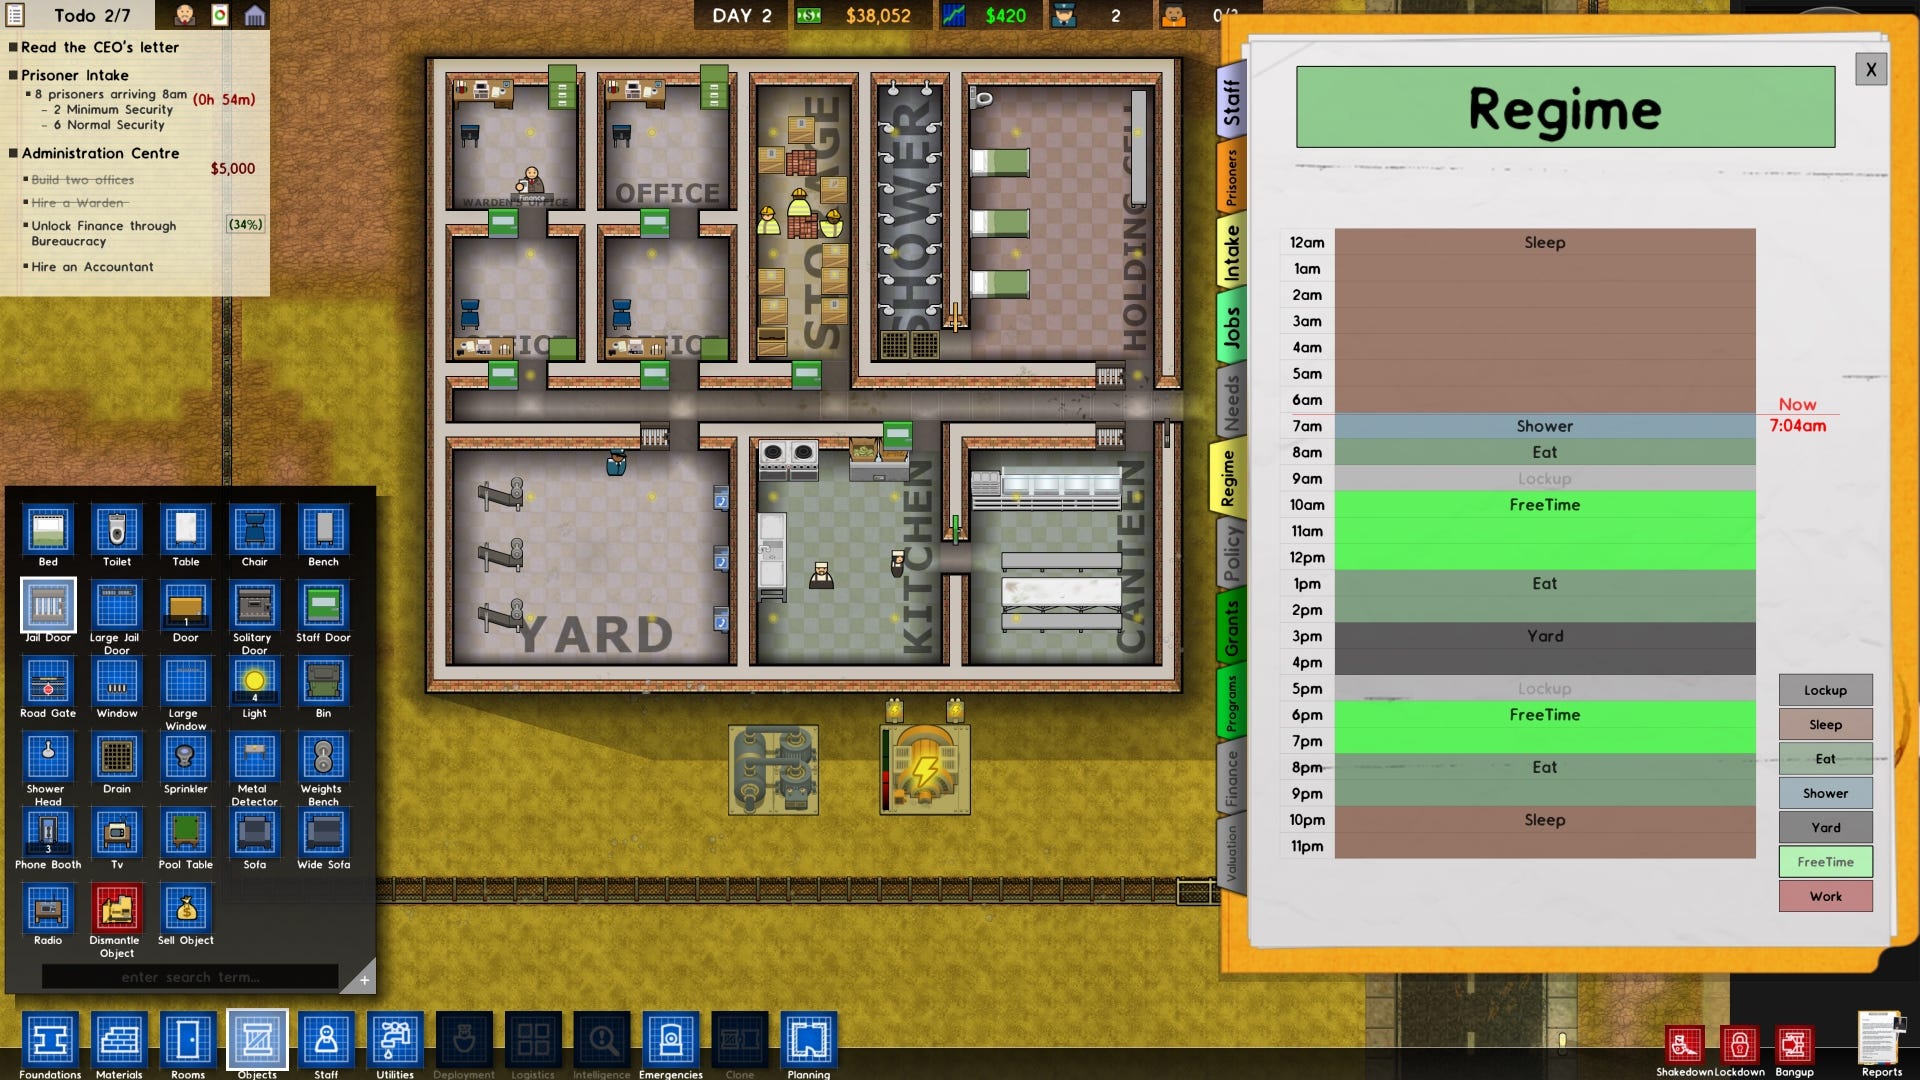
Now that you've got your basic facility up and running, you need to start working out what life inside is going to be like for your new arrivals. In the early days of your prison, you'll be receiving mainly low-risk category prisoners, so you can afford to let them roam around a little more, and avoid the psychological damage of too much time spent being locked down.
Access the Regime section and tweak the activities. As a general rule, just think about what you'd want in terms of sleep, breakfast, free time, exercise and so on and you'll tick the right boxes at this stage of the game. As part of our starting plan, we built a yard and filled it with all the bits and bobs that will allow our prisoners to phone home, keep themselves in good condition, and pass the time as well as they can. This is how they'll occupy themselves during Free Time.
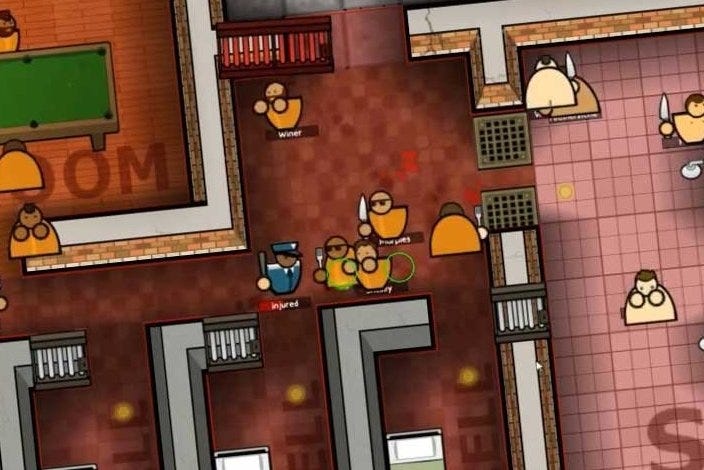
When your prisoners arrive, make sure you search them by clicking on them and instructing your guards to perform a patdown. The more stuff you prevent from getting inside, the less bother you'll have when it comes to mopping up the mess later on. Once everyone's settled in, it's up to you to respond to their demands and deal with the fallout of your design decisions.
The Grants section is always a good place to start if you're stuck for ideas, as it will give you some very big hints about expanding your facility, along with some very welcome bonus cash. As a general rule, you should always check the available Grants before building anything, so you don't miss out on money for tasks you were going to complete anyway.
Good luck!