Thief (2014) - A Man Apart, Secret Room guide, locked chest, machine controls, bridge escape
The next chapter of Thief involves some delicate assassinations and some very nimble footwork. Our walkthrough contains all the help you need.

There are half a dozen collectable items sprinkled throughout this chapter of the game, and we'll make sure you grab every last one of them as you make your way through the story. As always, you should pay a visit to the Shady Merchant before heading out, stock up on every single arrow type, and also grab the Wire Cutter and Wrench tools while you're at it - we'll be making extensive use of both throughout this section of the walkthrough.
Find a Way Into the Baron's Mansion
Now that you're suitably kitted out, you're ready to get stuck into the story, although be aware that it's extremely difficult to complete this opening section without being detected. If you're determined to complete the Remain Undetected Thieving Challenge, you have to be extremely nimble and use methods somewhat less violent than the ones we use in our guide.

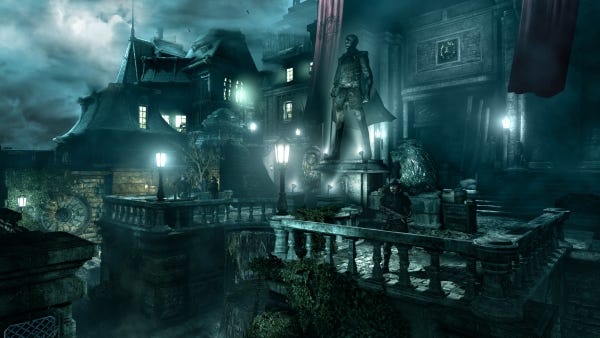
First of all, get up onto the ledge that you can see ahead of you. You'll have to wait for the lone patrolling guard to pass beneath you, then leap down from above to take him out. There's a dog in a cage nearby which you need to be mindful of too, but if you sneak very carefully over to the pillar to your south-east you'll find a collectible item: The Pinned Castinets - Greater Ruststain (1/6).
Go back to the very start of the stage and then head in a southerly direction towards a courtyard. There are two guards here, but if you time things right you can take out the first one without alerting the second. As soon as you've knocked him out, keep making your way to the south, wait for another guard to come near you, then take him out from the safety of the shadows. It's important you do this in darkness so that his partner isn't alerted. Keep making your way south along the eastern wall and finish off the third guard.
Hug the southern wall while heading to the east, then sneak your way up to the balcony and enter the room. Grab all of the treasure in here, then go back outside again. If you look to the east you'll see a wall that's between two staircases - climb up it. There are guards nearby, but if you stick to the shadows you'll be able to claim the City Heritage Plaques (16/16) - Elias Northcrest Statue. If you're missing any of the items from this set, take a look through the earlier chapters of this walkthrough, and make sure you have a good rummage around The City too.
When the coast is clear, jump down into the south-east corner and wait for the sword-wielding guard to patrol by. As soon as he reaches the rear of the statue, take him out. Your next target should be the guard who's by the southern balcony. Sneak up behind him, pick his pocket while you're at it, and then give him a good clobbering.
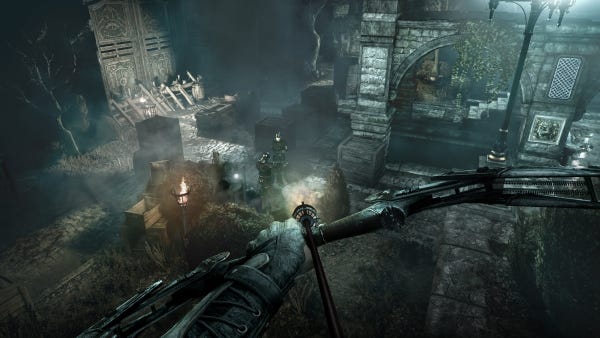
"You can actually sneak by these watchmen pretty easily, but you should think about using a Choke Arrow on the dog that's nearby."
Over to your north, you should be able to see a pair of guards together. You can actually sneak by these watchmen pretty easily, but you should think about using a Choke Arrow on the dog that's nearby, otherwise the creature might just give the game away.
Once you've snuck your way past these guards, keep heading in a northerly direction along a winding path. Stay crouched - there are guards up ahead of you - then make your way downstairs when no-one's watching. Make your way over to the safety of the shadows in the western part of this region.
Don't worry about the guards nearby, just keep moving north, then east, trailing the guard who's patrolling the eastern path. As soon as the opportunity presents itself, sneak up behind him and knock him out. Ignore the remaining guards, and simply fire a Choke Arrow at the dog. There's a box hanging around here. Use a Blunt Arrow to bring it down to ground level, then climb up it and onto a platform. If you fire a Rope Arrow at the anchor beam above you, you'll be able to get up to that window and prise it open.
Confront the Baron in His Private Study
Make your way through the attic and out into the hallway. Get into position behind the guard and take him out, then stash his body in the attic. If anyone comes wandering, they won't find his corpse. Make your way downstairs to the second floor, but do so quietly as there are some guards wandering around down here.
There's a cabinet in this hallway that you need to climb up. Use your Wire Cutter on the control box you're now high enough to access. If you go back to the bottom of the stairs, you should see a wall that you can climb to get up to a vent. Use the Wrench to remove the cover. Now quietly make your way across the ledge, then use the Wrench to get back into the hall and hack another control box. Drop down gently onto the floor and have a good rummage around in the nearby rooms to get hold of some lovely loot.
Once you've cleaned up, get back out into the main hallway and keep moving south. You'll eventually come to a door. Go through it, and then have a peek through the peep-hole to get a bonus mission: Find a Way into the Secret Room. Leave the area you're in, keep bearing to the left, and take the right-hand door when you come to it. Once you've hacked open the control panel, leave the room, turn right, and keep your eyes peeled for an odd-looking painting. Activate the two switches here to gain entry to the secret room.
You're going to need to pick a tricky lock to get at the goods inside that secret chest. Here are the adjustments you need to make to get it open:
- First Row: Do not adjust
- Second Row: Right once
- Third Row: Left once
- Fourth Row: Left or right twice
Now go around to the northern side of the chest and align the rows so that each one is red. You can now pick up Unique Loot (8/9) - Heart of the Lion. Again, if you have a different number, you'll need to reference the earlier sections of this walkthrough, or head to The City where plenty of these collectibles can be found.
Leave the room the same way you came in, then make your way back down the hallway towards the staircase you travelled down to get out of the attic. There's a set of doors to the east that lead to the library, but you'll need to pick the lock before you can go through them. Once you're inside, get into position behind the solitary guard and give him a thump. Pick up the nearby loot, then quietly make your way back out into the hallway. Take a right here and make your way downstairs.
If you just want to finish up the level, skip over this section. Otherwise, make your way down into the cellar to get your hands on some extra loot. There aren't any guards here, but there are plenty of traps. Make sure you use your Focus ability to avoid coming unstuck here.
Once you've finished exploring downstairs, move quietly into the kitchen and have a look through the keyhole that's just to your right. You need to get inside this Great Hall but there's a guard patrolling on the other side. Wait until he's out of the way, then open the door, take him out, and stash the body somewhere it can't be stumbled upon.
Go back inside the hall, look to the east, and climb up the wall. A guard will come walking along after a while, but you can take him out from above when he passes beneath you. Again, dispose of the body sensibly before hoovering up any loot that's lying around the Great Hall.
To the east of the kitchen you'll find a bedroom which contains some juicy loot. Grab the lot and then make your way back to the Great Hall. Go through the southern doors of this room to access the library.
"The presence of a suddenly-dead bird will actually make the guards rather suspicious for some reason."
You need to be extremely careful when you move around this room, as there are three guards and a handful of caged birds to watch out for. You might think the right thing to do here is fire a Choke Arrow at the cages, but the presence of a suddenly-dead bird will actually make the guards rather suspicious for some reason.
Have a little patience instead. Get up on the bookshelves, and then wait for one of the guards to break off from the pack and go wandering around. Swoop from above to take him out when you can.
As for the other two guards, you can either throw an object or fire an arrow to create a little bit of noise. When one of them investigates, take him out before dealing with the final remaining guard. There's a fair bit of loot scattered around the library, so make sure you pick everything up before moving on.
Take the left-hand exit to get out of the library, then make your way down the hall. Watch out for a pair of patrolling guards a little further along though. Throw an object into a corner of the wall to distract the first guard, then plant a Broadhead Arrow in his head. If you've timed things right, the remaining guard won't hear a thing - fire off a second shot to take him out.
Start looking through the rooms on the left for any treasure that's been left lying around, and then use the following code on the safe you find: 8-8-9. Once you've looted the safe you'll receive Serendi Stone Circles (6/7) - Sapphire Circle. Get back into the hallway, and make your way down it until you reach the Waiting Hall.
There are two guards to deal with in this room, and they make for a tricky pair. Distract them by throwing an object or firing a Blunt Arrow, or just sneak your way past them very, very carefully. You're ultimate objective is to make it through to the stairway up ahead, so that you can get up to the second floor of the Waiting Hall.
As soon as you get to the door of the Study Tower, climb your way up and then crawl through to the room next door. You should see a load of pipes around the lift shaft which you can climb to get closer to your mission objective. As soon as you've reached the highest point you can get to, leap across to the next pipe along, then go upstairs. Once you reach the top you'll be in the Study Tower.
Enter the Ceremony Room
When the lift doors open, make your way forward into the Waiting Hall once more. Note some new enemy types here called Graven. Although they wear different clothing, they're essentially the same as the guards you've dealt with up until now, and you don't need to worry about any special tactics.
As soon as you walk through the door, be ready to take out the first Graven you come across, and don't let him get away from you. Swoop over to the left and wait for the second Graven to come along - again, finish him off nice and quickly. If you prefer a less subtle approach, let these first two Graven wander off to a landing, and then fire a Blast Arrow into either one of them. That'll get you a handful of kills before you finish the rest off with Broadhead Arrows. Whatever floats your boat really.
Now move on to the western hallway of this second floor. Eventually, you'll stumble across a Graven trying to kill someone. Take the attacker out with a clean head-shot, then kill his partner before he can run off and sound the alarm. There's one more Graven to worry about, and he's in the door to the south. If he heard you taking out the other enemies, he'll be charging up to get you about now, but if you're lucky he'll still be in his room. Quietly get into position and then give him a good whack.
If you leave this room by the western exit, you'll see a painting hanging on one of the walls. Interact with it to get your hands on The Court of Montonessi (11/12) - The Married Spinster. You might find yourself looting a different part of this collection if you've just started using this guide. If so, you need to reference the earlier parts of this walkthrough, or go looking for the missing pieces in The City.
Find the Passage to the Baron's Laboratory
Turn right as you face the painting you've just looted, and climb over the crates you eventually come across. There are two Graven patrolling in the Ceremony Room ahead of you, so wait for them to split up and then dispatch them one by one. Take a close look at that corner to the south-west of the room, as there's a loose brick in the wall. Push it to open up the path to your next objective.
Descend into the Laboratory
This objective really couldn't be simpler. There's a lever on the wall that you need to pull, then you just need to head down the spiral stairs. As soon as you reach the bottom of this staircase, you'll automatically trigger the completion of the objective.
Acquire the Primal Stone Fragment
"You need to use the left-hand wheel until the crack is just between the two rings."
Keep heading down as far as you can until you reach a lever. Pull it to activate the machine, then head upstairs, ignoring the machine's controls. Use a Rope Arrow on the anchor beam that's above you, then jump up to the rope, slither down it a little, and finally jump over to the platform. If you look on top of the crate here, you'll be able to loot Memories of the Dead (5/6) - Braggart's Memory. Just like earlier, you might have to reference an earlier part of our walkthrough if you get a different part of this set. Lots of Thief's collectible items can also be found in The City section of the game.
Climb your way back up the rope until you're by the machine controls you passed by earlier. Look closely at the machine and you should see a crack in the glass. You need to use the left-hand wheel until the crack is just between the two rings - the machine will start shaking when you've hit the sweet spot.
Get hold of the right-hand wheel and turn it to ramp up the speed of the machine, forming a second crack in the process. Return to the left-hand valve wheel and repeat the process all over again. After the third crack has been created, adjust the wheels one last time. Once you've done this, the glass will break completely, allowing you to pick up your prize.
Escape from the Manor
Another simple challenge - simply climb your way up the wall by the objective marker as soon as you can take control of Garrett again. Job done.
Exit the Sewers
Whatever you do, don't stop sprinting here. Just keep heading in the direction indicated, and you'll eventually find yourself back up above ground. As soon as you do, you'll complete the objective. Nice work.
Get Across the Bridge
While you shouldn't have too many problems with the difficulty of this objective, you do need to be extremely nimble. As soon as you come out of the sewers, take a right and then run all the way to the end of the dock. Use your Blackjack to hit the reel.
Immediately head back the way you came and run across the boat. Keep pushing on ahead towards the objective marker, leaping from one dock to the next as you go. As soon as you hit the third one, get off it sharpish before it collapses.
You'll have to do a bit more of this platforming to finish up the chapter. Just keep moving in the only available direction until you've crossed the bridge safely. Once you've done so, you'll complete the chapter and receive A Man Apart as your trophy or achievement reward, depending on your chosen platform.
If you need to get your hands on one of Thief's safe combinations, just head back to the index page of our walkthrough.