Resident Evil Revelations 2 - Ep 3: Explore the sewers, kill the Barrel Boss and navigate the deadly pathways
Get down and dirty as Resident Evil returns to the sewers. Prepare for another barrel boss fight and close the gate to reach the other side.
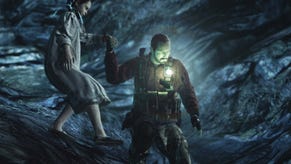
Once you've landed in the water, head forward and pass beneath the archway. Proceed along the tunnel and climb the steps to the left, moving through the shuttered door at the end. On the other side, continue along the passageway and follow the sewers around to the left. Attempt to open the electronic gate ahead, then prepare to meet a new friend.
Once the gate is opened, make your way through and use the workbench directly ahead to equip your new-found Capacity Lv. 3 and Damage Lv. 4 upgrades. When you're ready, take the steps leading down to the right. At the bottom, follow the sewer tunnel back in the direction you just came, shooting the Tower Emblem through the barred gate when you reach it.
Where to find the Sewers Map
Next, turn around and make your way back through the sewer water, proceeding through the tunnel at the far end. Follow it around to the right and grab the Sewers Map from the crate on the small platform to the right. Drop back down into the water, noting the tunnel leading off to the right, then continue forward. There's a crate to smash at the end.
Next, return to the tunnel you just noted and move on down. When you reach the junction, clamber onto the platform ahead and smash the crate. Locate the waterfall on your right and head beneath it. On the other side, shimmy onto the nearby crates and climb again to reach the ledge above.
Next, pull yourself up onto the pipe and smash the crate at the end. Finally, drop down to the ledge on the right and spin the valve to open the grating below - you'll be rewarded for this in the next chapter. When you're done, splash back down into the water, pass beneath the waterfall and continue to the end of the tunnel.
How to kill the Barrel Boss
At the junction, make a left. Almost immediately, you'll be besieged by several mutants and the barrel-wielding beast from earlier. Deal with the standard variants first to make things a little less fraught, then concentrate your fire on the barrel mutant. As before, it shouldn't take too many shots to bring him down - but be wary of his projectile shots and devastating charge attack. Once he's down, follow the sewer tunnel forward and head around the corner to the right.
Smash the nearby crate, then make your way up the steps. At the end of the corridor, switch to Moira and prise the two planks away from the door. When the path is clear, head on through.
In the next area, smash the crate ahead and proceed along the passageway. At the end, descend the steps to reach the lower level. Pass through the gap in the wall ahead and immediately deal with the mutant that appears to your left. When he's down, climb the small staircase leading to the platform on your right.
Using the gate as a bridge
Continue along the platform and pull the lever once you reach it. This causes the gate in the centre of the room to descend but, unfortunately, it also alerts a wave of mutants to your position at the same time. As the gate begins to fall, retrace your steps down into the water and take a left, dealing with any mutants that spring up to attack.
Continue onward toward the far end of the room and climb the flight of steps nearby. At the top, you'll be accosted by a hammer-wielding mutant so take him down quickly.
Now that the gate is closed, you can use it as a bridge to reach the platform on the other side. Cross over and smash the crate on the left. Use this high vantage point to deal with any remaining mutants below, then continue to the end of the walkway. Next, leap over the gap to reach the platform and pass into the next chamber. Finally, descend the steps.
Next, make your way behind the first pillar to the right and continue forward, passing between the two adjacent pillars ahead. Directly beyond, there's a mud slope leading to another series of tunnels. Scale the incline, smash the nearby crate and continue up the small tunnel to the left.
In the passageway at the top, take another left and duck down in order to crawl through the small hole ahead. On the other side you'll find a breakable crate. Turn around and, before squeezing through the hole again, look up. Fire a shot to dislodge the Ruby (250BP) and claim it as your own.
Back in the previous passageway, continue forward and move into the next chamber. Swipe the Green Herb on the left, along with the hidden item secreted behind the oil drums. Next, take a right and make your way down the steps nearby.
How to cross the platforms safely
Once in the water again, move forward and head up the staircase to the left. At the top, you'll spot a series of makeshift walkways. Follow them carefully around until you reach the platform in the centre of the room. As you proceed, several mutants will rise from the water below, so make use of the high vantage point and deal with them quickly. Do watch out for exploding mutants - if you're knocked off the walkway, you risk disturbing even more enemies in the water.
Once you're on the central platform, ignore the blue plank leading to the left, as it will break underfoot, dropping you back into the mutant-infested water. Instead, cross over the pipe to the platform opposite. There's a ladder leading up to the left but, first, head right and smash the crate in the corner. Next, dislodge the nearby ladder and scramble down to smash the crate below.
Finally, look left and head through the water to the far side of the room, dealing with any remaining mutants on the way. There's a Rare Parts Box resting by a pipe at the end, so grab it, then return to the ladder you dislodged a moment ago.
Shimmy up and make your way to the ladder on your left. Climb up and walk across the pipe ahead, dropping down to the platform below once you're above it. Finally, begin crossing the makeshift walkway to reach the other side - and prepare for another mutant ambush.
How to escape the sewers safely
First, deal with the exploding mutant that lands ahead, as this will reduce your chances of being thrown into the water below. Next, proceed cautiously along the walkway and prepare to face a second exploding mutant that drops down as you near the other side. You don't have much time to react to his arrival so be extra vigilant about your footing. If you do get knocked off, don't panic - quickly return to the ladder you dislodged earlier and climb up to reach higher, safer ground.
Once the mutant uprising has been quelled, continue along the makeshift walkway and take a left at the end. Drop into the water and use the staircase opposite to reach the next platform. Finally, climb the ladder to reach the room above and head through the shuttered door to proceed.
- Read on if you need help with the gravestone puzzle solution.
- You can find the rest of our Resident Evil Revelations 2 Episode 3 guide from the index page of this article.


