XCOM 2 Bonds explained - How to increase Cohesion, Bond level up rewards
Every Bond benefit explained for pairing teammates together.

XCOM 2 Bonds is a new system introduced in expansion War of the Chosen, which rewards you for having soldiers complete missions together.
Each soldier has a compatibility rating with every other soldier in the squad, this rating is called Cohesion and effects how quickly one soldier will bond with another.
If you need more help, our XCOM 2 War of the Chosen guide provides a breakdown on how else you can tackle the huge expansion.
How to level up Bond Cohesion in XCOM 2
Bonds work on a rating system named Cohesion, which ranges from 1.0 to 9.9, with anything at 5.0 or above being considered "high" or "very high".
Sending soldiers on missions with teammates with whom they have high cohesion with will increase the likelihood that these soldiers will become bondmates. A solider can only have one bondmate at a time but if their bondmate dies they will, eventually, be able to form a bond with another soldier.

How Bonds strengthen and level-up
Once the joint cohesion bar for two soldiers has reached maximum for the first time, a level 1 bond will be formed and you'll be asked to confirm that you would like to bond the two soldiers.
You don't have to do this if you're hoping they'll bond with a different soldier but if you form the bond it becomes permanent, while they both live. If you opt to for the bond, the cohesion bar will be reset and begin rising once more, as soldiers embark on missions together.
Once the cohesion bar has reached maximum a second time, a level 2 bond can be formed but this is must be performed aboard the Avenger, in the Training Centre and will result in both soldiers being unavailable for mission selection for 3 days.
Once this bonding process is complete, the cohesion bar will once more reset, rise and reach maximum, at which time a level 3 bond can be formed. This the highest bond level available and requires the soldiers to be ensconced in the Training Centre for a period of 6 days, after which they will have reached their maximum bondage level.
Bond level can be increased by taking soldiers out into the field on combat missions, and also by sending soldiers on covert missions together via the Resistance Ring. The rewards for some Resistance Ring missions are specifically geared towards increasing soldier bonds.
Bond levels and rewards
Here's the different perks and rewards for using the Bonds system:
Bond level 1
Here's what you get from Bond level 1:
- Teamwork: Grant an additional action point to a bondmate. This is a once per mission action that sees one bondmate give up a single action to confer an additional action on their buddy.
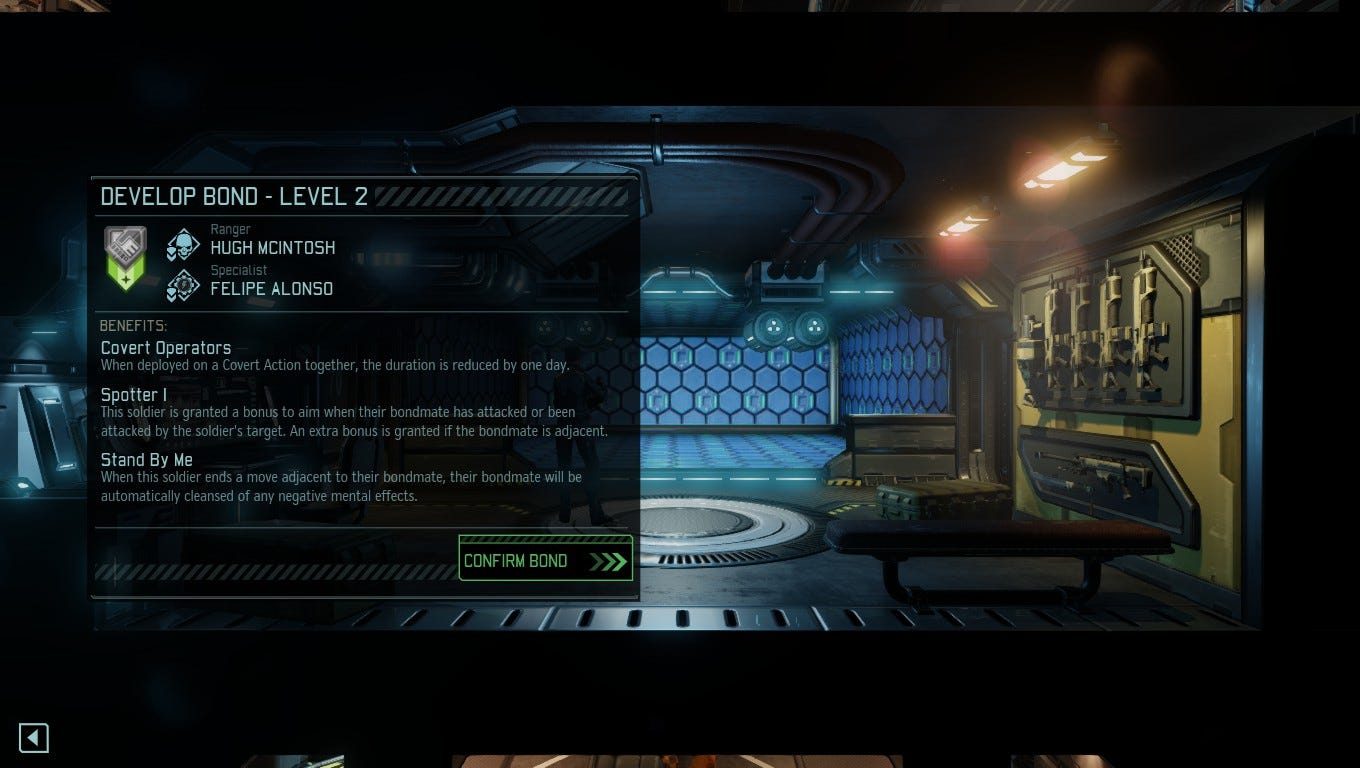
Bond level 2
Retains the Teamwork bonus from bond level 1 and adds:
- Covert Operators: When deployed on a Covert Action together, the duration of the operation is reduced by one day. Stand By Me: Ending a turn adjacent to a bondmate will cleanse any negative mental effects. This is a passive effect that is applied every time bondmates end a turn next to one another.
- Spotter: Soldier is granted a +10% bonus to aim when their bondmate has attacked, or been attacked, by the soldier's targeted enemy. An additional +10% bonus to aim is granted if the bondmates are standing adjacent to one another.
Bond level 3
Retains all of the benefits of bond levels 1 and 2 and adds:
- Advanced Teamwork: An additional use of the Teamwork bonus, allowing for two actions per mission to be granted between the bondmates. These are not "free" actions as one bondmate must give up an action to grant they other a bonus action.
- Dual Strike: A combined standard shot attack is made by both bondmates. Both bondmates must have line of sight on the enemy being attacked. This attack costs the instigating soldier an action, but is a free action for the bondmate, so can be used even after the bondmate has taken their turn.
If you need more help with XCOM 2's expansion, our XCOM 2: War of the Chosen guide and tips can explain everything you need to know, from how to beat The Chosen Assassin, Warlock and Hunter and the new The Lost, Spectre and Advent units. Combat them by learning about each new faction with our Reaper abilities and skill tree, Skirmisher abilities and skill tree and Templar abilities and skill tree pages, as well as learning about the new Challenge Mode, Resistance Ring, Ability Points, Fatigue and Bonds systems. Good luck, Commander!
How to increase Bond Cohesion effectively
If you're looking to effectively increase your Bond cohesion, we'd recommend the following:
- Take note of the cohesion between soldiers, but don't favour it above taking a balanced squad into the field. Taking four Sharpshooters out in the field because they have high cohesion with one another might increase the chance of them bonding, but is much more likely to result in them failing the mission or dying outright.
- The Teamwork bonus is incredibly versatile. It can be used to grant a bondmate in an advantageous position an additional attack to finish off an enemy, but its use extends beyond this. Granting an extra move to a bondmate who has ended their movement by revealing a new group of unseen enemies, or allowing them to activate overwatch, heal or hunker down are all very valid uses of Teamwork.
- Don't fret too much about the types of soldiers who bond. It might seem ideal to have two Sharpshooters bond, and have them sit side by side on a roof picking off targets with the Spotter Adjacency Bonus, or to have two Grenadiers make a stand next to each other, but it's the Teamwork bonus, and later Dual Strike, that are the real boons of the bondmate system.
- When activated Dual Strike will cause the bondmate to fire with their primary weapon. So, if a Ranger instigates Dual Strike, their Sharpshooter bondmate will fire on the enemy with their sniper rifle, even if they've already used the sniper rifle that turn.
- Dual Strike will use one charge of ammo of the primary weapon of both bondmates, and so both must have at least one shot in the clip for Dual Strike to be actionable.
- Covert operations via the Resistance Ring are a useful way of increasing cohesion between two lower-ranked soldiers that you don't want to risk taking out into the field.