Uncharted 4 - Chapter 8: The Grave of Henry Avery
A guide to the start of the adventure in Scotland, complete with treasure locations, journal entries, puzzle solutions and conversations.

We now head to a ruined cathedral in Scotland for the next portion of the game, on the trail of the great pirate Henry Avery. Below we walk you through Chapter 8, complete with treasure locations, and how to get journal entries and optional conversations, and how to solve a major puzzle.
- Treasure: Redware and Silver Jug Flask - In a small clearing to the far left of your starting position.
- Treasure: Bronze Boar - In a small cave in the large dark grey rocks on the far right, towards the bottom of the first slope.
Head down the slope keeping to the right, and drop onto the gravel slide below, steering hard right and grabbing the edge. At the far end is a point to attach your rope to, so use it to climb down to the ground below.

After a brief exchange with Sam you'll be ambushed, so take cover and return fire. When the coast is clear head forward to find a small basecamp. Grab a stick of dynamite from on top of the boxes covered with green tarps and toss one at the large wooden doors. Head inside the tower to discover the walls are too high, then locate the yellow wheeled box near the scaffolding in the collapsed stone building. Blow out the wooden doors and wheel the box out and round - as you approach the tower you'll be ambushed, so take cover and deal with your attackers.
- Treasure: Carved Wood Kashkul - On the right of the cliff edge below basecamp.
Finish pushing the box into the tower and position it under the hole. Restock on dynamite before you go, and then climb up to the level above.
- Treasure: Carved Nut Bottle - Between the tower and the rope swing, on your left, are a few crates tucked under a rocky overhang. Clear them out with some dynamite and crawl inside to find this item.
Head down the slope and use your rope to swing across to the rocky outcrop opposite. Grab on and climb up until you're in range of the next rope anchor, then use it to wall-run to the ledge on the left. Now re-attach your rope to the first anchor point and swing again - more height and a shorter rope mean you can now swing to the higher handholds on the rocky outcrop. When you reach the ladder, wait for Sam, then boost him up to it. Climb across to him and let him pull you up, then use L3 to point to your destination.
Slide down the slope, and then slide down the next and leap from the bottom. Climb down and to the left and wait for an enemy to position himself below you before performing a drop attack. Head forwards through the long grass and stealth-attack the remaining two, then prepare for a gun battle.
Use the grass and fence on the higher area on the right as cover to get a good vantage point to mark as many enemies as you can see, then pick them off, and possibly pick up the sniper rifle from the far right vantage point - you should be able to get most of the enemies patrolling the lower areas using stealth, but the ones on the upper part of the structure will probably require a more direct approach. There are a few gas canisters to use for environmental damage and plenty of cover, so if you take your time, it should be reasonably painless.
Once everyone's dead, head onwards and round the corner. Grab the handholds and work your way to the right to the next platform, then use your rope to swing across to the handholds on the cliff opposite.
Slide down the slope and be ready with your gun - there are three enemies here that'll open fire immediately. When they're down, climb up the rocks to the high ground where one of them was shooting from, and jump out onto the slippery slope behind the nearest pillar and quickly climb up. Now jump off up the slope, steer yourself behind one of the other two pillars and clamber up the broken arch. Move across the rocks to the top of the slope, then jump up and across and steer yourself to the other side as you slide, then grab the handholds when you're close enough and pull yourself up to the top.
Tip: jumping while you slide stops your descent, so if you steer hard in one direction and bunny-hop, you can cross to the other side without sliding down at all.
Jump and steer your way across the next gravel slide. Stick to the right hand edge of the area, and when you're past the last pillar, turn around and jump-slide across the gravel to the wall with the pole and grab a handhold.
- Treasure: Travelling Inkwell with Seal - Stick to the right hand edge of the area and make your way to the far corner. Drop down to a small alcove below to find another collectible.
From here, jump-slide across to the pillar with the curved corners, and jump across from there to the archway. Climb up, pass through the next arch, and grab the poles on the other side of the wall to reach more handholds. Climb to the top of the wall and then slide down to your left, using your rope at the bottom to swing across the gap.
- Treasure: Carved Ivory Vanitas - Use the handholds to the left of the door to reach a room above it to find this item.
When you enter the graveyard, examine the grave that Sam points out, and then head to the far side of the yard. The tomb you're looking for is at the far end, on a small area that juts out past the rest of the yard. Examine it to reveal a hidden passage.
- Journal Entry: Turn 180 degrees from the first grave you looked at, head over the short wall ahead of you, and examine the open grave.
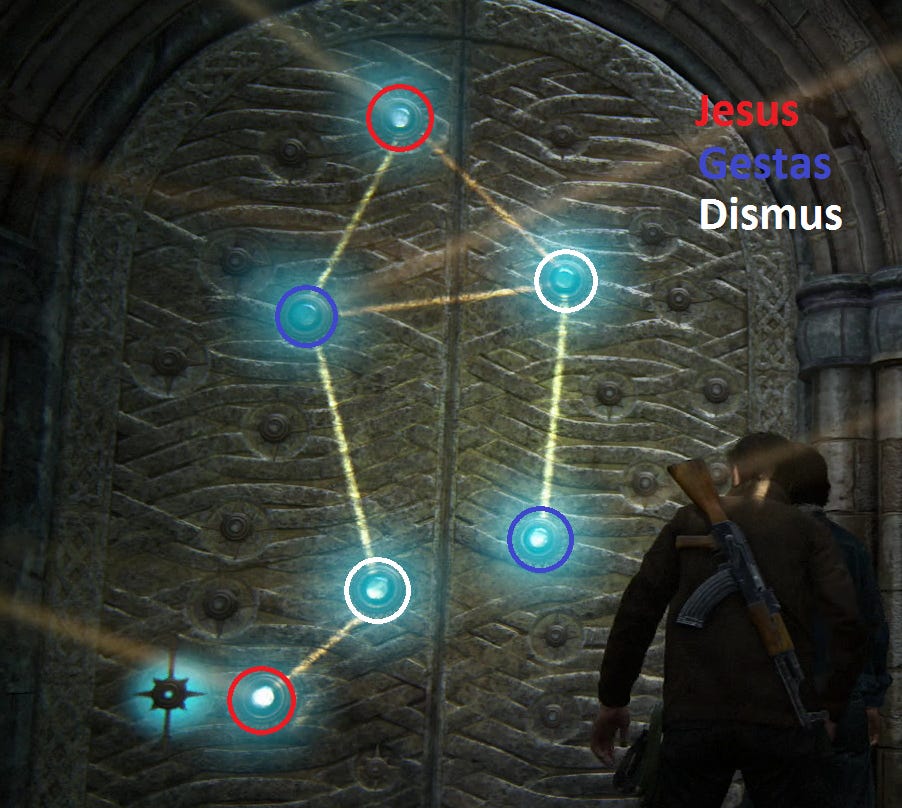
Make your way into the crypt to find statues of Dismas, Jesus, and Gestas. Examine them and then head round behind them to find a lamp. Once Sam has lit it, return to the statues.
- Journal Note: On the floor, on a skeleton just to the left when you reach the bottom of the stairs.
- Treasure: Scottish Ha'penny - In a small room off to the side of the puzzle room.
- Optional Conversation: Speak to Sam after examining the statues.
Chapter 8 puzzle solution
You need to line up the lights from each statue with two of the points on the door behind. Start with Jesus and line the beams up with the top and bottom points, then line Gestas up with the middle left and bottom right points, and finally Dismas with the two remaining points, as in the image below. Once they're lined up, head round to the door and turn the handle in the bottom left to open it and reveal your next destination.
- Optional Conversation: Talk to Sam at the door once the puzzle is solved.
Make your way out of the crypt and prepare for another firefight. There's not a lot of advice we can give for this one - the enemies are quite spread out and have most angles covered, so it's unlikely you'll be able to do much stealth work.
When the coast is clear, open the big door and head through. Drop down and head down the slope to your left, slide to the bottom, and climb across the plank to the upper level. Head right, jump across the gaps, and hit L3 when you reach the sea edge.
Drop down and make your way up the basalt rocks ahead to find a post for your rope. Swing over the gap and you'll face a few more enemies - they have the upper ground here, so make use of cover as much as possible. If you wait for them to finish talking and then head up the short wall and into the gap in the rocks near your landing point, you can scale the cliff and grab one enemy from below, then take cover in the grass to wait for the remaining two to wander over.
- Treasure: Slipjoint Clasp Knife - From the area where you land, climb up the wall, head into the gap in the rocks, and crawl through the small opening to the right to find a hidden cavern.
- Treasure: Pewter Singing Bird Box - From the broken ladder, turn around and jump over the gap to the cave opposite. The collectible is sat on a barrel to the left of the entrance.
Head up and find the broken ladder. Boost Sam up and wait for him to make an alternative path for you, then use your rope to swing across and climb up. Once you're up, attach your rope to the other side of the log and jump down. Swing to the handholds to your left, then climb up and left until you're hanging above a wooden pole. Drop onto it then swing forwards and leap onto the slippery slope.
Steer hard left as you descend, then use your rope at the bottom to swing across to some more handholds. Climb up and bear left then use your rope to swing over the wooden debris and onto another slide. Keep left and jump at the end, then head right along the handholds. When you reach the end, jump up to the ladder, watch the cutscene, then use your rope to swing to the wooden bars and climb up and wait for Sam to lift you onto the top.
- Treasure: Tortoise Shell Snuff Box - From where Sam lifts you up, head left and stand on the edge of the cliff facing the rope point below and drop down to a small passage.
Take the path to the left, jump over the gap, climb right and down, and drop to the ground. There are more enemies ahead, and due to the location a straight-up firefight is easiest. When they're dealt with, head up and climb into the narrow tunnel. Lift the wooden beam out of the way and emerge the other side, jump onto the slippery gravel and leap off at the end. Keep heading forwards, swing over the gap, make your way over the beams, and climb the stairs.
- Treasure: Persian Tailoring Scissors - Located under the right-hand end of the wooden platform at the second set of stairs.
You'll eventually emerge outside. Head forwards, enter the cave to your left and follow it as it winds along and down. When you reach the door, stick your hand in the hole to end the chapter.
Walkthrough navigation:
- The next part of our walkthrough explains how to complete Uncharted 4 - Chapter 9: Those Who Prove Worthy.
- Return to the index page of this article for the rest of our Uncharted 4 walkthrough.
Other guides:
- Struggling to track down a Treasure? Have a look at our Uncharted 4 Treasures and collectibles guide.
- For details on how to unlock all of the game's Trophies, take a look at our Uncharted 4 Trophy guide.