Bloodborne - Winter Lanterns, Bloodied Trousers, Rakuyo, Blood Rock
How to survive Bloodied Trousers in Bloodborne's DLC.
This article explains how to survive XXX in Bloodborne: The New Hunters.
If you're interested in more advice, our complete Bloodborne walkthrough and for the DLC our The Old Hunters guide and walkthrough can help.
Return to the cave mouth and step inside, working your way along the passage. A short distance ahead, you'll reach a junction - and naked snail people will attack from along both passage. Take them all out then follow the passage to the right.
Survive Brador's next invasion
As you near the dead-end ahead, you'll hear the sound of a bell tolling once more. Grab the Lead Elixir from the corpse up ahead then quickly about-face. Immediately, Brador will materialise along the passage behind you. Don't attack just yet. Instead, retrace your steps and pass back out of the cave - the wide open area offers much more room to manoeuvre. Deal with the invader as before, and collect the Bloodied Trousers once he's dead.
Head back into the cave and, this time, take a left at the junction. As you near the end of the passage, you'll spot two more naked snail people, and (if you squint) a skull-spewing figure behind them. Quickly run in, dodge over the snails and under the skulls, and destroy the seated figure with a few well-placed slashes. Finally, eliminate the remaining snail people.
When it's safe to proceed, turn around and follow the passage to the left, grabbing the Madman's Knowledge from the corpse at the end. Carefully drop off the ledge behind it and you'll find yourself in a vast cavern with a strange blue hole in the ground nearby. Immediately take a left and locate the lever in the alcove.
Yank the lever and a platform will descend from the ceiling behind you, plugging the large blue hole. Step onto the platform to return to the level above. At the top, collect the Kin Coldblood (10) from the corpse against the wall then unlock the door opposite. This leads back to the Lighthouse Hut lamp, creating yet another shortcut. Feel free to spend your hard-earned Blood Echoes in the Hunter's Dream then return to the Lighthouse Hut lamp.
Next, make your way back into the lighthouse tower and ride the elevator down to the cave below. At the bottom, locate the lever that you originally used to summon the elevator and face away from it. Beyond the platform you'll see two passages - one leading left and the other leading right. You'll also spot a ladder leading down into the hole that the elevator rests on.
To begin with, approach the passage to the right. Before entering it, however, slip on armour with high frenzy resistance, such as the Crowfeather Set. When you're ready to go, move along the passage and pause as the cave opens out ahead. Just passed the central column, the caves split again - and you'll see a Scurrying Beast run by, moving from the left passage to the right.
Defeat the Winter Lanterns
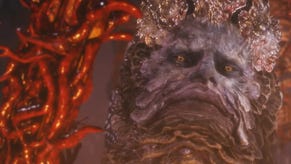
Two singing brain creatures - also known as Winter Lanterns - are stationed along the tunnel to the left - both of which will inflict frenzy damage on you whenever you're spotted. To proceed, you'll want to wait for them to separate (one creature will shortly wander toward the right-hand tunnel) and deal with them individually.
When that happens, rush in, defeat one brain creature then take cover behind the central column until your frenzy gauge depletes. Remember to stay vigilant during the fight, and be sure to avoid the brain creature's forward tentacle grab. A successful grab will cause major physical damage as you're repeatedly chomped, plus ever-rising frenzy damage too.
Once the first Winter Lantern is down, repeat the process to eliminate the second enemy. When both creatures are dead, return to the junction and grab the Lead Elixir from the corpse resting against the central stone column. Now, it's time to explore the two passage more freely.
At the end of the left-hand tunnel, you'll find two corpses resting on a ledge. Grab the Tempering Damp Blood Gem (5) and Kin Coldblood (11) then look out into the cavern below. You'll spot a ladder on the central column which, believe it or not, leads back to the well in the village square. There are also two tough shark creatures in the area - if you kill them both, you'll receive Lady Maria's Rakuyo weapon. Don't expect an easy fight, however!
Follow the right-hand passage along, meanwhile, and you'll emerge at the bottom of the large, walkway-strewn chasm from earlier. Almost immediately you'll be ambushed by a horde of naked snail creatures that will do their best to belly-flop you out of existence. Finish them off quickly then climb the small ramp directly opposite the tunnel mouth.
Follow the walkway along and down into the next small area then use the ramp ahead to reach the third section of the chamber. Here, you'll be ambushed by two lightning summoning creatures and more naked snail people. Needless to say, eliminate them all before continuing.
Finally, climb the ramp at the end and follow it up to the platform above, grabbing the Old Bolt Damp Blood Gem (5) and precious, precious Blood Rock from the corpses at the end. With these in your possession, retrace your steps and return to the large elevator room back along the caves.
Next, locate the ladder leading down into the hole beneath the elevator platform. Descend the ladder and collect the Cursed Kinhunter's Damp Blood Gem (6) from the corpse at the bottom. Make your way back up the ladder and, at the top, approach the left-hand passage, collecting the Great One's Wisdom from the corpse on the left as you draw near the tunnel entrance.
- Our walkthrough continues with a step-by-step guide to beating Bloodborne's Orphan of Kos boss.
- For the rest of our Bloodborne: The Old Hunters walkthrough, head back to the index page of this article.


.png?width=291&height=164&fit=crop&quality=80&format=jpg&auto=webp)


