Wasteland 2 - party composition, Ranger Citadel, radio tower, levelling up
How to get started with Wasteland 2, from building the perfect party, to exploring the Radio Tower and gaining access to the Ranger Citadel.
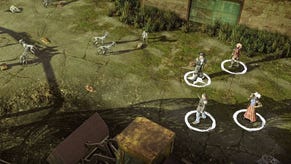
Danger lurks everywhere in Wasteland 2, and you'll need a well-rounded team to see off all of the threats in this desert world. When you first start the game, you have the choice of either creating your own unique team of Rangers, or selecting from a choice of pre-made characters. If you're going down the bespoke route, but want to follow our walkthrough closely - you might want to try and work some of our team skills into your own creation.
Party composition
Our choice of Rangers represents a pretty solid collection of base classes, but you can of course switch things out if you want to up the challenge or just take a different path through the game.
Slick - Negotiator
Skills: Barter, Bladed Weapons, Kiss Ass, Smart Ass
Fade - Safecracker
Skills: Lock picking, Safecracking, Submachine Guns
Hex - Techie
Skills: Perception, Computer Science, Energy Weapons
Widow O'Neill - Jill of all Trades
Skills: Bladed Weapons, Handguns, Kiss Ass, Perception, Smart Ass, Field Medic
The Ranger Citadel
Once the opening cut-scene's finished, you'll start a conversation with General Vargas. Eventually you'll be given your first mission, which is to find the repeaters carried by Ace when he was snuffed out. When the conversation's over, go north from the Ranger Cemetery, but be sure to grab the shovel. Don't worry about the entrance to the Citadel right now - you can't enter it until you've proved yourself worthy.
Keep heading north, go over a bridge, and you'll find yourself at a merchant. You won't be able to buy anything useful right now, but do keep the location of this NPC in mind so you can pick up new armour and ammunition down the line.
After the trader you'll find yourself approaching a trio of Rangers sitting down. Ignore them for now and keep heading north until you come to an NPC cleaning up graffiti. Get your shovel out and use it on the ground just a few feet away from him to get some Scrap and other items.
Turn around and head back towards the pack of Rangers, then carry on down the path until you come to another NPC called Angela. Work through her conversation options, then let her join you on your journey. As you head back towards the Rangers, use the shovel to dig up a little dirt on this path.
Before making your way into the desert, stop off at the merchant and unload the junk you've picked up so far, grab any extra ammunition you can stuff in your pockets, then make your way towards the revolving globe and interact with it to get started in Wasteland.
The World Map helps you zip around all of the adventuring areas of Wasteland 2, and when you first access it you'll be contacted by The Citadel. Before moving onto the next steps of the walkthrough, there are a few important things to keep in mind when it comes to the map.
Water is a critical resource to consider, so keep an eye on the water indicator in the bottom right-hand corner of the screen. Your party will start off with full water canteens, but you need to monitor this resource closely.
Next, make sure you keep an eye on the radiation meter that sits in the bottom left-hand corner. Radioactivity is extremely dangerous, and you need to either pass quickly through paths containing it, or avoid them altogether.
Finally, make sure you understand the water costs of making any movement on the map. When you highlight a certain path with your mouse, you'll see figures which indicate the water cost of making it to that location. There's also a fog of war on the map, and you never know what might be lurking in the darkness.
Those are the fundamentals of the World Map, then, but you need to consider the Party Map too. To access it, click on the View Map button so you can view marked settlements, not to mention mission areas you might want to get working on. Our walkthrough picks up again with the Radio Tower pointed out by General Vargas. Select it, then pick Travel from the right-hand side of the UI.
Radio Tower
As soon as you enter this mission instance, you'll be given an update by The Citadel. Once you've received your more detailed instructions, keep moving north through the current area until you come to a nasty-looking pile of dried blood on the floor. Follow the drops up and towards the fork in the road, then examine the bush with the glowing orb on your left. Doing so grants you Ace's badge.
Keep heading north until you find yourself having a distinctly unfriendly chat with Spyke Alpha. Assuming you're either running the same party as us, or you have characters with similar traits, you can use the Break option here, then use Kiss Ass to carry on down the road unimpeded. Not only will you dodge an unnecessary fight by doing so, you'll also get a marker to a Mysterious Shrine on your Party Map.
Start exploring the new area, beginning with the Radio Tower itself. Have a character with Computer Science re-splice the wires here, then keep heading in a north-easterly direction. Take the item you can see on the ground to add Ace's Log Book Pages to your inventory. Now leave via the nearby gate and look for the barrels with the nearby blood splatters. Follow them and pick up the Broken Metal Leg lying on the ground.
Once you've picked it up, take a right and keep trailing the oil on the floor until you come to a cave entrance. Enter, then work your way through the cave, keeping an eye out for a box of items over on your left. Take what's inside, keep heading forwards, then kill the big Toad that's lurking around.
When it's dead, take all the loot and pick up any Log Book Pages that are littered about the place. Now interact with the box by the dead machine to get Repeater Units and another page. Next, use the Perception skill on the same machine, then Computer Science to get a few extra Energy Cells and a Smyth piece. Finally, radio back into the Citadel using the Call button.
After updating the Citadel on your mission progress, you'll be tasked with finishing Ace's task of connecting up some Repeat Units to a trio of Radio Towers.
Levelling up
Before moving on with the story, it's time to level up your party. First, use the Call button on your radio to speak with General Vargas. Once you've connected, you'll be whisked over to your inventory screen.
You won't have any attribute points to allocate this time, but you will need to spend some skill points. How exactly you choose to spend these points depends very much on your own party composition, but we chose to upgrade Slick with +1 Kiss Ass.
Return to Ranger Citadel
Now that you've got your next mission objectives, it's time to return to the Ranger Citadel. When you get there, have a chat with General Vargas, talk to him about the Log Book Pages you've been picking up, and make sure you also give him the Broken Metal Leg. He'll give it to Captain Mercaptain, who'll give you some new side-quest intel. You can view all of these mission updates by hitting L and taking a look through your Log Book.
Head back to the first page for the rest of our Wasteland 2 walkthrough.

