Dark Souls 2 - Ruin Sentinels, help, boss strategy, summon
You need to take a very specific approach if you want to kill all three of the deadly Ruin Sentinels. Our walkthrough has a foolproof guide to the fight.
The fight against the trio of Ruin Sentinels in the Lost Bastille will push your nerves to the very limit. There are a few things you can do to make things a good deal easier though, so use our guide to get to grips with the tactics required for finishing the fight in style.
How to kill the Ruin Sentinels
The moment you come out of the mist you'll fall down onto a platform and be attacked by Yahim without warning. If you're suitably equipped with a hefty shield, you'll be able to block this initial attack without taking any damage whatsoever. If you can't handle that first hit though, simply dodge as soon as you land to avoid this first whack altogether.
Don't leave this platform until you've finished fighting Yahim. If you drop down onto the ledge below you, you'll only engage Alessia and Ricce as well - and that's definitely not going to make your life any easier. Try and stay as close as you can to Yahim, as this will limit the creature to using one of two attacks.
The first is a pretty linear lunge with a big animation that you can see coming a mile off, and the second is a sweeping circular attack across the entire front of his body. He'll either come at you with two of these latter attacks back-to-back, or start with a lunge and then follow it up with the circular assault.
The good news is that you can block both of these attacks if you have a pretty good shield on you. Otherwise, you can dodge away from the lunge fairly easily, and get to the rear of the enemy to avoid the circular attack. That's a tricky approach to take though, and you'll find it much easier to avoid damage with a shield. Just be aware that the circular attack has a pretty wide radius too, so if you run to your opponent's rear, make sure you step back a little too.
"Fire off a few shots at Alessia from the shorter end of your platform, just as this second Sentinel starts making its way over to you."
Don't be tempted to follow Yahim down when he falls to a lower platform during the fight. Wait for the enemy to jump back up and continue attacking you, but stay out of the way when it lands. Generally speaking, it will land back in the area it fell off from, so pay attention to where it tumbles. You can also look at Yahim's positioning to get a feel for where it's likely to land.
As soon as your opponent is dead, remain standing on this higher platform. If you've got any ranged abilities whatsoever, now's the time to make use of them. Fire off a few shots at Alessia from the shorter end of your platform, just as this second Sentinel starts making its way over to you. The pillar's a good frame of reference for planning this sneaky attack. If you're behind it, you're safe to make your own attacks, while avoiding the one that's coming your way when the Sentinel lands.
Once you're going toe-to-toe with Alessia, you can expect a similar fight to the one you just finished. Be aware though that Alessia will do a pretty good job of blocking your counter-attacks with a shield, so make sure it's down before lunging in. Depending on the speed of your weapon, you should be able to get a couple of good whacks in after dodging the creature's opening attack.
Make sure you circle around to the other side of Alessia to deal with the linear and circular attacks. After a few rounds of this back-and-forth get over to the corner of the platform, because Ricce's about to pop up and say hello too - remember where Alessia landed, as Ricce will follow suit.
If you're feeling pretty feisty, you can remain on this platform and slowly chip away at each enemy's health. Expect very similar attacks to those you encountered with Yahim, although your opponents will make use of shields to block some of your incoming damage. The good news is that this close proximity limits their attacking options. The bad news is that the options they do have are all up in your face.
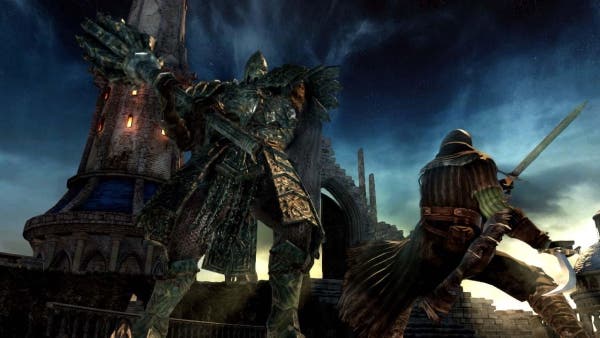
Should you choose to jump off the starting platform and onto the one below, you'll take some falling damage, but doing so does give you a moment's respite before the two Sentinels catch up with you. If you keep too much distance, they'll charge up a shield-throwing animation. If that shield hits you, you'll lose a lot of life, but as soon as they've thrown their shields they'll lose the use of them. That makes it much easier to land your own attacks.
Given enough room, the Sentinels will rise even higher into the air and lunge at you in a straight line, crashing right into you and doing some serious damage as a result. Good timing will allow you to evade these attacks, and you can even block the damage with a shield. Better to evade if you can though, so you can swiftly counter-attack without fear of losing any stamina from blocking.
"If you notice the Sentinels spinning around at any point, get ready to either back up out of harm's way, or guard against the incoming damage."
If you notice the Sentinels spinning around at any point, get ready to either back up out of harm's way, or guard against the incoming damage. The attack that's being charged can hit you multiple times depending on how close you are to the enemy. The good news is that even if you're unlucky enough to take every hit, a good shield with plenty of stamina in the bank should keep you up on your feet.
When fighting the Sentinels on the lower floor, try and stay reasonably close at all times, and make sure you always have eyes on the pair of them so you don't get caught out by any nasty surprises. Make sure you always counter-attack whenever you've evaded or blocked their damage, but don't be greedy and take more than a couple of swipes each time - they'll punish you mercilessly if you do.
Regardless of whether you fight the Sentinels up top or down below, make sure you concentrate on defeating one at a time. Take any wide open shots you can at the other target's partner, but it's generally sensible to focus on taking one of them down as soon as possible, so you don't spend too long fighting both at once. To say that life becomes much easier when you're dealing with the one remaining Sentinel is to make quite an understatement.
Heading back to Majula
When you've finished killing the Sentinels, go through the doorway that's on one side of the room. Go all the way upstairs to get back in the room you were in earlier, then make your way around to the right. There's a door on your right that will lead you to a Soul of a Nameless Soldier. Once you've got it, walk very gingerly towards the end of the corridor. When you hear a creature up ahead, dodge back immediately to avoid an explosion.
Make your way into the room that's ahead of you, and then light the bonfire on your left. Before climbing down the ladder you can see to the right of that bonfire, head back to Majula and level up using the pile of souls you earned from killing the Sentinels. While you're back in town, make your way over to the well by the big house and smash it to knock the stone down into the well. You'll get an Estus Flask Shard for doing so.
Head back to the first page for the rest of our Dark Souls 2 combat guide.


