Castlevania: Lords of Shadow 2 - Find the Antidote II walkthrough, Raisa Volkova tactics, Brotherhood fights
Expect a much tougher fight again Raisa Volkova in this section of Lords of Shadow 2. Our guide has all the tactics you need for killing her.

You're going to have to face off against a much tougher Raisa Volkova in this section of the walkthrough, but before that you'll have to deal with a handful of new enemy types. If you've come unstuck at any point in this chapter, we've got a complete breakdown of all the tactics you need to know.
Find the Antidote II walkthrough
Go back down the path, and then head into the castle interior. The door ahead will open eventually, so pass on through it to trigger the next cut-scene. Once it's finished, use your newly-acquired Mist Power to slip through the gate. Use it again to float up to the next level when you reach the end of the room. Make sure you top up your magic before heading on, then make your way up the ladders, go across to the middle of this area, and use your Mist Power to get into the next room.
Once you're in that room, interact with the Memorial, and then use your Void Projection skill on the sensor dropped by the Riot Police. Drop down to the area below you and deal with the enemies you encounter, as well as the Riot Police sensors. Look beyond these sensors and you'll see a car - get on top of it, and then climb up the building. Keep heading to the right, and then jump down into the next area.
There's a crack in the wall over on the far right-hand side which contains a Pain Box. Pop through it and pick up the Chaos Gem inside before you move on. Go into the adjacent room and offer up your blood to unlock another Map Room - you might want to take this opportunity to explore earlier areas using your new Mist Power. Check the earlier parts of our walkthrough for situations that call for it.
"You might want to take this opportunity to explore earlier areas using your new Mist Power."
Assuming you're ready to move on, enter the hallway that's opposite you, make your way towards the gate, and then use Mist Power to get down onto the garage that's just below you. Interact with the lever to turn the power on, then get into the lift.
You'll need to use your Mist Power to get through the gate to your right, but if you make your way down the ramp you'll come across another Pain Box with a Chaos Gem inside it. Now head back in the opposite direction and use your Mist Power to get through the gate that's just to the left of the stairs. There's another lever in the corner of this area. Activate it to get the power back on, then make your way out and then up the stairs.
As you make your way upstairs you'll be attacked by a pack of monsters. Take them out and then keep going up - there's another Life Gem in the Pain Box up here. Go to the gated room at the other end, defeat the enemies, and interact with the Memorial.
Go all the way around this room until you come to a lift. Use your Mist Power to get inside it. Interact with the lever to get to the floor above, but if the power's off, just use Mist Power to get through the gate by the entrance to the room, and then drop down to turn the electricity back on.
Once the lift's stopped moving, leave it, kill all of the enemies you come across, then keep to the right until you reach a Memorial. Now go back around and use your Mist Power to slip through the grate. Climb the wall ahead of you and then head around to the opposite side. Walk down the corridor and use the lift. If you keep travelling down the next walkway, you'll find a broken section of flooring.
Jump over this precarious section, then go downstairs to get another Life Gem from a Pain Box. Travel back the way you just came and go through the right-hand door to trigger a cut-scene. Once it's finished, go down the hallway until you come across a alcove just on your left. Get within the shadows, shift into your rat form, and then pass through the vent on your left.
You're about to face a boss battle against a new and invigorated Raisa Volkova, but first you need to switch back into your fighting form - get over to the far right-hand side of this room to switch out. Quietly make your way behind the scientist, and then use your Vampiric Possession ability to take charge of him. Now walk over to the door and use the access panel to open it up. Doing so will trigger a new cut-scene, before throwing you into the fray against Raisa.
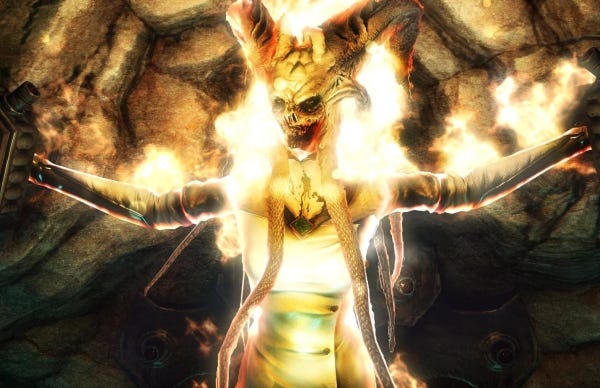
How to kill Raisa Volkova, Satan's daughter
"Never hang around on the floor for too long, as this is where the majority of her attacks are delivered to."
Get ready for an everything-but-the-kitchen-sink approach from Raisa. She'll launch projectiles along the floor at you, make use of a pair of charges you can't block, leap at you from short range, throw a tornado at you, and also smash the ground and sweep her tail into you. As if that wasn't enough to contend with, she'll also move onto the platforms above from time to time, and rain unholy hell down upon you.
When you see Raisa move, make sure you stick to aerial attacks, otherwise use your Shadow Whip at absolute maximum range. Never hang around on the floor for too long, as this is where the majority of her attacks are delivered to. When she starts twitching, dodge out of the way immediately to avoid the incoming damage. If you stick to using your whip, you'll eliminate all of the short-range threats, while dodging will get you away from all of her linear projectile damage.
As soon as she jumps up and onto those platforms, get ready to dodge around and around in circles in order to avoid the flurry of projectiles - not to mention the stomp attack that Raisa will land with when she comes back down to earth. When you see her preparing this manoeuvre, get well away from where she's poised to leap from, and get ready to dodge, dodge, dodge. There's a lot to handle in this fight, but stay nimble and you should take her down in pretty short order.
How to fight the Brotherhood
With Raisa down, Dracula will return to his castle. As soon as you're back in control of him, turn around and enter the small room nearby. Use one of your Chaos Bombs to shatter the ice, then travel down the path. Eventually you'll come to a ledge that you can jump off in order to access a Pain Box with a Life Gem inside.
Climb your way back up onto the path again, then take a right as soon as you can and drop down onto the platform below. Make your way across the bridge, then head right until you're on top of the wooden platform. Keep heading up this structure until you're around the middle of it. If you've got a spare Dungeon Key about you, keep climbing up and into the corridor above. Use the key at the very end of it.
Get back onto the main structure and then keep heading towards a wooden platform that's way over on your far right. Leap over, then start climbing the tower on your right to trigger another cut-scene. Once it's over, you'll need to do battle against a pack of regular enemies, accompanied by a Heavy Brotherhood Warrior. Kill the normal enemies first, then use your Chaos Claws to rip the Warrior's shield to pieces. At this point you can attack him like a regular enemy, but just stay on the lookout for a circular stomp attack, as well as a basic attack that you just can't block.
"The Cleric has a nasty habit of spawning more opponents for you to deal with, so there's little point in taking out his friends first."
The fighting's not over just yet. Once this lot are down, you'll have to fight the Brotherhood Cleric, accompanied by a handful of less powerful knights. This time around, ignore the trash and focus solely on the Cleric. The Cleric has a nasty habit of spawning more opponents for you to deal with, so there's little point in taking out his friends first.
There's a device in the corner which you should interact with to clear the path above you. Now climb up the wall but stay away from the stairs for now. Take the path that leads to the left instead, so you can get your hands on another Pain Box. Just be aware that this jump is much trickier than most - use your Mist Power when you're in the air to extend it just a little further, and head towards the ledge that's sticking out on the left-hand side of the platform.
Once you've bagged yourself another Chaos Gem, drop down onto the ledge that's below you, and open up another Pain Box for a bonus Void Gem. Note that there's a Map Room you can unlock, just below you and to the left. When you're done, make your way back up to the spot where you fought the Cleric.
Need a helping hand with the Gorgon fight? Head back to the first page of our walkthrough for some essential tactics.